Master Forge
Welcome to the Official Master Forge guide. You can select the links below to navigate to the topics that you find most relevant.
The Master Forge bundle consists of two Forge Digitizers, a mechanical bridge connector to join the two, and, possibly, depending on which variation you purchased, some additional bolt-ons and add-ons. This section will discuss each of the items included in any of the Master Forge bundles, regardless of the specific configuration.
Click here to skip to the Getting Started Guide.
Out of the Box
Parts
When you first receive your Master Forge Bundle, it will come in a cardboard box. Once you open the box, you’ll find your brand new Master Forge inside its tactical carrying case. You will also find an insert that includes the layout of the device and some functions that the Master Forge has.

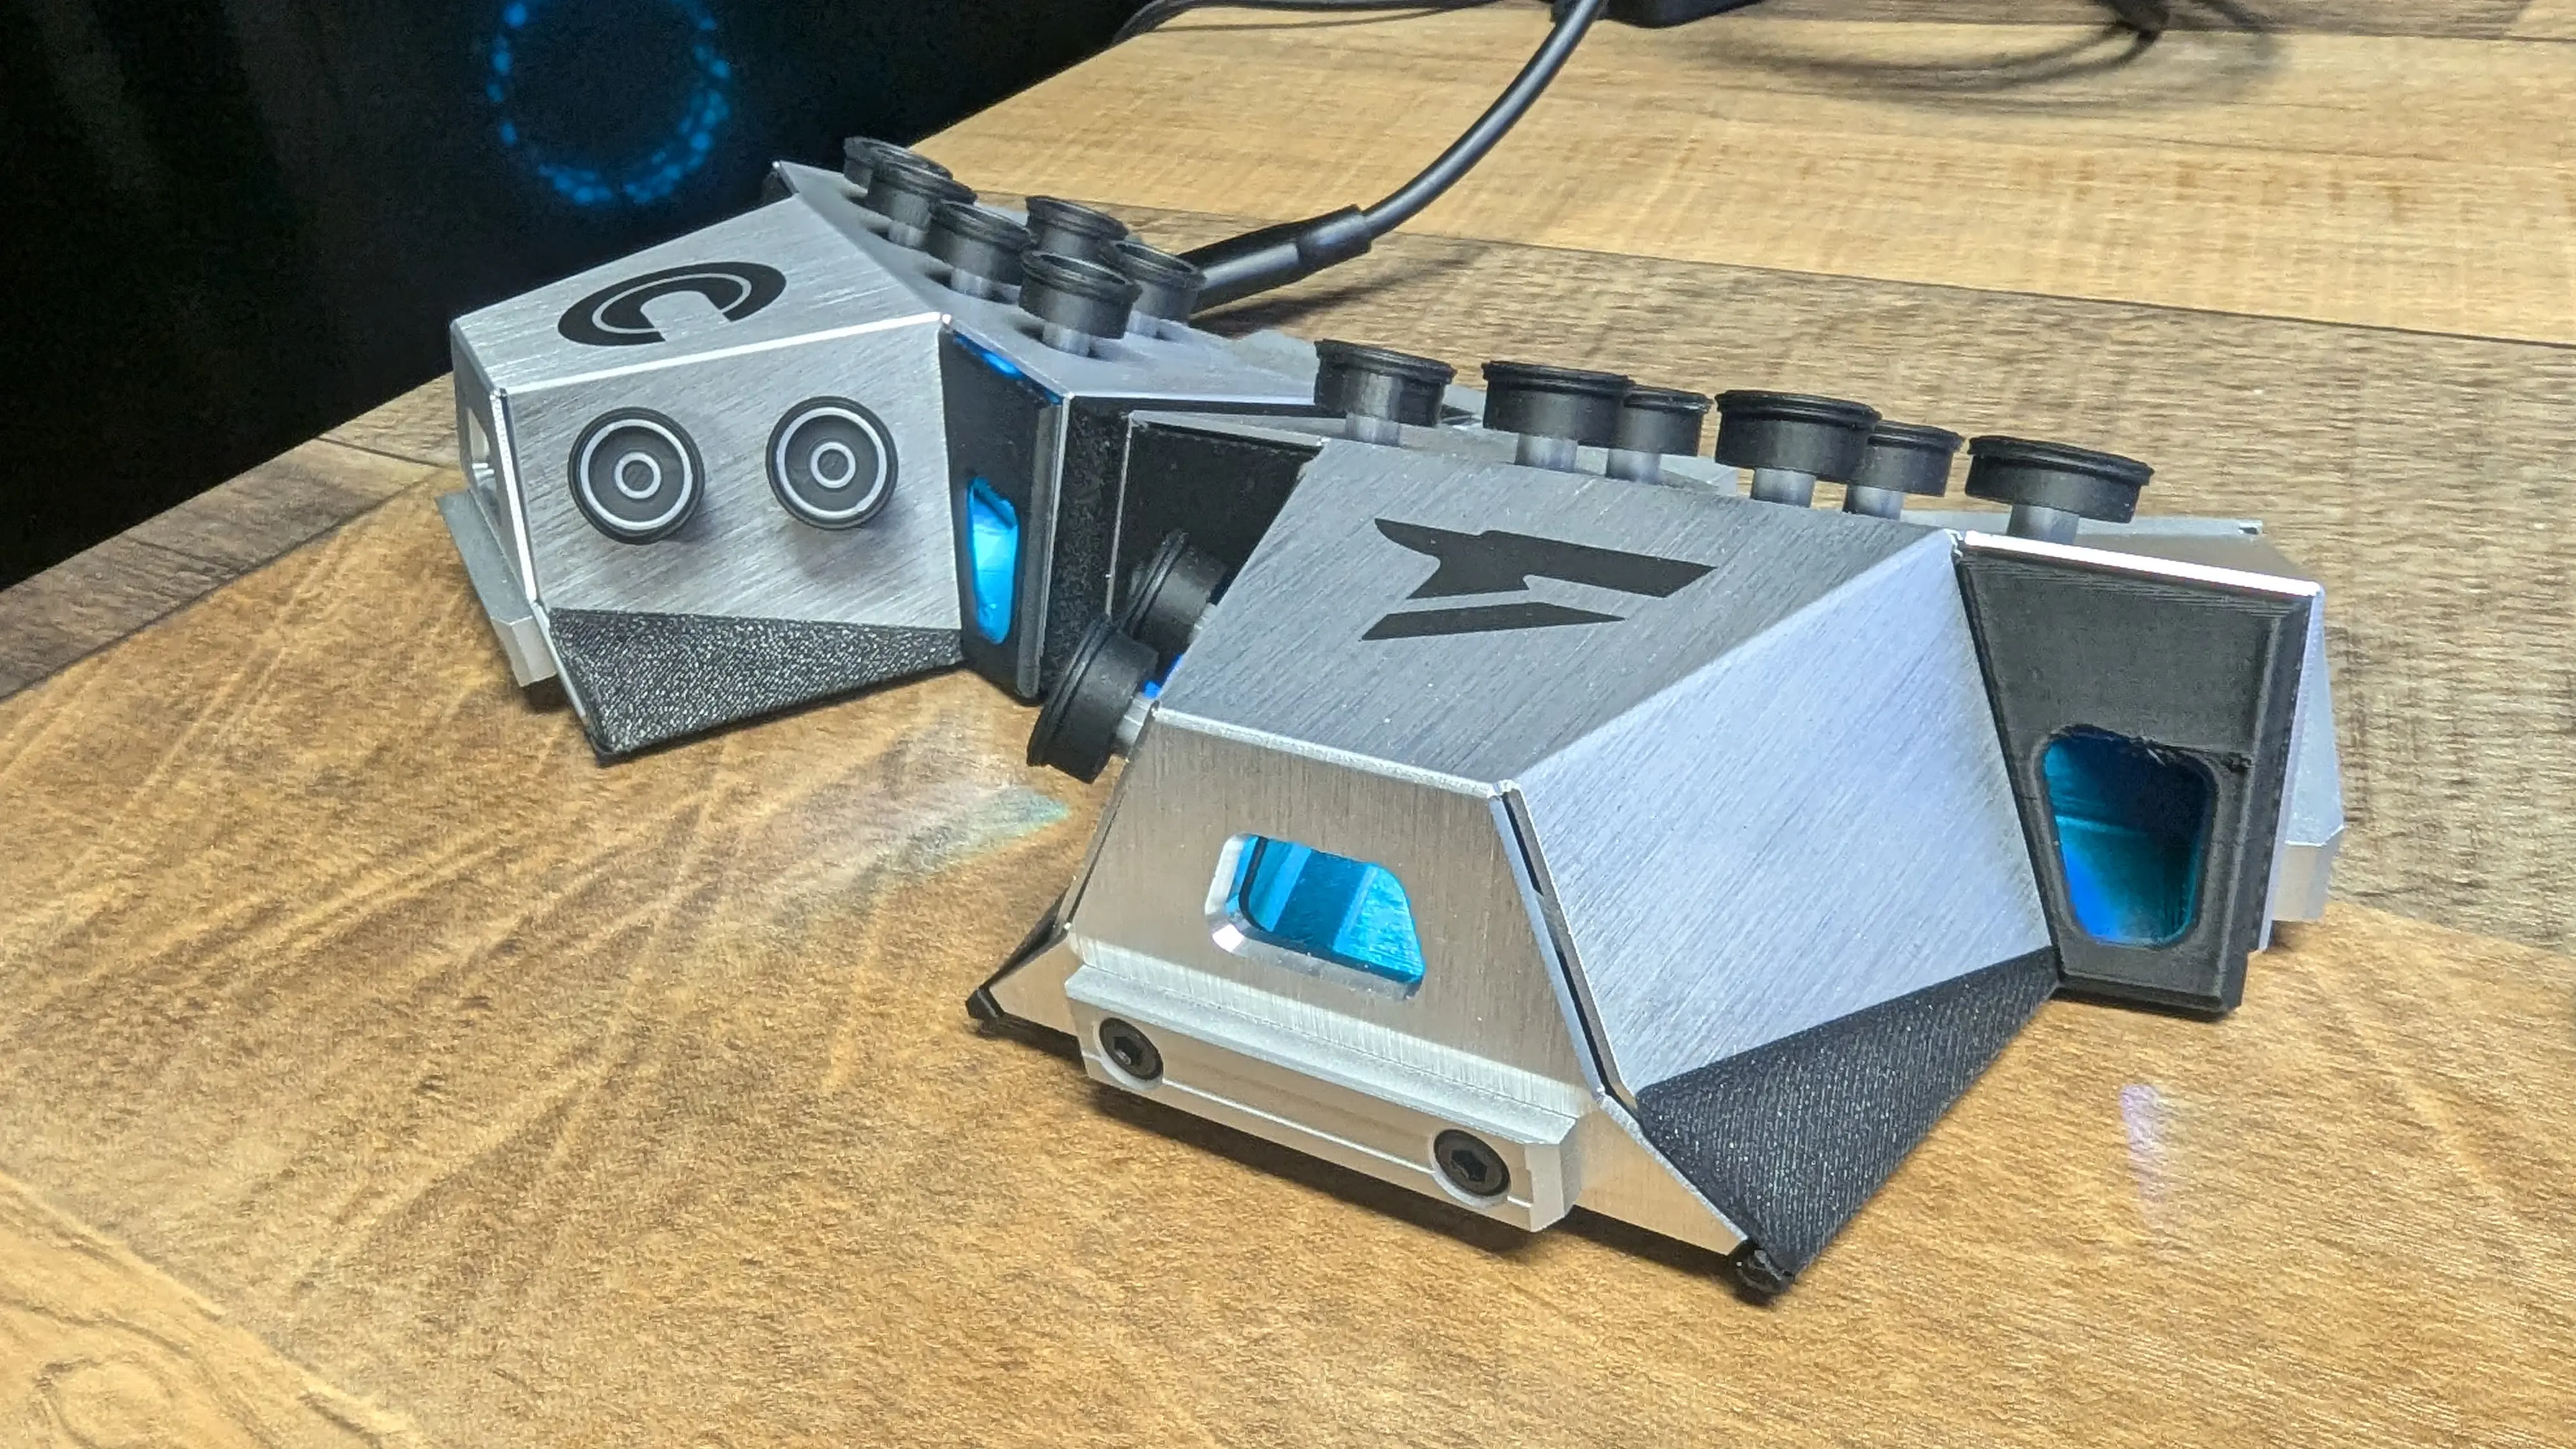
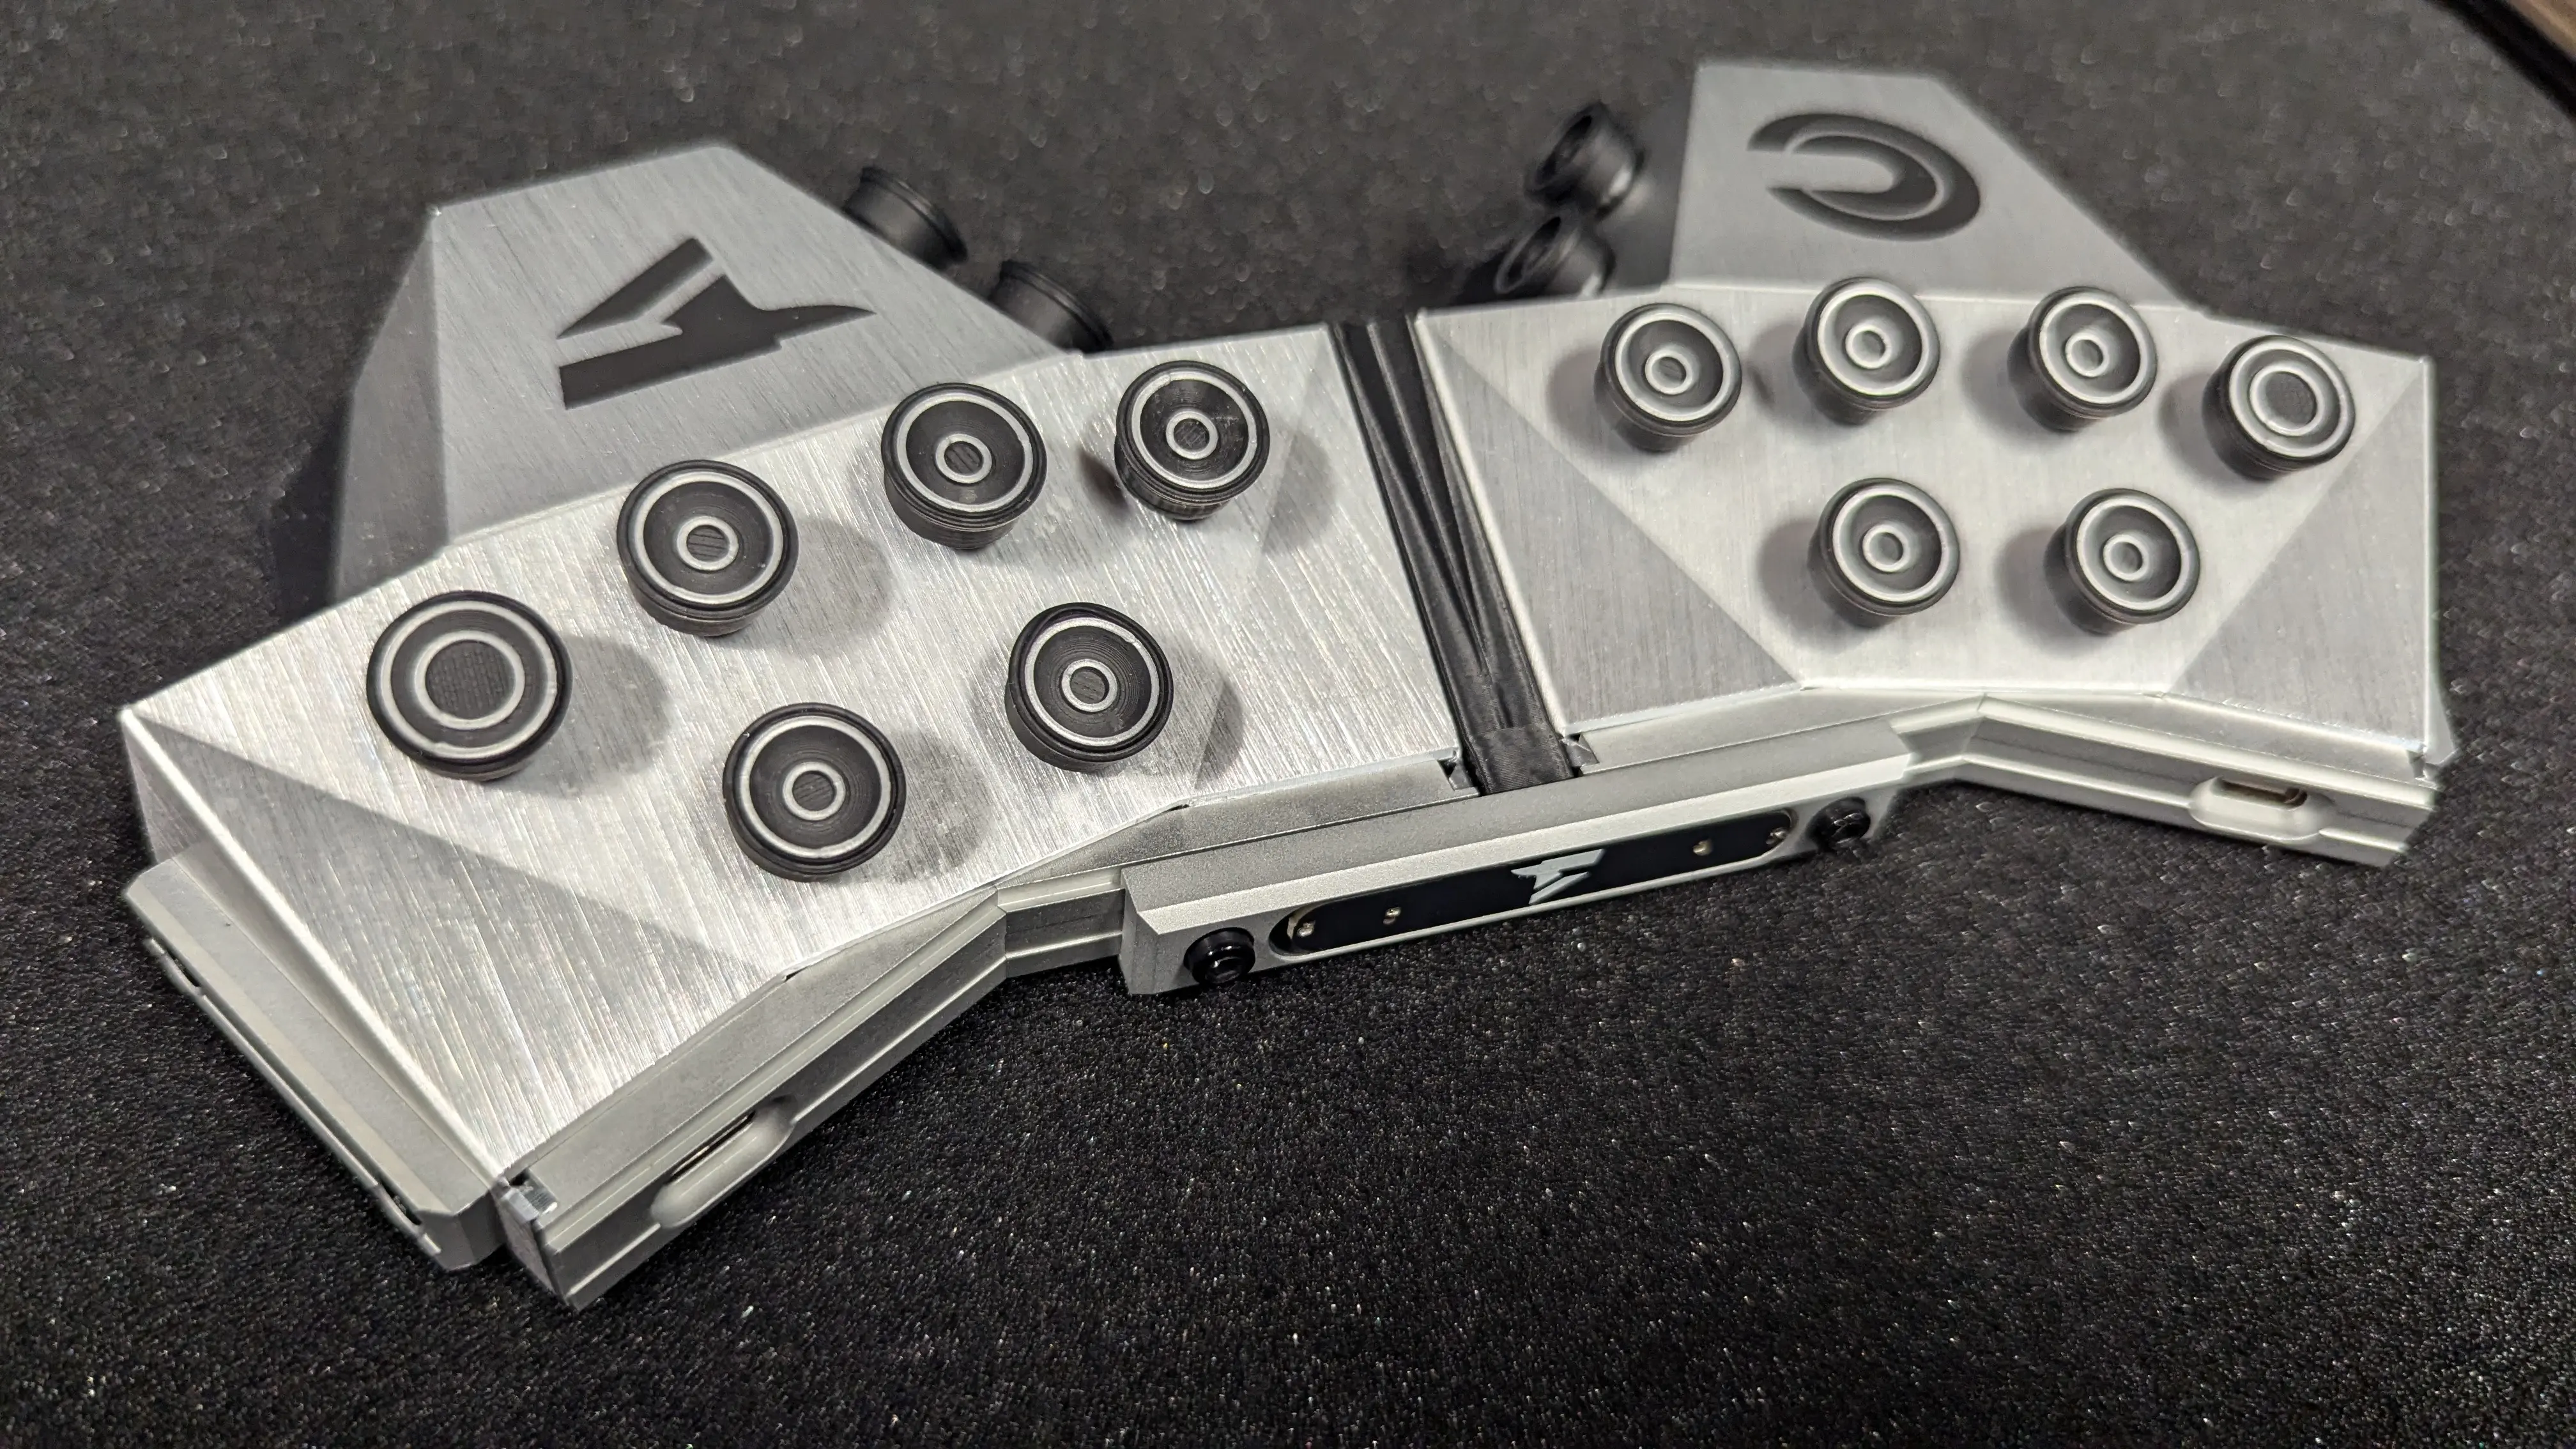
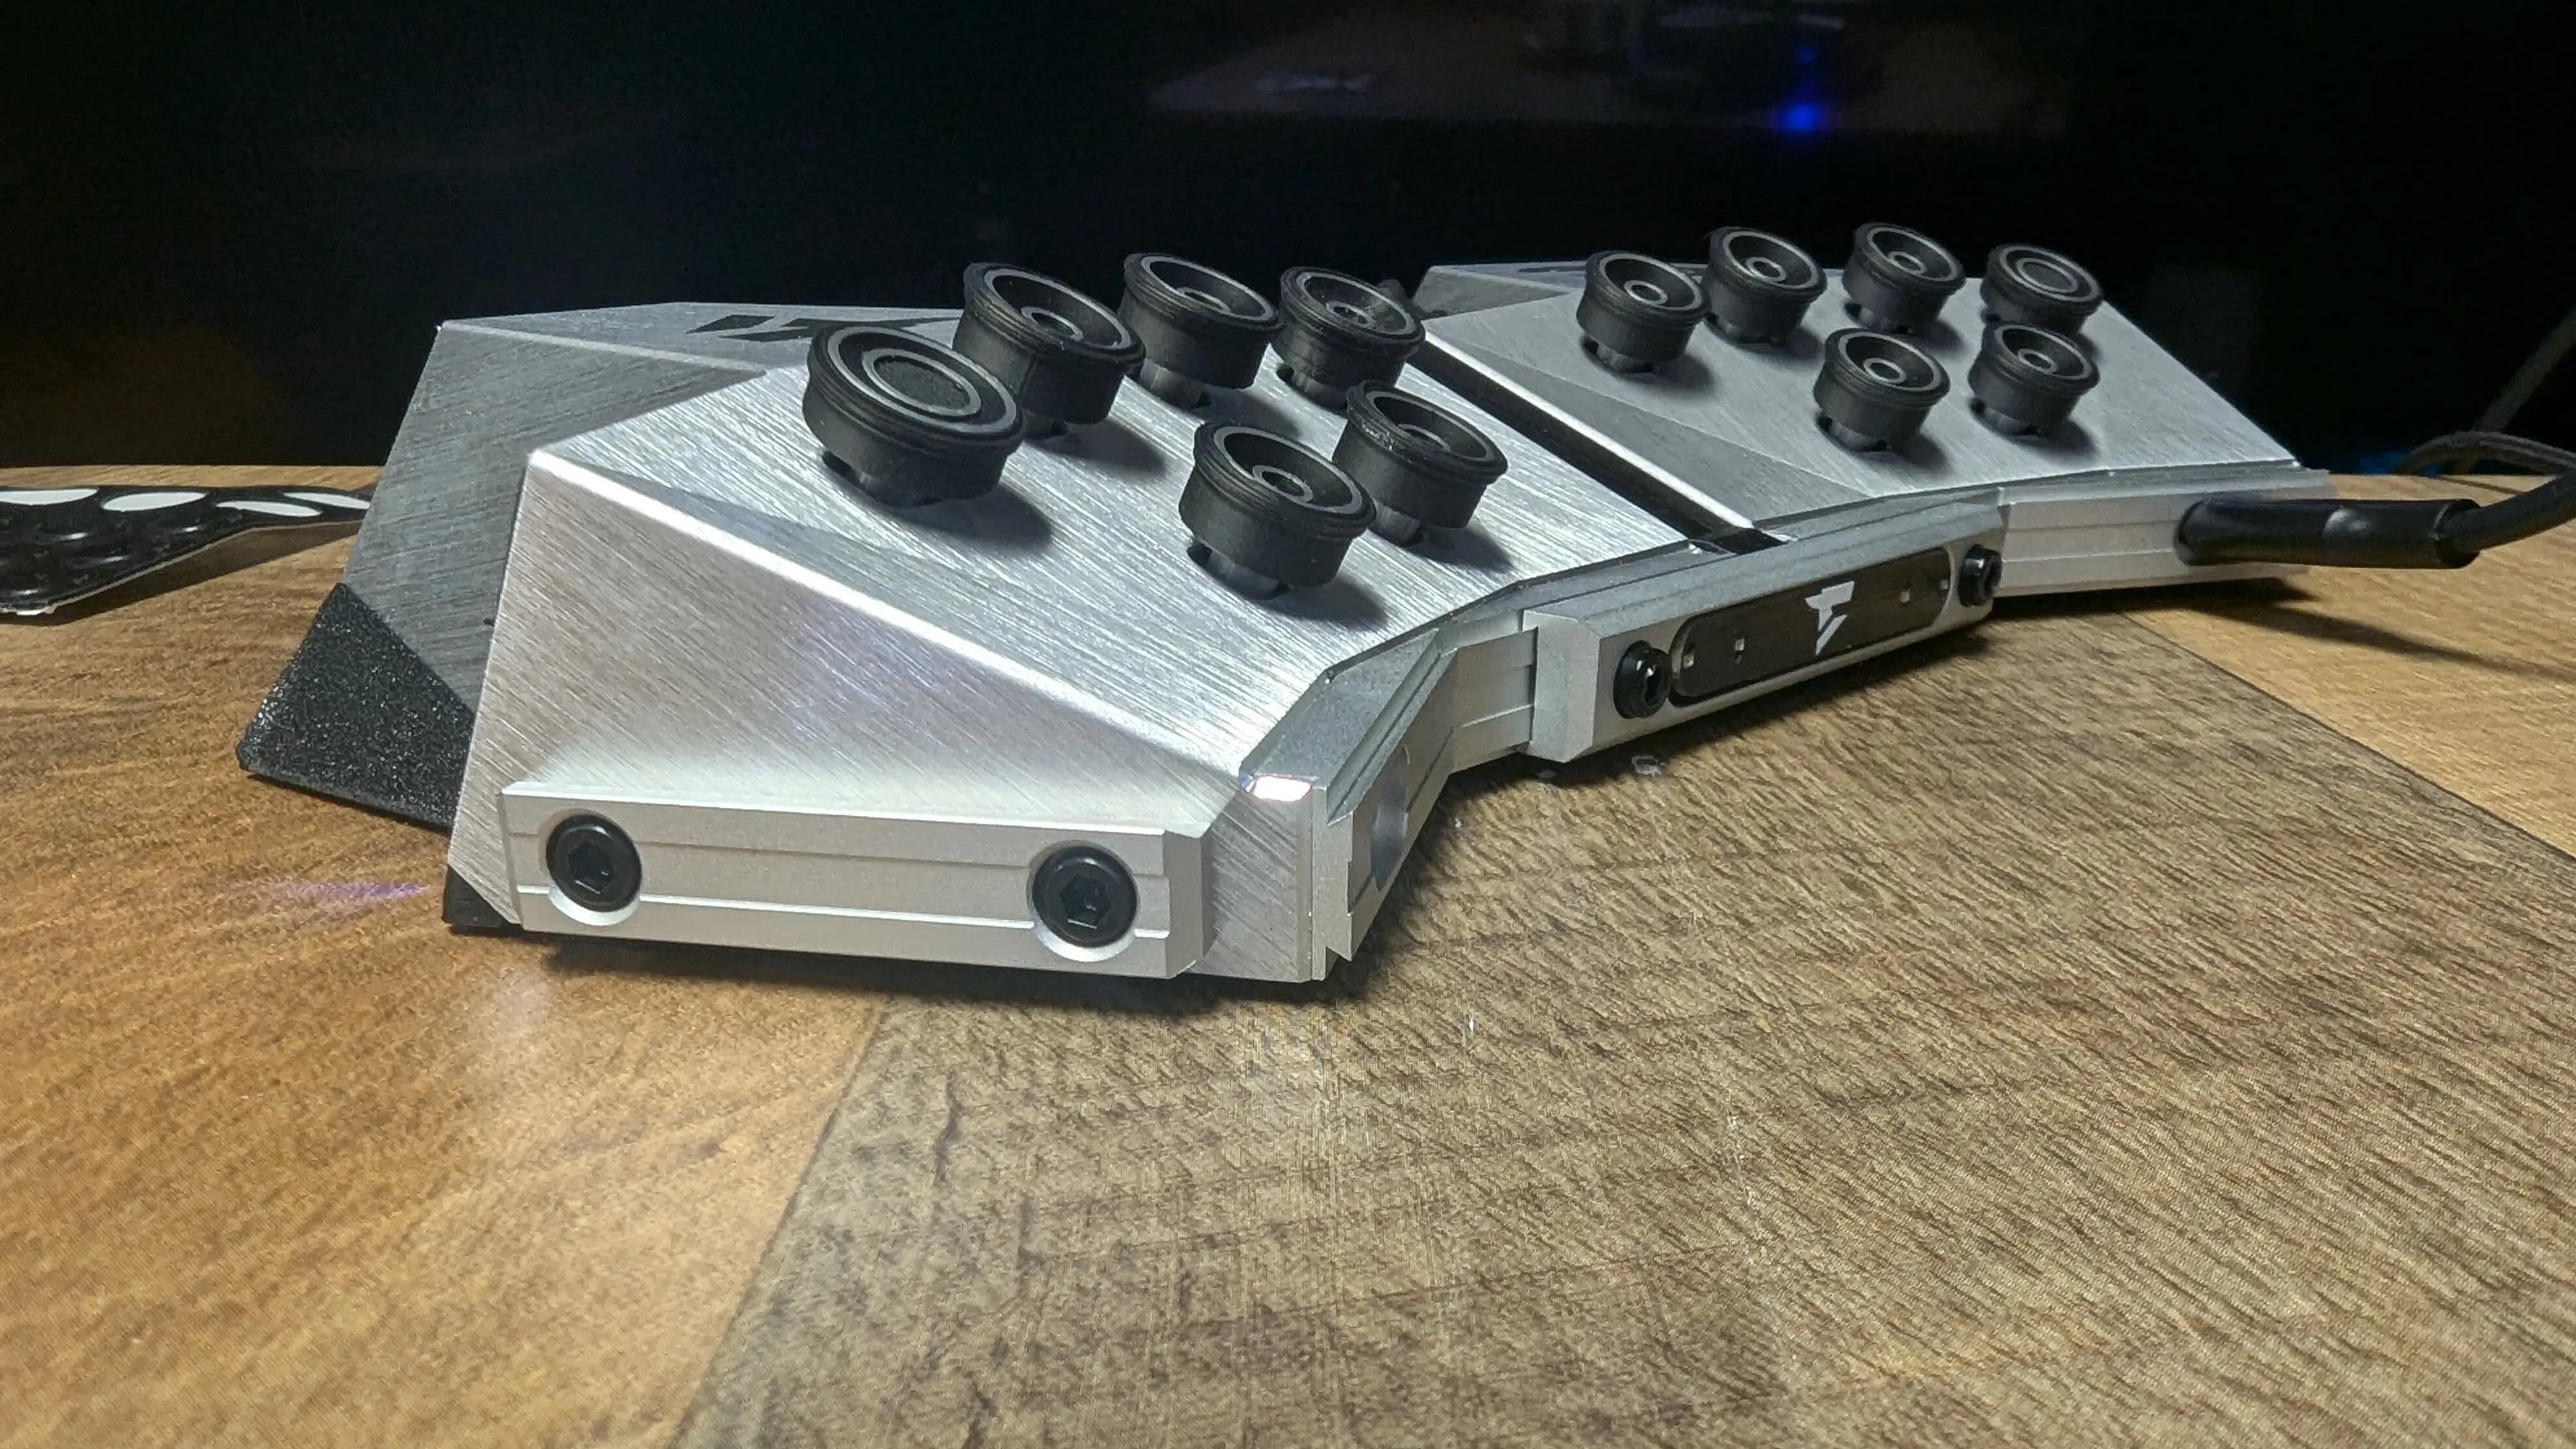
Once you open the tactical case, you’ll meet your shiny, new Master Forge. The Master Forge consists of two digitizers with 8, 5-way switches, joined together by a mechanical bridge connector.
The Digitizers
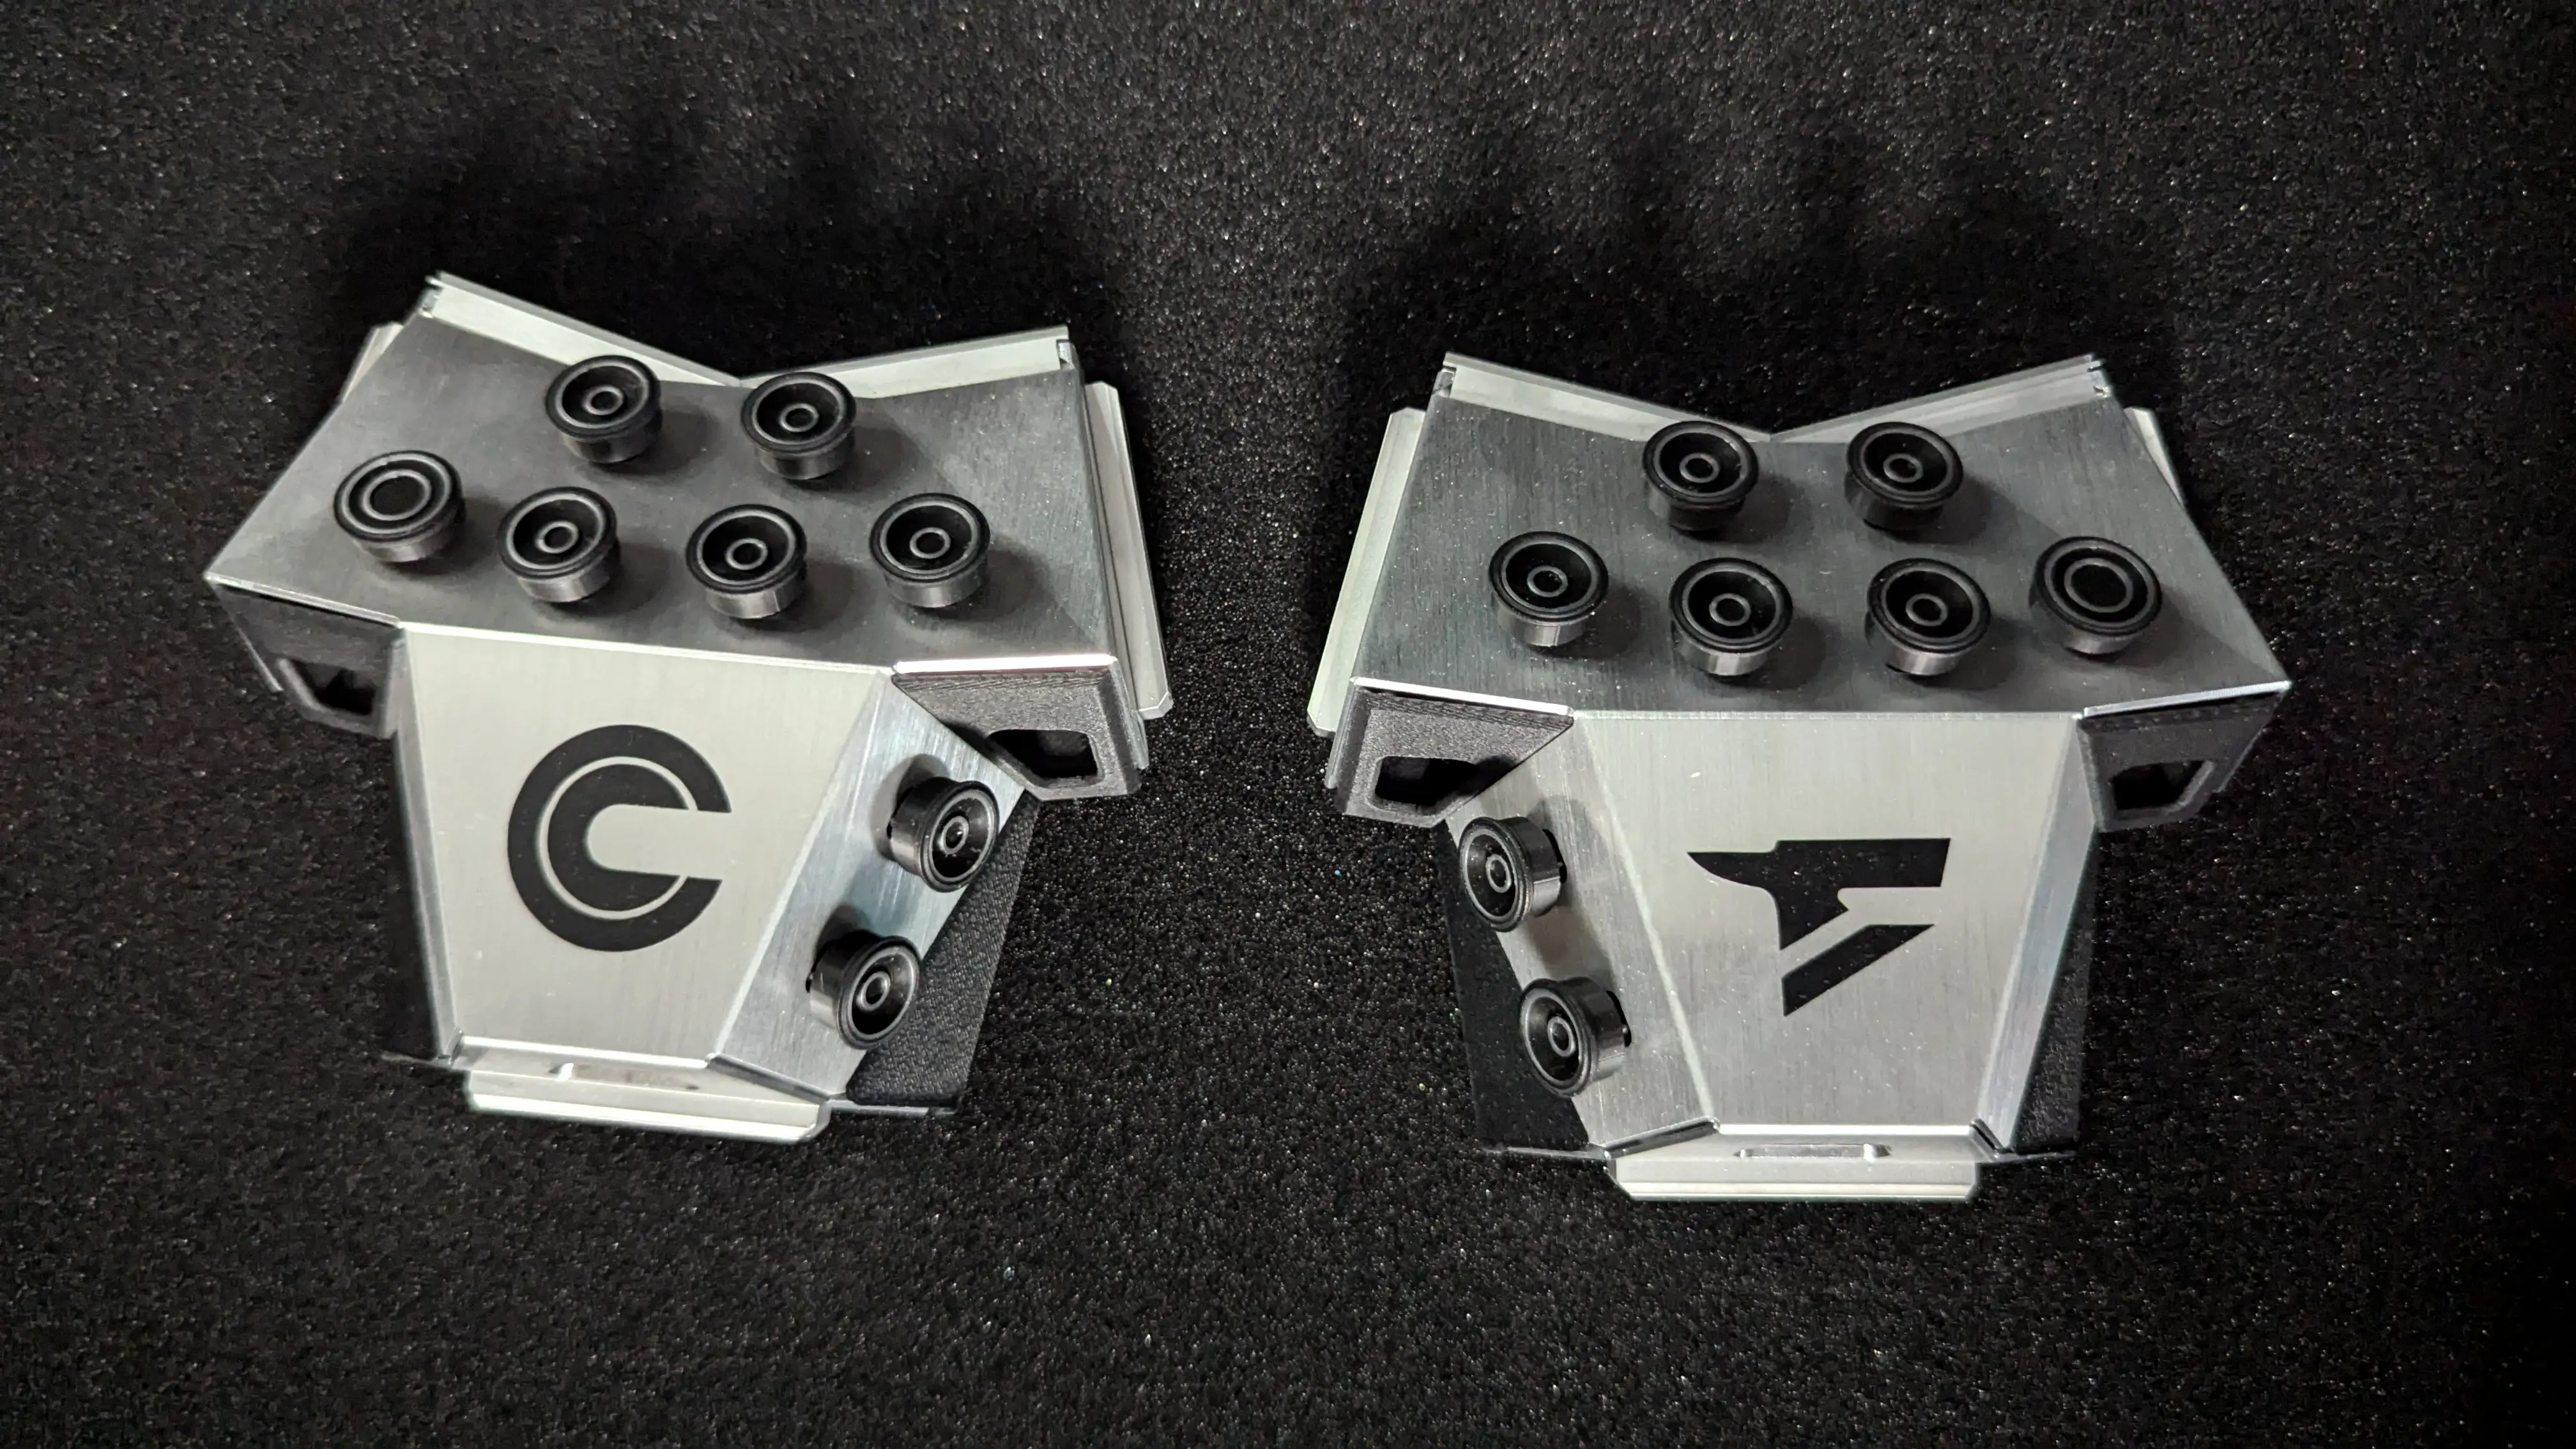
Your device will come with two Digitizers which, together, comprise the Master Forge. Each digitizer typically corresponds to each hand and is designed for the ergonomics and comfort of each hand. The digitizers are composed of a 3D printed endoskeleton and a machined-aluminum exoskeleton. The exoskeleton of the digitizer is actually two pieces which are the trapezoidal-shaped “shell,” and the flat and partially hollowed out “baseplate”. They are held together by five M2, Philips screws which are under the “feet” pads of the device. The feet are round, rubberized and help the device to have a grip on desks and other smooth surfaces.
There are two different kinds of digitizers, each of which can be purchased individually; the left digitizer and the right digitizer. Each one contains a Platinum CharaChorder Core where they store chords, layouts, and settings.
The front of each digitizer has a slotted rail which allows bolt-ons to be “bolted” onto the digitizer. An example of a bolt-on is the bridge connector. Along this slotted rail you’ll find two USB-C ports on each digitizer, one at the exterior edge of each “shoulder.”
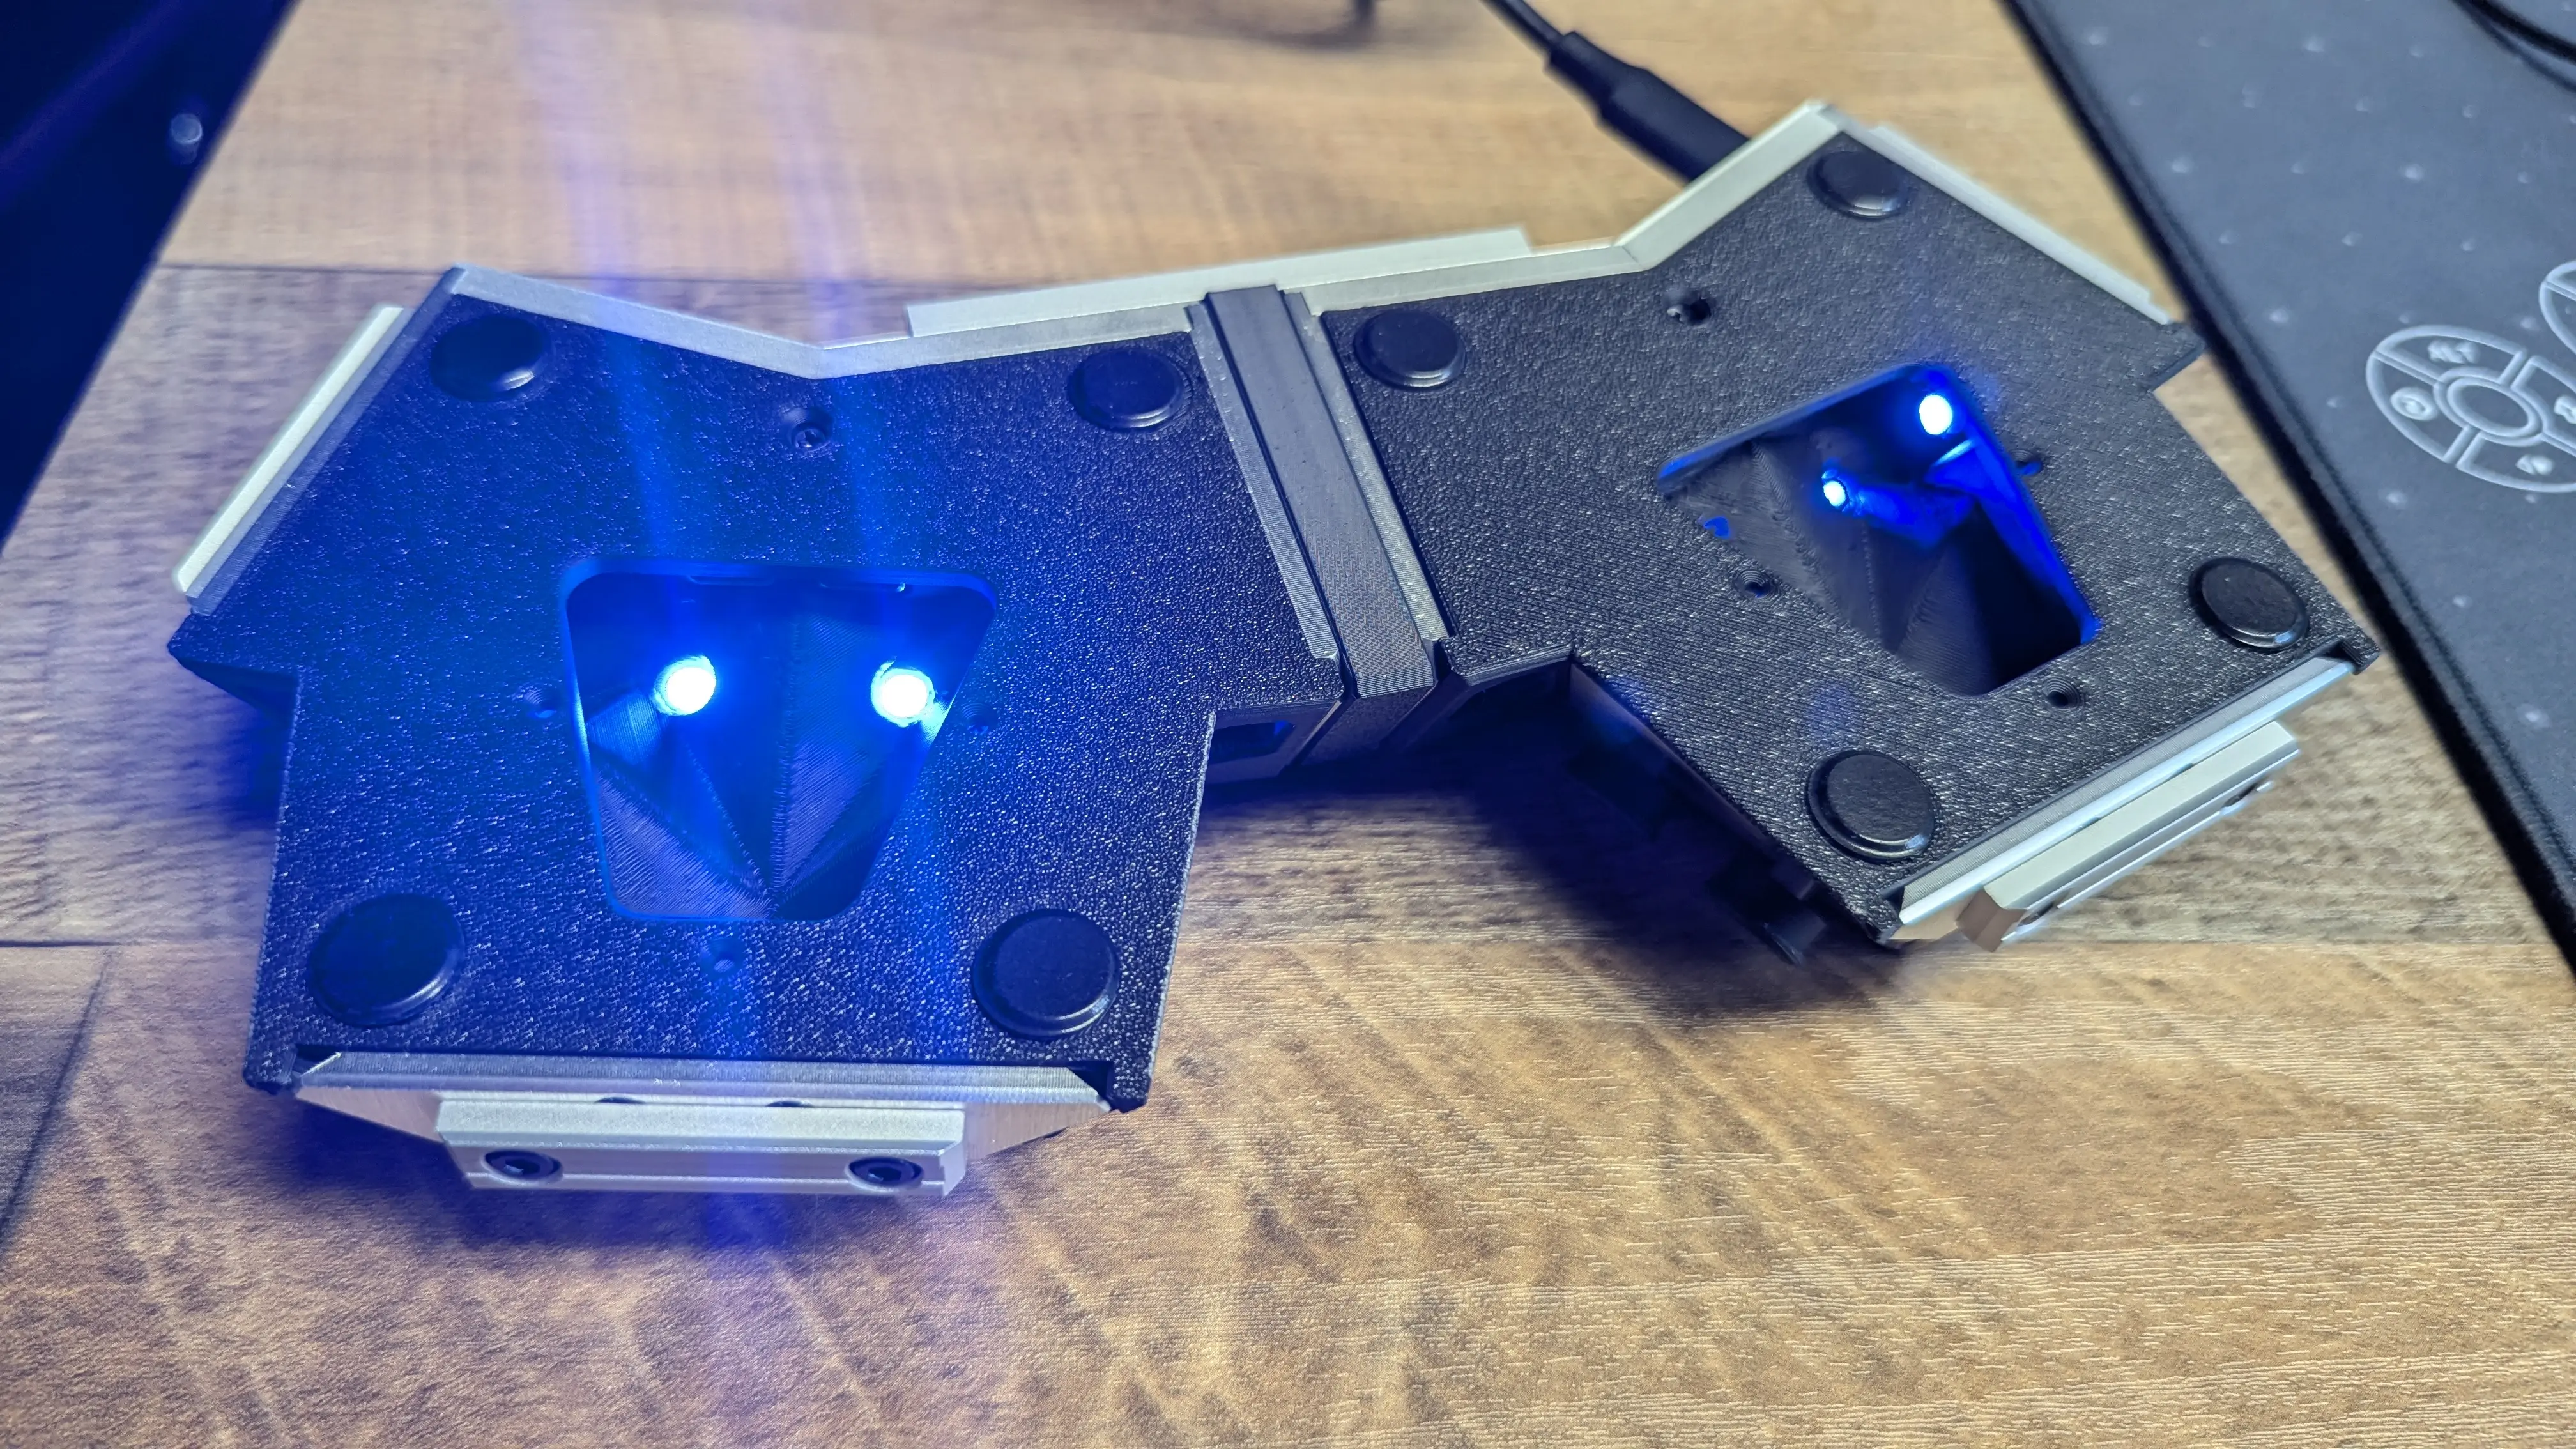
The underside of each digitizer is partially hollow to allow for cables and connections to happen in a discreet manner underneath the device. Inside the cavity, we can find two additional USB-C ports and downward facing LED clusters.
On the sides of each digitizer, you’ll notice the bookend rails. Under each rail, on the body of the digitizer, you’ll see holes for the screws that hold the bookend rails in place.
The Bridge Connector
Out of the box, your digitizers will be connected by a mechanical bridge bolt-on. This bolt-on is also machined-aluminum and made from a slotted rail. It’s held in place by two, M3 nylon screws. Nylon screws don’t “set” into the aluminum like steel screws, which prevents damage to the slotted rails, since the slotted rails at the front of the device don’t have any holes for screws to go into. It’s more of a friction hold, which is a key concept of bolt-ons.
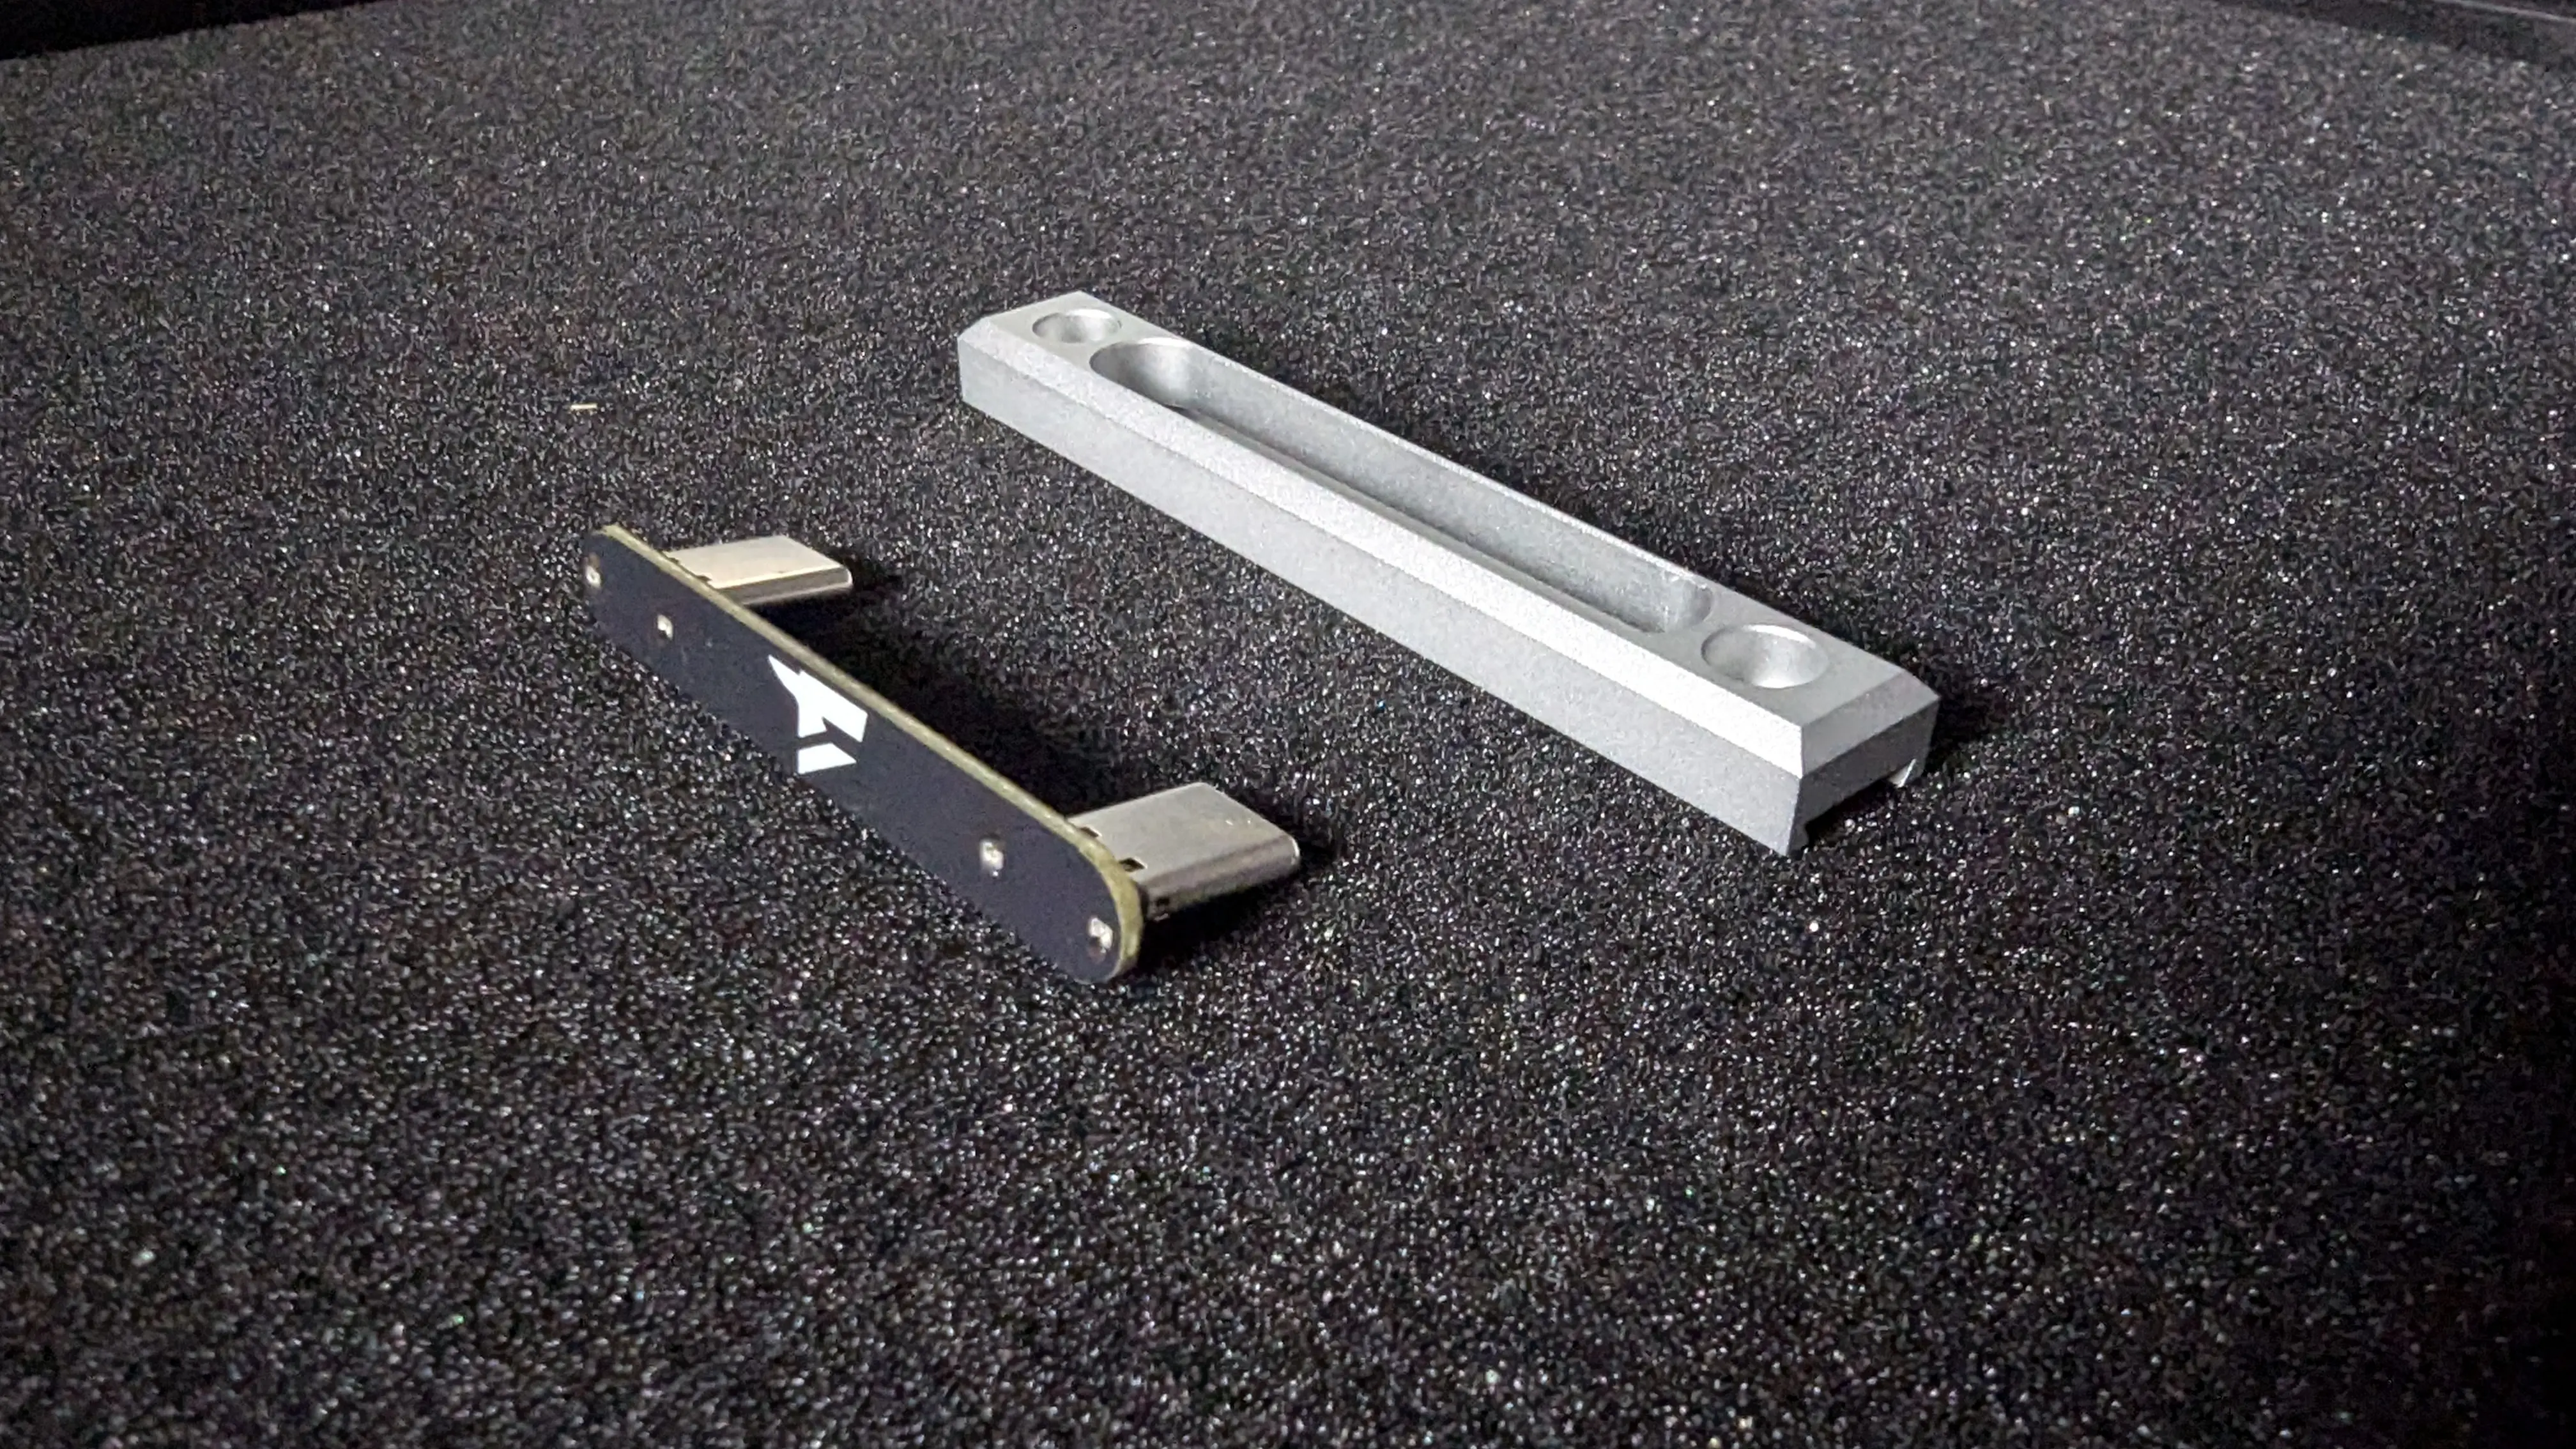
Additionally, the two digitizers are connected by the electrical bridge connector, also known as the mini-connector. This piece fits inside the cavity of the mechanical bridge connector and should be removed BEFORE removing the mechanical bridge connector.
Note
When separating the digitizers, the electrical bridge connector should be removed before the mechanical bridge connector.
Similarly, when putting the digitizers together again, they should be assembled in reverse order of how they were disassembled; that is, the mechanical bridge connector should be secured into place before pressing the electrical bridge connector into place.
The electrical bridge connector is a thin printed circuit board that ends in a USB-C plug on either side. This makes it so that the front right port of the left digitizer feeds into the front left port of the right digitizer.
When connected by the official Forge bridge connector, the left digitizer should be the one connected directly to your computer. See Getting Started for more information about this.
The Bookend Rails
Each digitizer of the Master Forge comes with three removable bookend rails. These rails are what allow the digitizers to attach to other anchor bodies and bolt-ons.
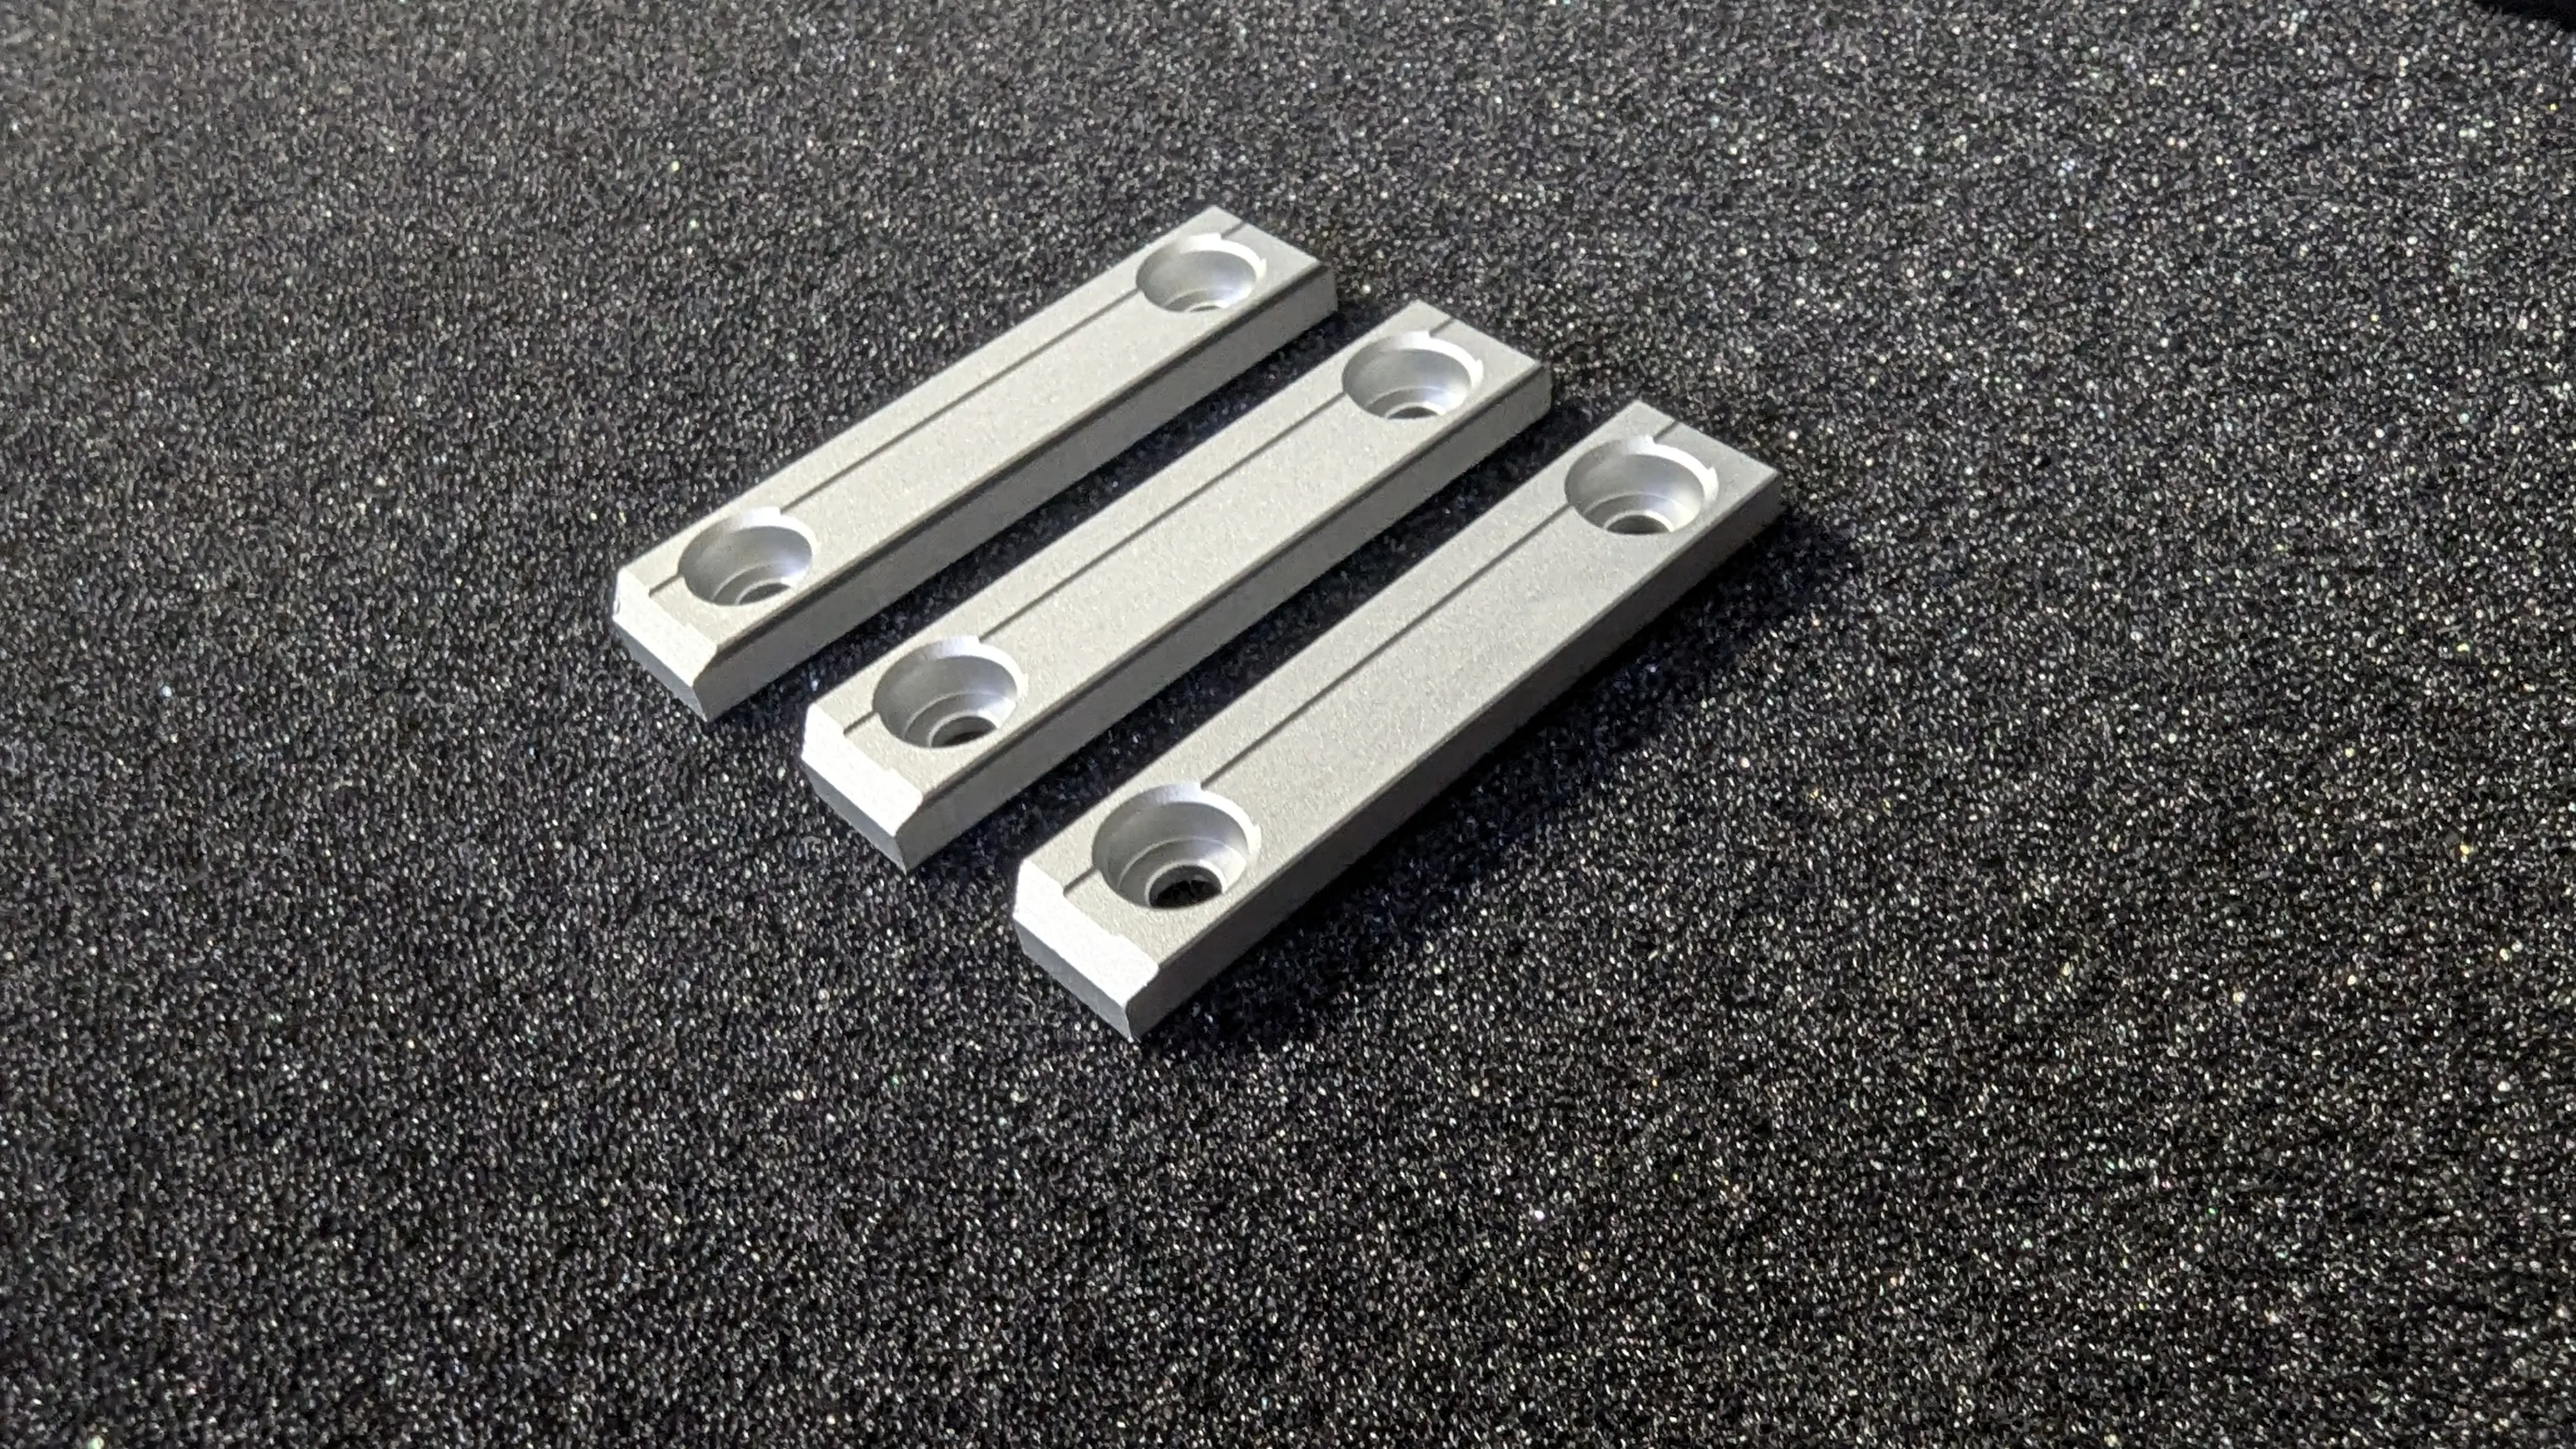
The bookend rails are made of machined aluminum and are held in place on the body of the digitizers by two (size), steel screws.
The Splitter
Included with every Master Forge order is a 3D-printed Splitter. This piece serves to prevent anything from falling into the space between the forge digitizers whenever these are connected by the bridge connector.

The Switches
Instead of the one-dimensional buttons that traditional keyboards use, Forge digitizer levers, which we will call switches, detect motion in three-dimensions so users have access to 64 unique inputs without their fingers breaking contact with the device. The digitizer switches produce a digital input, as opposed to analog. All of the switch caps are 3D-printed and measure [measurements]. Under the switch cap, there’s a stem that’s [measurements] thick and square in shape. The stem is not removable without disassembling the device whereas the caps are hot-swappable.
Each digitizer has eight 5-way switches. Starting from the outside on each digitizer and working inwards, the switches correspond to the following fingers; pinky, ring, middle, and index. The two switches along the “torso,” that is, the inner-most side of each digitizer, correspond to the thumb. You can see what characters are on each switch by default in Layout. Additionally, there are two more switches not on the “home-row” which can be accessed by the ring and middle fingers. The correct positioning of your fingers is for them to follow the arc in which the switches are laid out.
Note
IMPORTANT: In this manual, we will refer to switches in the following way, starting from the pinky finger and working inwards: pinky, ring, middle, index, thumb 1, and thumb 2. The switches below the “home-row” will be referred to as the aux 1 and aux 2 switches, where the switch further to the left on the left digitizer is aux 1. Symmetrically, aux 1 is the switch furthest to the right on the right half.
Each switch has five press-able directions. Throughout this guide, we will use cardinal directions to refer to the directions in which each switch can move, with north being forward, away from your body. Switches can move north, south, west, east and down, into the device. Note that unlike the CC2, pressing switches into the device on the Master Forge is a chorded input which activates all four directions simultaneously. Please be mindful that, as part of the device’s ergonomics, each switch has a slightly different angle, so feel free to familiarize yourself with your new device.
Out of all eight switches, the pinky switch is made to be wider than the other seven in order to make using it easier, and also more optimized for held-key press functionality like that used with the shift key or layered keymaps.
Earlier, we mentioned the five directions in which a switch can be actuated, or pressed. Aside from the four cardinal directions, each switch can be pressed down, into the device. We often refer to this press as a 3D press, since it’s not a lateral movement, but rather a movement along the Z axis of the switch. This special press requires no lateral movement in order to work, just apply force onto the switch “into” the device.
The four cardinal directions on a switch can be mapped to a configurable key, which can include letters, numbers, symbols, control keys and even function keys. You can see the most current list of configurable action codes in the Device Manager. The 3D press cannot be assigned to an individual character, but, instead, allows you to press all four cardinal directions on a switch simultaneously, as a chord.
Connections
Every Master Forge order will come with the power cable that goes out to the computer inside the box. The power cable included with every Master Forge is a standard, braided USB-A to USB-C cable. Some configurations may include an additional cord. To know what’s included in your order, read the configurations section.
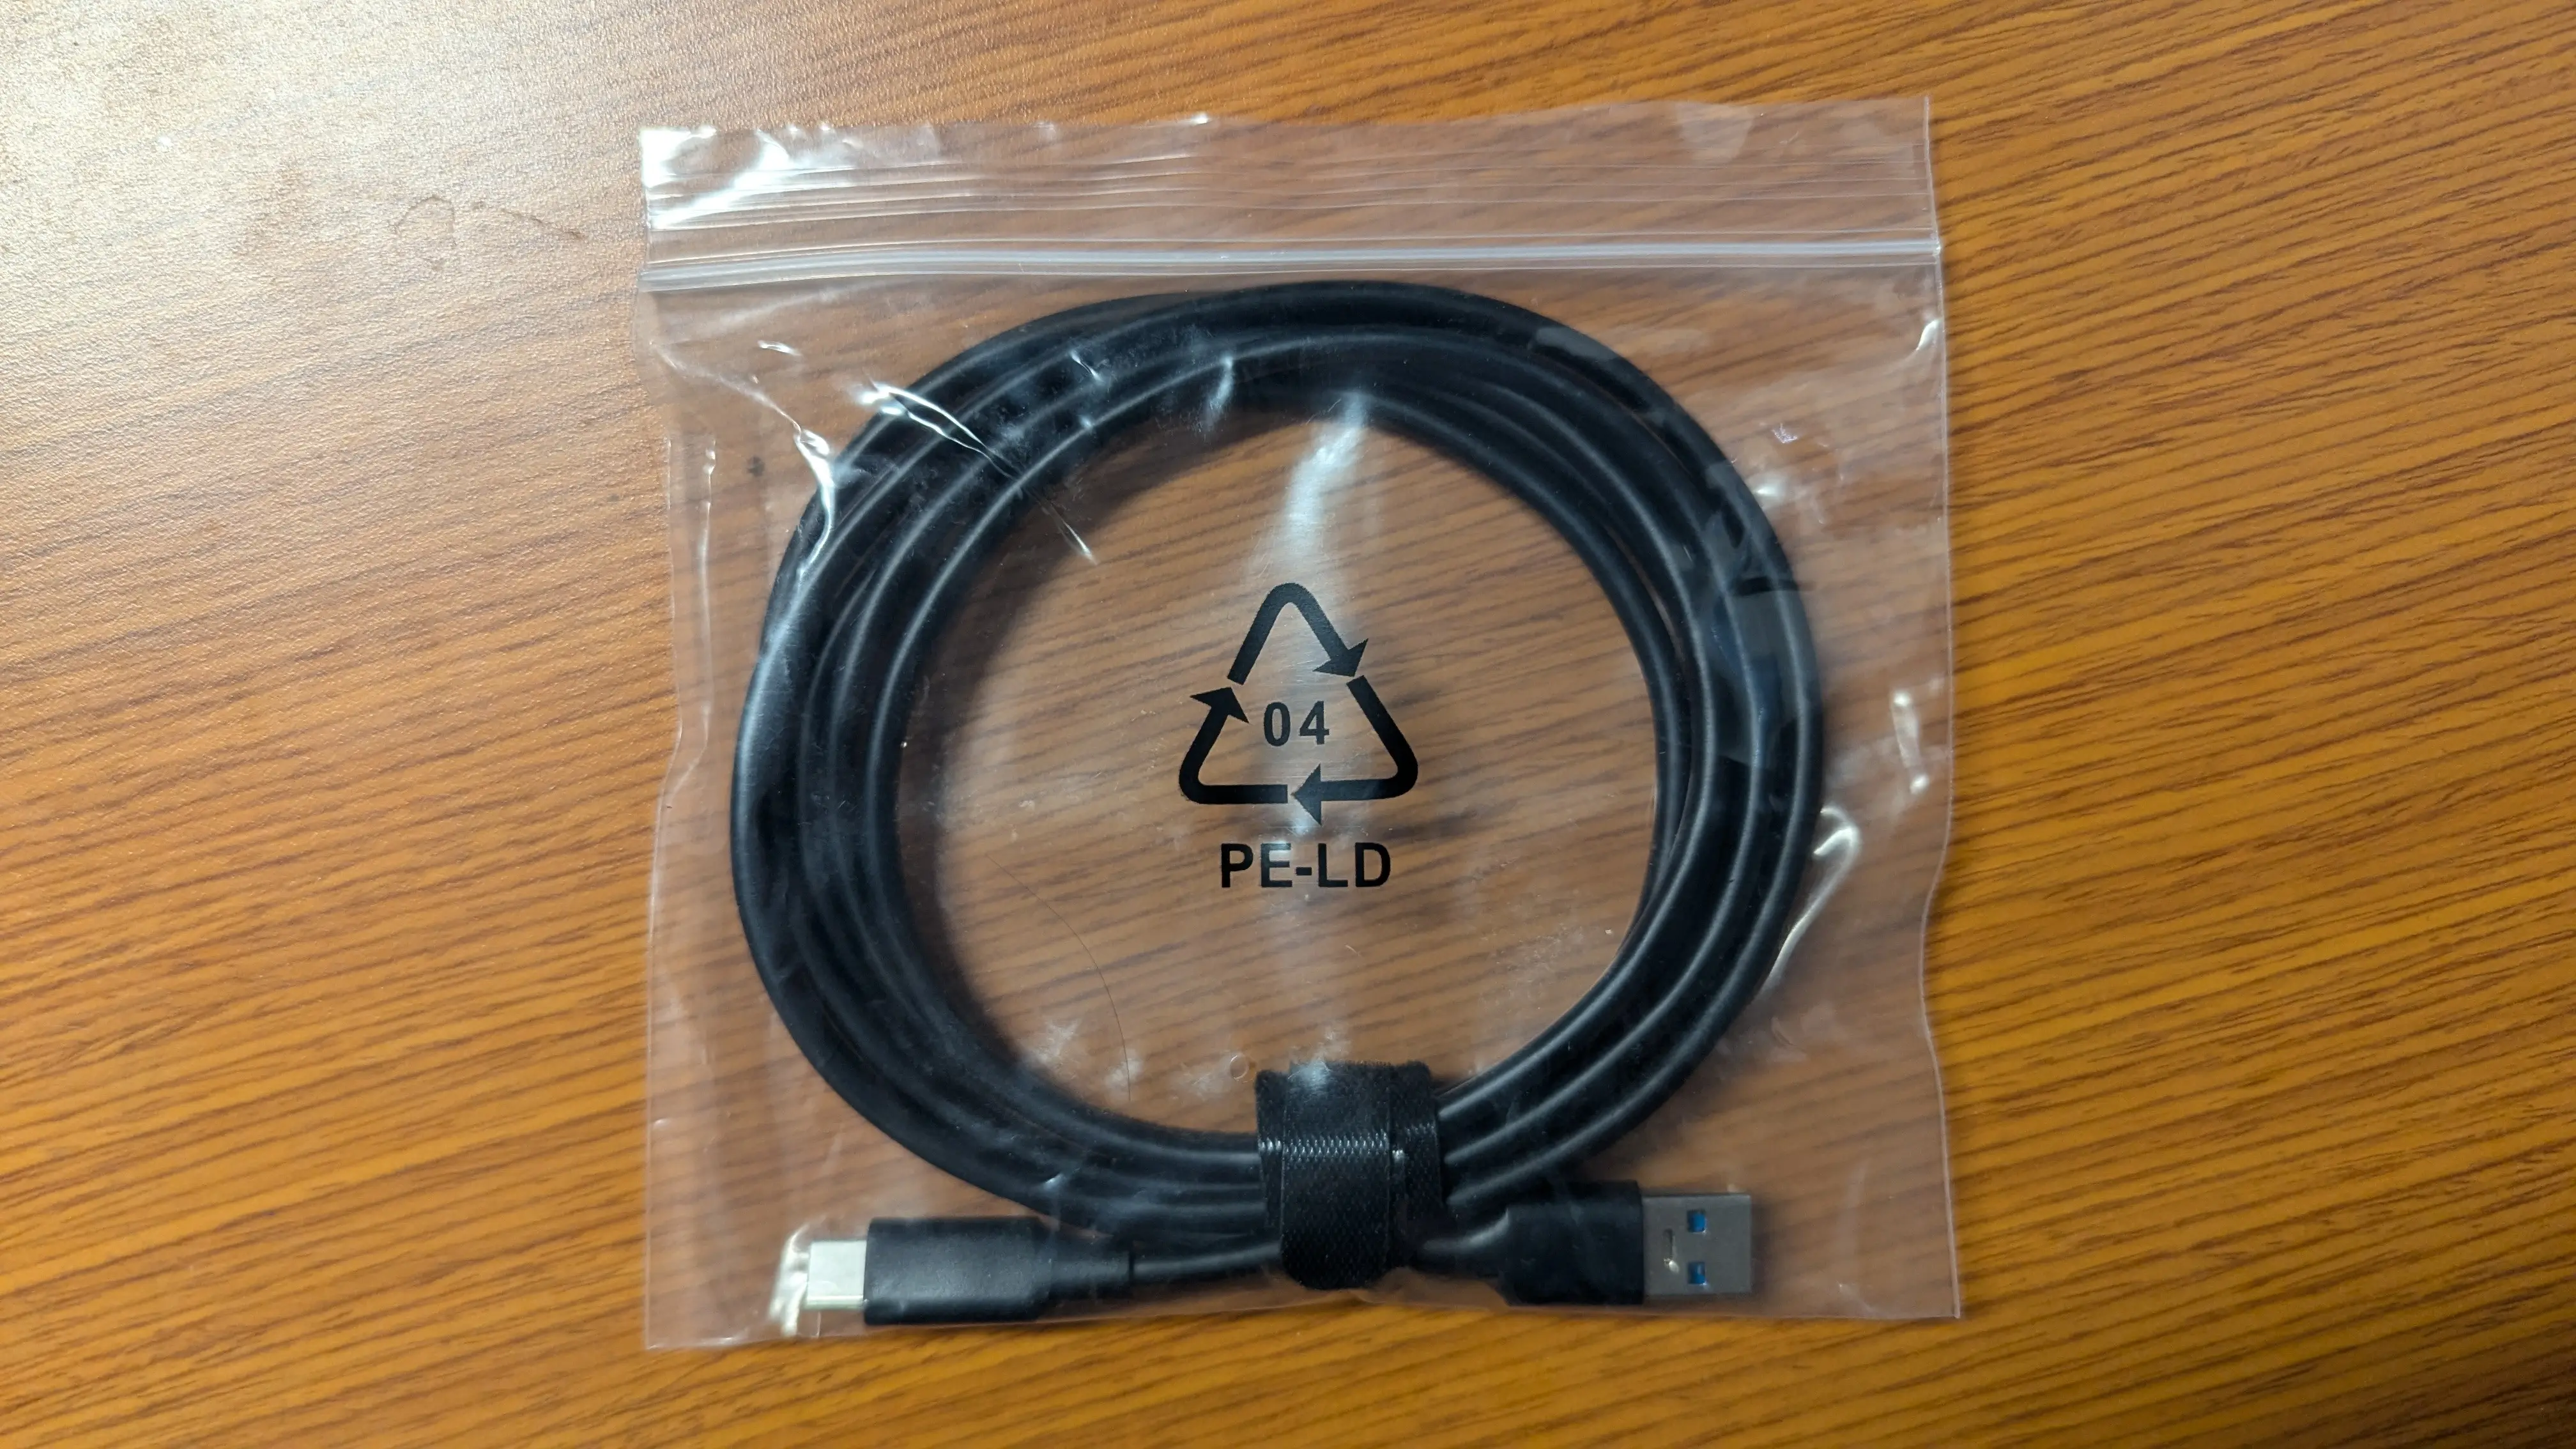
Another cable that may be included with your order is a 3.2 gen 2, braided USB-C to USB-C cable. This cord is meant to be used if you choose to separate your digitizers.
Things to remember if you separate your digitizers
- There are two main things to remember if you choose to use your Master Forge separated:
The cable that you use to connect the digitizers must be a 3.2 gen 2, C to C cable.
As pointed out in the getting started section of this page, power to an anchor body or bolt-on must be received through the front left USB-C port. This means that every anchor body or bolt-on that you add to your system has to be linked to the Master through the port on the front left.
Getting Started
The Master Forge is plug-and-play, so it doesn’t require any additional software to work. Before plugging your Forge in for the first time, it’s important to make sure that either the electrical bridge connector or a USB-C cable is correctly plugged into both digitizers.
All Forge anchor bodies, including the Master Forge Digitizers, should be connected to a power source through their front, left USB-C port. It’s important to use that specific port to connect your device to your computer because no other port will permit your Forge to function correctly. As a rule of thumb, all Forge anchor bodies must receive power through their front, left port. The other three ports are outgoing ports in order to connect other anchor bodies and bolt-ons. Each additional anchor body or bolt-on will need to “receive” power from the “Master” anchor body, or from an anchor body or bolt-on connected to the Master. A “Master” anchor body is the one connected directly to your computer. Please note that some bolt-ons may function as a Master.
If you haven’t done so, now would be the time to plug the included USB-C to USB-A cable included with your order into the LEFT digitizer. If you would rather use an after-market USB-C to USB-C cable instead, due to a personal preference or computer requirement, that is also okay. Regardless of your selection, we’ll refer to the cable that connects directly to the computer as the sole Power Cable. If you have any additional bolt-ons, now would be a good time to plug them into your Master.
Once you have your setup connected, you can plug the Master Power Cable into your computer. Upon connecting, the LED lights under your digitizers will start their rainbow cycle.
- If this is your very first time using a CCOS device, we recommend the following:
Place your cursor into a place where it’s safe to type
Place your hands on the digitizers and nestle your fingers on the switches
Move your index, middle, and ring fingers southwards, towards your body, one at a time.
These directions correspond to the letters U, O, E, T, N, and S. Now, let’s try a chord.
How to perform a Chord?
A chord is a type of input that allows you to press multiple keys at a time in order to achieve a predetermined output. In order to perform a chord, you must press all of the input keys at the same time, within the press time limit. Additionally, you must release all of the keys at the same time, that is, within the release time limit. Once these steps are performed accurately, your CCOS device will, very quickly, type the keys pressed, backspace them, and then output the predetermined chord.
We can test out your preloaded chords, of which there are 500, by chording both index fingers South, towards your body. You might need to play around with the timing a bit. Just remember that you have to press both switches together, at the same time, and then release them at the same time. As mentioned before, it might take a bit of playing around with the timing, but, eventually, you should see the word “the” output onto your typing space. Congratulations! You just performed a chord!
Some other chords you can try
- Here are some other preloaded chords that you can try. You can read the section on chord notation for instructions on how to interpret the following chords.
c+b = because
m+b = maybe
u+o+y = you
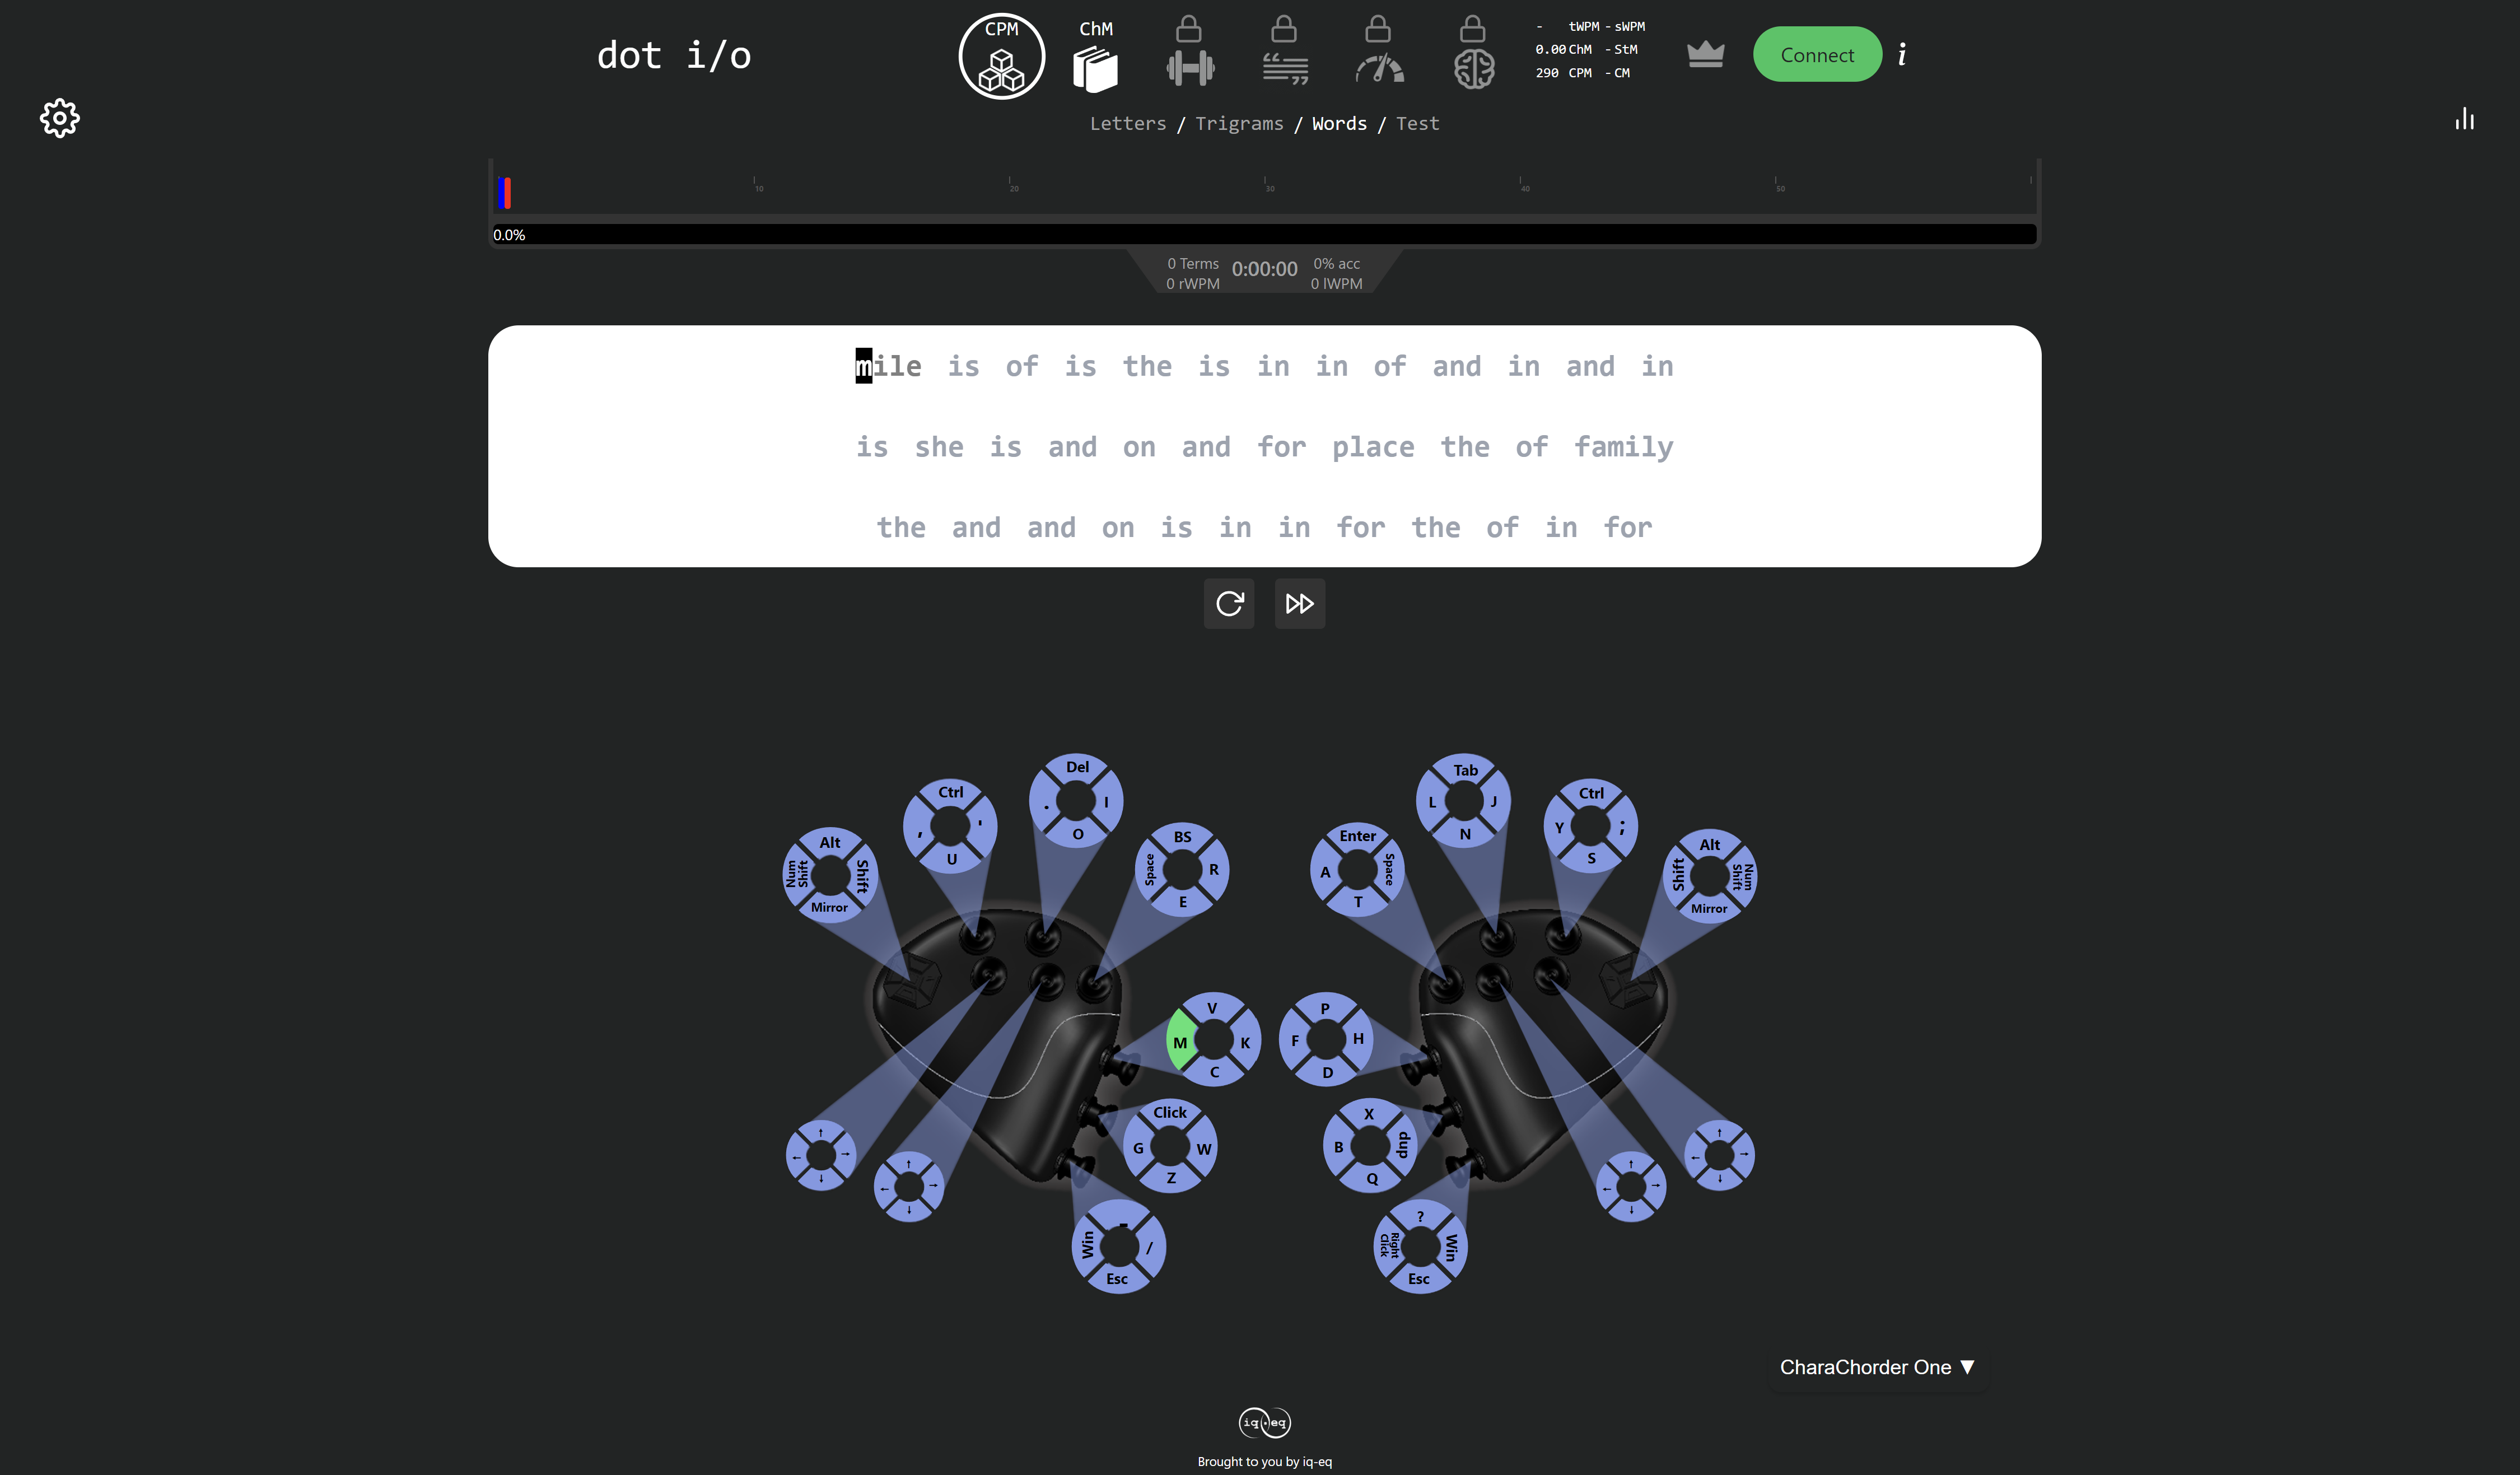
Now that you’re up and running, and that you know how to perform chords, you can head over to the training section for instructions on how to get started with learning your device. If you want to just jump in without having to read a minute longer, head on over to our training website; https://www.iq-eq.io/#/
Setting Up
There are a few steps that you’ll likely want to take if this is your first time using your Master Forge. In the following section, we will update your device, explain navigation in the GTM, and demonstrate the default layout on your new device.
Updating your Device
Checking your Device’s Firmware
You can check your device’s current firmware by following the steps below:
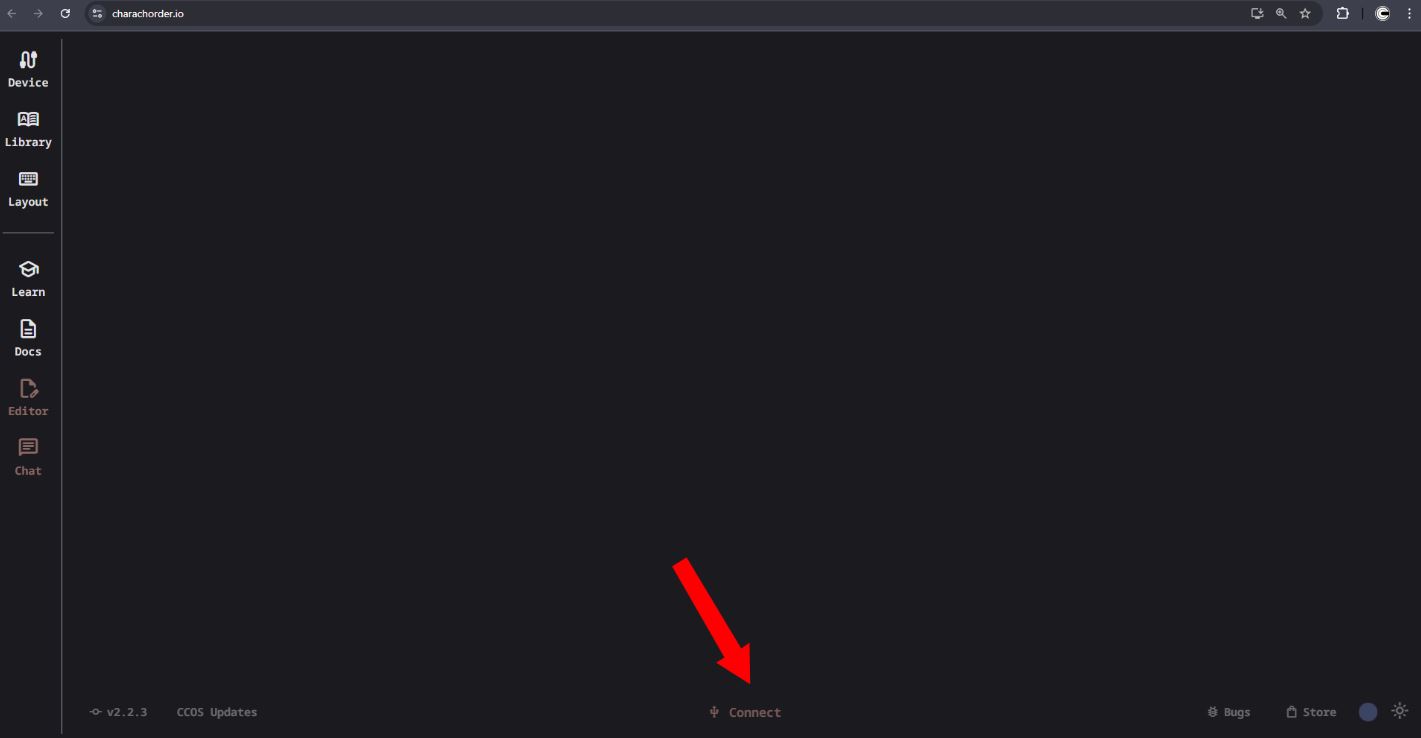
On a chromium based browser, such as Chrome, go to the Device Manager (Linux users see this link for more information about configuring serial port access).
Click “Connect” at the bottom center of the page.
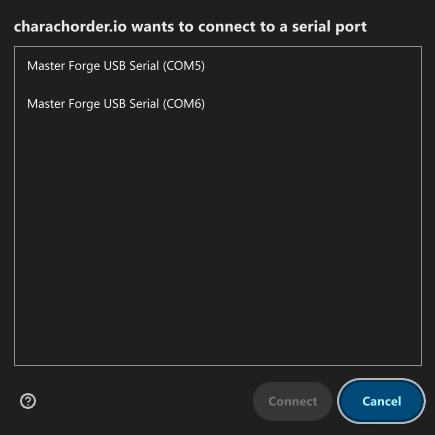
When the popup box comes up that reads “charachorder.io wants to connect to a serial port,” choose one of the two listed devices with the same name: Master Forge USB Serial (currently each Master Forge half is detected separately), then click the “connect” button.
Now you can find your firmware version for the connected Master Forge half, at the bottom left of the page. It will read something like this: CCOS 2.1.0
The device name is also shown at the bottom center.
The left half is called: Forge M4G
The right half is called: Forge M4GR
To check the other half’s firmware version, disconnect by clicking on the device name at the bottom center of the page. Then reconnect by clicking on the bottom center connect button and choose the other Master Forge USB Serial device.
Updating the Firmware
Currently each half of the Master Forge has to be updated separately.
Warning
IMPORTANT: Before updating the firmware, please make sure that you have a backup of the Master Forge’s left half (it’s called Forge M4G), it has your layout, chord library, and settings. The update might reset those, so it’s important that you keep backup files handy. Currently the Master Forge’s right half (called Forge M4GR) only controls it’s own LED settings. For instructions on how to restore backed up files, visit the Restoring from a Backups section.
To check which is the latest firmware release for the Master Forge, here are the firmware pages for each half:
Left half (M4G) https://charachorder.io/ccos/m4g_s3/
Right half (M4GR) https://charachorder.io/ccos/m4gr_s3/
You can follow the steps below to update each Master Forge half:
Head to the Device Manager https://charachorder.io/
Connect to the device manager by clicking the bottom middle
Connectbutton.
When the popup box comes up that reads “charachorder.io wants to connect to a serial port,” choose one of the two listed devices with the same name: Master Forge USB Serial (currently each Master Forge half is detected separately), then click the “connect” button.
Note, which Master Forge half we are updating first. The device name is shown at the bottom center:
The left half is called: Forge M4G

The right half is called: Forge M4GR

Click on the bottom left button: CCOS (your firmware version is listed here, for example:
CCOS 2.1.0).Click on the firmware version you want to install.
Before you start the update, make sure that you don’t type on the Master Forge while it’s updating. It shouldn’t take more than 30-60 seconds. The Master Forge supports over-the-air (OTA) updates, therefore it’s enough to just click on the
Apply Updatebutton.While it’s updating, the device manager disconnects, and the Master Forge disconnects from the OS. In Windows, it plays a device disconnected sound. When it’s done, Windows plays a device connected sound.

Connect to the device manager and look at the CCOS x.x.x version, at the bottom left on the page, to see that the updated was successful.
Now repeat the steps, but pick the other Master Forge USB Serial device from the connect device popup box to update the other half.
Understanding the Settings
The Forge has operational settings that are user-configurable. Since the device is plug-and-play, you don’t need any software to edit the device’s settings; all you need is a place to type text. We call these settings the Generative Text Menu, or GTM for short.
You can access the GTM by chording both pinkies north on any space that allows text entry such as a notepad app. For an explanation on chords and how to perform them, visit the Chords section.
Once you perform the chord to call up the GTM, your Forge will type out the menu and its options. It will look something like this:
Master Forge GTM [ >K<eyboard || >M<ouse || >C<hording || >D<isplay || >R<esources ]
Navigation around this menu is based on letter-presses. In the example
above, you can select the desired submenu by pressing the letter between
the angle brackets (for example: >K<) in your target submenu on your
CharaChorder One. In the example above, you would press K for
Keyboard, M for Mouse, C for Chording, D for Display, and
R for Resources.
In some submenus, you will see numeric values. In order to increase or decrease these, you can use the arrow keys on your digitizers.
CharaChorder > Chording > Press Tolerance [ Use up/down arrow keys to adjust: 25ms ]
You can read an explanation on all of the settings on your CharaChorder device here.
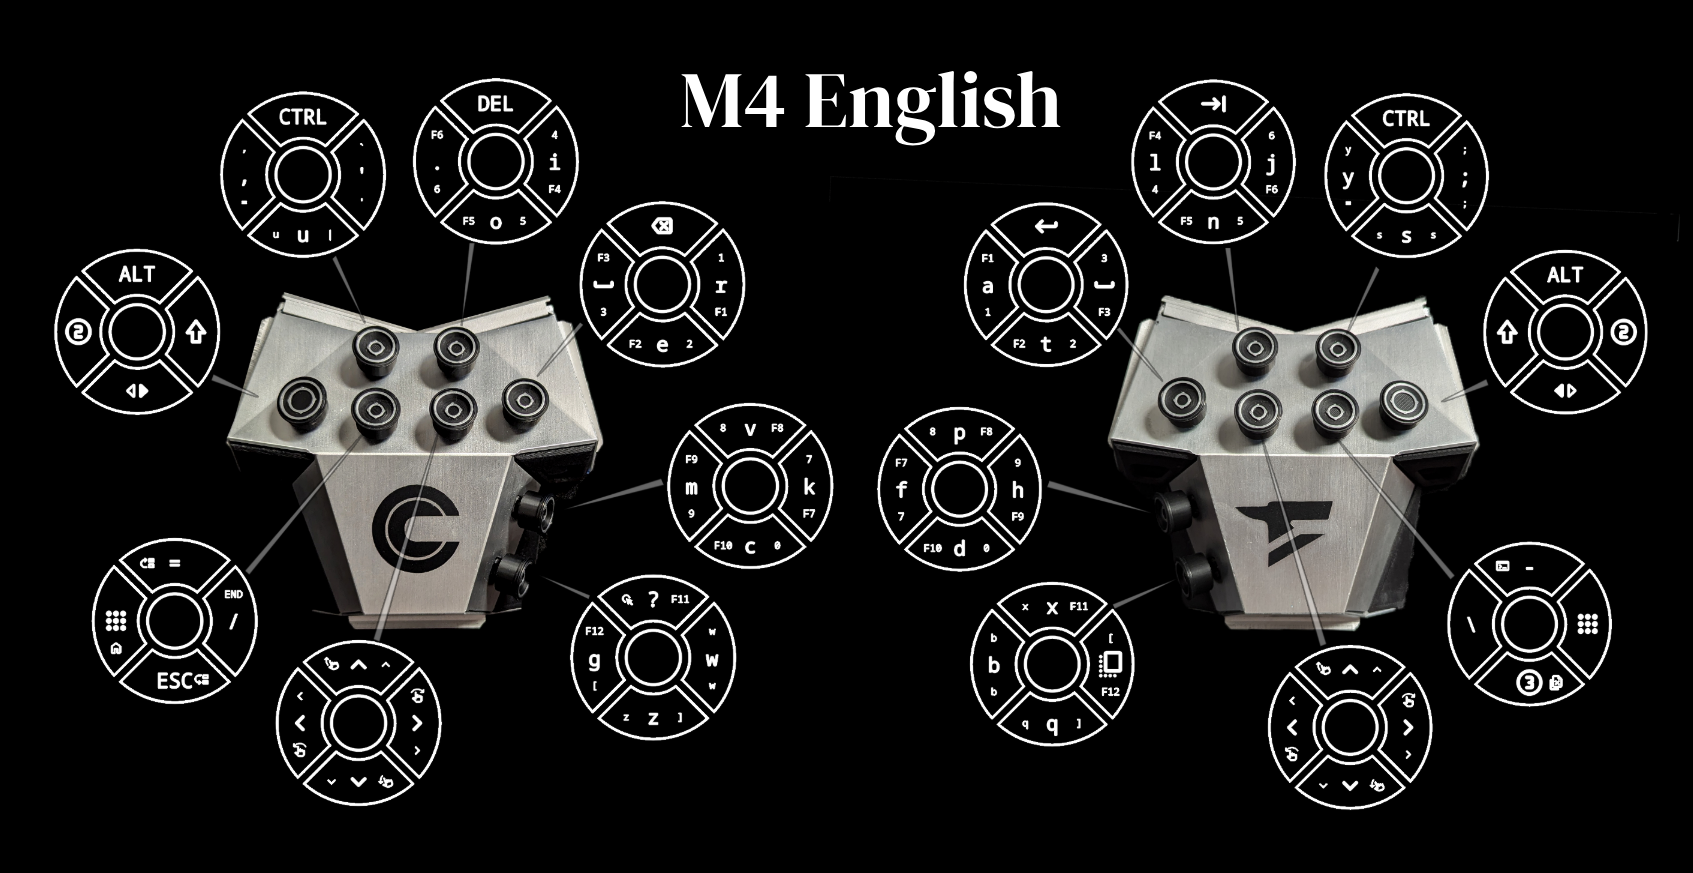
Learning the Layout
The default Master Forge layout, which we will refer to as the M4 English layout, has been designed to favor bigrams and trigrams commonly used in the English language while making the letters accessible for a logical choice of lexical chords. You can find the quick reference guide for the layout below, and read about how the layout was designed, here.
Note
General consensus amongst the community is that, while not perfect, the letter arrangement of the default layout is good enough that further modifications would provide very little benefit considering 500+ WPM have been reached in peak conditions.
Most commonly only special character and number placement are changed, for example to benefit coding.
Some exceptions include optimizing for VIM bindings, though people have successfully used the default layout for VIM as well and benefits of such modifications are debatable.
Layers
The Master Forge layout has 3 layers: the base layer called the A1 layer, the secondary layer referred to as A2, and the tertiary layer named A3. Being as the Master Forge has 8 switches on each digitizer, and taking into account that each switch can access 4 different individually assignable positions, and considering that each layer has access to all of those 8 switches, we have over 190 assignable slots between the two digitizers.
In this section, we’ll refer only to the default M4 English layout. If you have modified your layout to something different, then the next portion might not be accurate for your device. If you have purchased your device from CharaChorder, then the following is accurate to your device.
By default, auxiliary layers are accessible by pressing and holding the “layer access” keys. This creates a “shift” into one of the auxiliary layers, but only momentarily. Currently, there is a “hacky” way to make it so that layers are toggled instead of shifted, but this is not an official feature. Toggleable layers, as they may exist in current CCOS builds, have not been tested extensively and cannot be guaranteed to come issue-free.
Toggleable Layers
If you have no interest in knowing why this works, you may skip down to the steps described below in order to enable toggleable layers. CCOS devices use a “shifted’ layer method that requires a press and hold of a key in order to access keys on auxiliary layers. By default, the layer access keys tell the device to go into that layer. Releasing the switch tells the device to return to the base layer, since the same “location” is mapped to the layer access button on the target layer as well. We can exploit this functionality and force the CCOS device to stay in a certain layer by simply removing the layer access key from the target layer. That way, the device doesn’t know that it should return to the base layer when you release the switch.
In order to set your device up to have toggleable layers instead of shifted layers, you’ll need to head to the Device Manager and remap some keys. We’ll describe here how to remap the A2 layer access key, but the same steps apply to the A3 layer. These instructions assume that you have already connected your device to the Device Manager.
Make sure that the A2 layer access key is mapped to the key of your choice on the Alpha layer (A1 layer). This is the key you will use to toggle into the A2 layer
On the A2 layer, find the same location that you mapped the A2 layer access key and change that key (on the A2 layer) to
No Key Pressed. This change is what prevents your device from shifting back into the A1 layerOn the A2 layer, choose another location and map the A2 layer access key there. This is the key that you will use to return to the Alpha layer.
A1 Layer
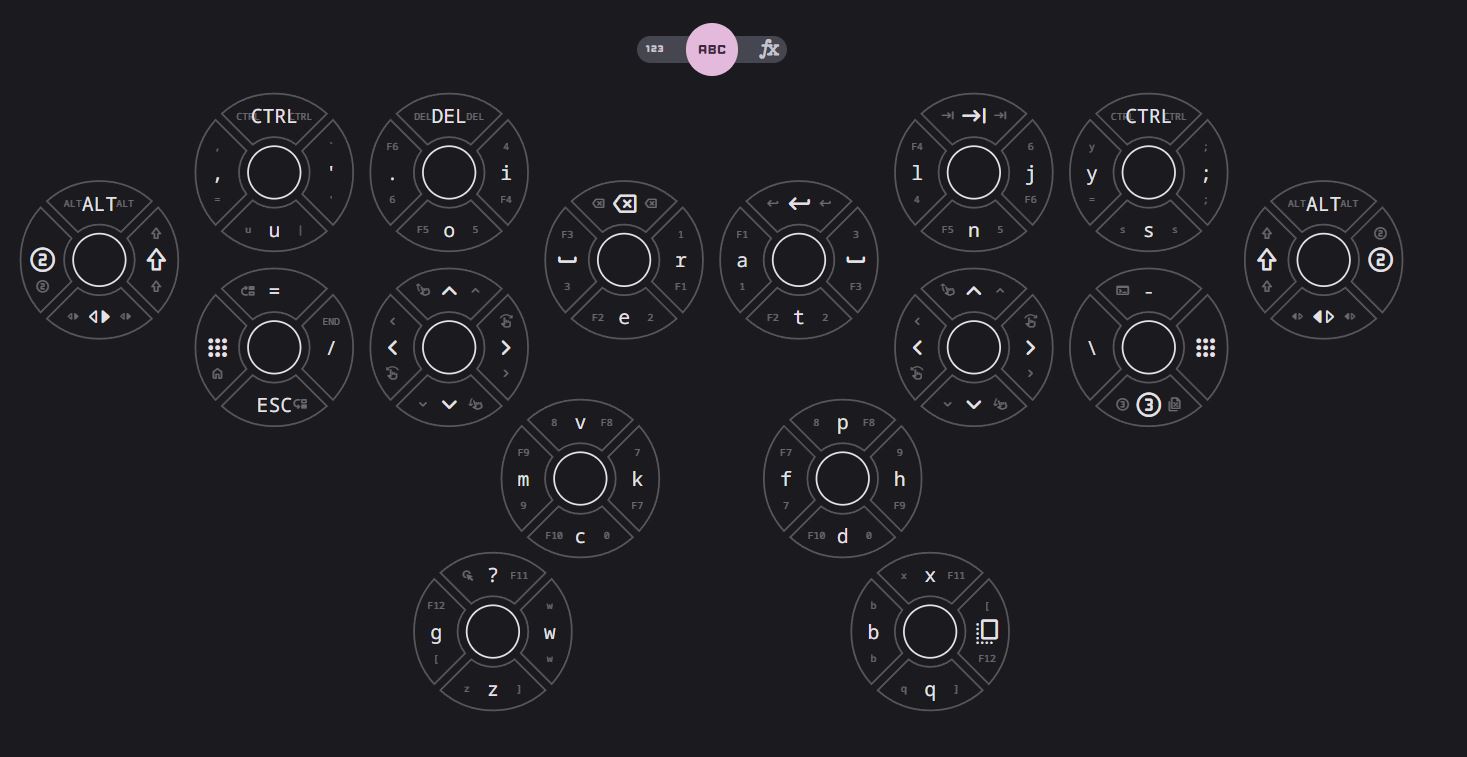
The A1 layer is the main layer that is active by default. The M4 English layout has all 26 letters of the English alphabet on the A1 layer so that you can access all letters without having to hold or press anything else. Your device will always be in the A1 layer upon boot.
While the A1 layer is active on the Forge digitizers by default, you can map the A1 access key, which bears the name “Primary Keymap (Left)” or “Primary Keymap (Right)”, in the Device Manager.
Note
Mapping the A1 layer access key is redundant unless you setup your device to toggle between layers, instead of shifting between them.
A2 Layer

The A2 layer, sometimes referred to as the “number layer”, is accessible with the A2 access key. In the above graphic, you’ll see this labeled as “num-shift.” In the Device Manager, this key has the name “Numeric Layer (Left)” and “Numeric Layer (Right)”, one for each digitizer.
By default, the A2 Layer is accessible by pressing and holding either pinky finger outwards, that is, west on the left pinky or east on the right pinky. You do not have to hold them both, only one is required. Any key that is on the A2 Layer can only be accessed by pressing and holding the A2 Layer access key along with the target key. You do not need to chord the keys together; it’s only required that the A2 Layer access key is pressed while the target key is pressed.
Note
EXAMPLE: On the M4 English layout, you can access the number
4 by pressing and holding the right pinky to the east and the
left middle finger to the east.
A3 Layer
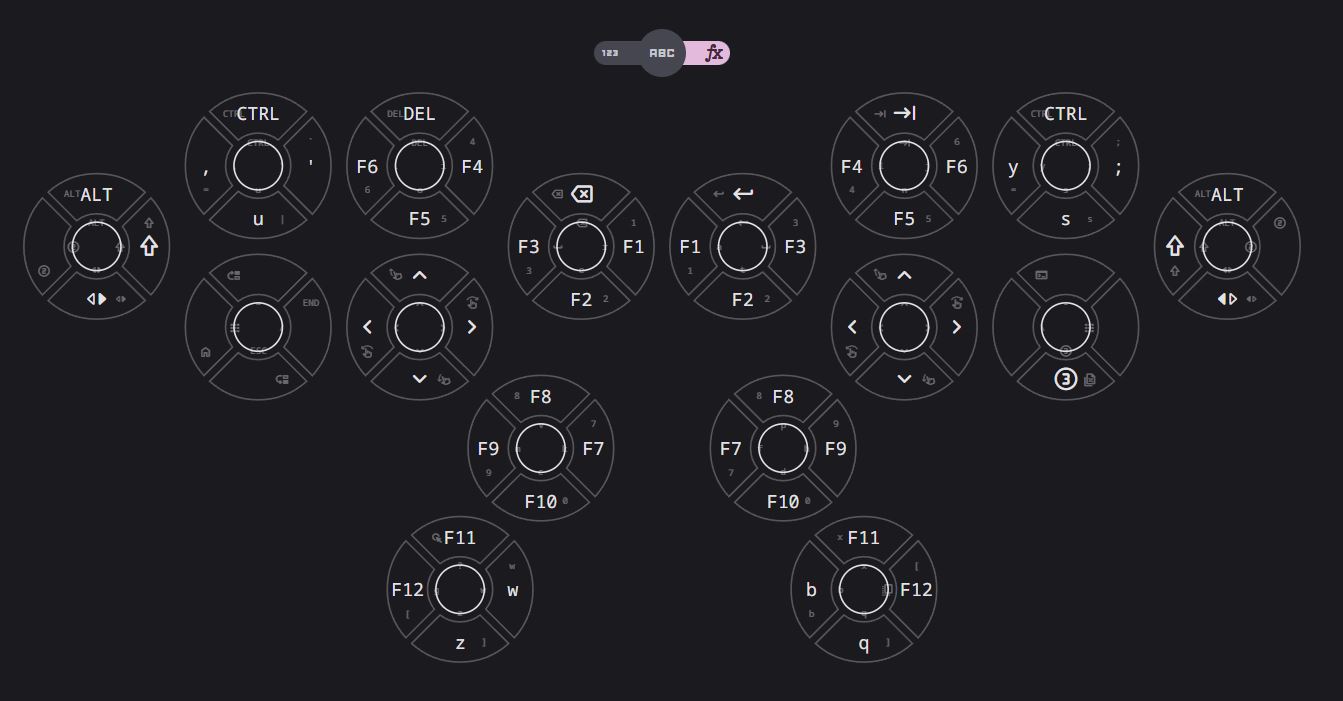
The A3 layer, sometimes referred to as the “function layer”, is accessible with the A3 access key. This key is not in the above graphic, and instead is accessible by [INFO]. In the Device Manager, this key has the name “Function Layer (Left)” and “Function Layer (Right)”, one for each digitizer.
By default, the A3 Layer is accessible by [INFO]. You do not have to hold them both in order to access the A3 layer. Any key that is on the A3 Layer can only be accessed by pressing and holding the A3 access key, along with the target key. You do not need to chord the keys together; it’s only required that the A3 layer access key is pressed while the target key is pressed.
Note
EXAMPLE: On the M4 English layout, you can access the F1 key by
pressing and holding [INFO] and adding the letter a or r (location of number 1 on the default layout) to it.
Shift Modifier
List of shifted key actions
Alpha key |
Shifted key |
|---|---|
` |
~ |
1 |
! |
2 |
@ |
3 |
# |
4 |
$ |
5 |
% |
6 |
^ |
7 |
& |
8 |
* |
9 |
( |
0 |
) |
- |
_ |
= |
+ |
[ |
{ |
] |
} |
\ |
| |
; |
: |
' |
“ |
, |
< |
. |
> |
/ |
? |
On top of the three aforementioned layers, the Shift key, which is a modifier, can be used to access some extra keys. The Shift keypress works just like it would on a traditional keyboard. You can capitalize letters and access symbols attached to numbers. This works with any key on any layer, just like other modifiers (such as Ctrl and Alt). The Shift modifier output is currently controlled by the Operating System that your Forge is plugged into, and it is not possible to customize their outputs.
In the above graphic, you’ll see the Shift key labeled as “Shift”. In the Device Manager, this key has the name “Shift Keyboard Modifier (Left)” and “Shift Keyboard Modifier (Right)”, one for each digitizer.
By default, the Shift is accessible by pressing and holding either pinky finger inwards, that is, east on the left pinky or west on the right pinky. You do not have to hold them both, only one is required. Any key that requires the Shift Modifier can only be accessed by pressing and holding the Shift key along with the target key. You do not need to chord the keys together; it’s only required that the Shift key is pressed while the target key is pressed.
Note
EXAMPLE: On the M4 English layout, you can access the capital
A by pressing and holding the left pinky to the east and the
right index finger to the west.
On the M4 English layout, you can access the @ symbol by pressing
and holding both pinkies to the east and the left index south.
Configurability
The Master Forge’s layout is configurable, which means that you can remap almost all keys. Though the M4 English layout has been optimized for writing in English by chentry and chording, some users may choose to remap their device’s layout to better suit their personal needs. For a thorough explanation on how remapping works and how to remap your device, visit the remapping section
Master Forge Configurations
When the Master Forge was unveiled in November of 2023, CharaChorder began taking pre-orders offering everyone the same bundle. In September of 2024, CharaChorder ran a Kickstarter campaign for the Master Forge for 5 weeks, offering three different tiers, each with a different configuration. After the Kickstarter campaign finished, the Master Forge went on back-order sale on the Forge website. The following section identifies what each of these 5 bundles included.
Forge Website Pre-Orders
The Master Forge was announced at CharaChorder’s annual ChorderCon in 2023. It was announced alongside the Forge brand and other Forge products such as the Coder’s Forge and the Gamer’s Forge. After a surge in Master Forge orders, the Master Forge was given development priority. Every Master Forge order placed between November 2023 and early August 2024 includes:
One (1) M3 Allen wrench
Note
As of March of 2025, the Forge Trackball Bolt-On has not finished development. As such, some pre-orders and Kickstarter backers may not receive their trackball bolt-ons with their Master Forge. These will be shipped at a later time.
Kickstarter Orders
The Master Forge Kickstarter campaign launched on August 27 of 2024 and closed on October 7 of 2024. The bundles offered on Kickstarter can be separated into three: Basic, Premium, and Super.
Basic
The Basic backer tier on Kickstarter includes the following:
One (1) M3 Allen Wrench
Unlimited Forge CAD Access
Super
One (1) M3 Allen Wrench
Unlimited Forge CAD Access
Lifetime VIP Membership
GTM Immortalization
Digitizer Exoskeleton signed by Riley Keen, Founder and CEO of CharaChorder
Post-Kickstarter
Once the Kickstarter campaign ended, the Master Forge was put on sale for pre-orders on the Forge Website. Orders placed on the Forge website starting October of 2024 include: