Generative Text Menu (GTM)
CharaChorder GTM [ >K<eyboard || >M<ouse || >C<hording || >D<isplay || >R<esources ]
The Generative Text Menu, known by its abbreviation as GTM, is an onboard, text based menu which can be accessed anywhere you type. Through it, we are able to modify CCOS settings including chording tolerances, mouse speeds, and realtime feedback, among other settings and features, without the need to use a software. It’s a core feature of CCOS that you will want to learn how to use to make the device your own.
You will notice that some settings have different press and release values. This is because the switches are read by the CCOS at two different moments in time: when they are pressed, and when they are released. We have designed CCOS to have configurable settings for each of those “events” separately, for maximum adjustability. Intuitively, each press setting, such as debounce press, will affect the way that the CCOS reads the switch at the time that the switch is pressed into any one direction. Conversely, release settings, such as release debounce, will change the way that the CCOS reads the switch at the exact moment that the switch is released, or un-pressed, from any one direction.
Note
Although you can configure your CCOS settings anywhere that you can type through the GTM, you can also edit them on the CharaChorder Device Manager.
Warning
Please note that updating your CCOS device might reset your GTM settings to default. Please make sure that you have a backup of your GTM settings before updating your CCOS device. For instructions on how to restore backed up files, visit the Restoring from a Backup section.
How to access the GTM
First, move your cursor into any area where you can type. For best results, you may want to choose a text area that doesn’t automatically format text since some of the keys that the GTM uses may trigger unwanted formatting. We recommend using a vanilla (basic) text editor such as Notepad. Please note, however, that Windows Notepad has been known to have issues with how the GTM is displayed on Windows 11 PCs.
Use the table below to find out how to trigger the GTM for your CCOS device. Please note that triggering the GTM will require a “chorded” action.
Device |
How to access |
|---|---|
CharaChorder One |
Chord both pinky keys north ( |
CharaChorder Lite |
Chord |
CharaChorder X |
Chord |
CharaChorder Engine |
Chord |
Available Menus
Menu |
Description |
|---|---|
Settings related to using your device in character entry |
|
Settings related to using your device as a mouse |
|
Settings related to chording on your device |
|
Settings related to your device version and other CCOS texts |
|
A menu of resources, mostly links |
Keyboard
Under this menu, you will be able to modify settings pertaining to how your CCOS device interacts with your computer.
Scan Rate
Path: GTM > Keyboard > Scan Rate
The scan rate, sometimes known as the “Key scan duration,” refers to the frequency at which the device checks the state of the input keys. For reference, 5 ms corresponds to 200 Hz, which means that CCOS checks the position of the keys once every 5 milliseconds, which equals 200 times in a second. Having a lower number is usually better as it makes CCOS more responsive, though the difference at low numbers is usually negligible. In the GTM, this setting is adjustable in millisecond (ms) units.
You can find the default scan rates of the different CharaChorder devices in the table below.
Device |
Default Value |
Min. Value |
Max. Value |
Increments |
|---|---|---|---|---|
CharaChorder One |
2 ms |
0 ms |
20 ms |
1 ms |
CharaChorder Lite |
2 ms |
0 ms |
20 ms |
1 ms |
CharaChorder X |
2 ms |
0 ms |
20 ms |
1 ms |
Debounce Press
Path: GTM > Keyboard > Debounce Press
The debounce press setting refers to the time frame (measured in milliseconds) in which CCOS will filter out duplicate key activations on a press event. In other words, any duplicate activations within the given time frame will only be counted as one.
We should adjust this setting if we are having unintentional duplicate characters while typing. Increasing this value will lower the probability that unwanted duplicate characters will appear because it tells CCOS to wait longer before typing an additional character that’s assigned to the same switch-direction. However, having this setting set too high might also cause issues with CCOS not reading intentional double-presses, so it’s recommended to try different numbers in small increments. This setting should be used in connection with the debounce release setting.
You can find the default debounce press value of the different CharaChorder devices in the table below:
Device |
Default Value |
Min. Value |
Max. Value |
Increments |
|---|---|---|---|---|
CharaChorder One |
7 ms |
0 ms |
100 ms |
1 ms |
CharaChorder Lite |
12 ms |
0 ms |
100 ms |
1 ms |
CharaChorder X |
1 ms |
0 ms |
100 ms |
1 ms |
Debounce Release
Path: GTM > Keyboard > Debounce Release
The debounce release setting refers to the time frame (measured in milliseconds) in which CCOS will filter out duplicate key activations on a release event. In other words, any duplicate activations within the given time frame will only be counted as one.
We should adjust this setting if we are having unintentional duplicate characters while typing. Increasing this value will lower the probability that unwanted duplicate characters will appear because it tells CCOS to wait longer before typing an additional character that’s assigned to the same switch-direction. However, having this setting set too high might also cause issues with CCOS not reading intentional double-presses, so it’s recommended to try different numbers in small increments. This setting should be used in connection with the debounce press setting.
You can find the default debounce release value of the different CharaChorder devices in the table below:
Device |
Default Value |
Min. Value |
Max. Value |
Increments |
|---|---|---|---|---|
CharaChorder One |
7 ms |
0 ms |
100 ms |
1 ms |
CharaChorder Lite |
12 ms |
0 ms |
100 ms |
1 ms |
CharaChorder X |
1 ms |
0 ms |
100 ms |
1 ms |
Keystroke Delay
Path: GTM > Keyboard > Keystroke Delay
This setting adds a small delay to keystroke inputs. It is measured in microseconds (μs) and is very small by default.
You should increase this value if your computer is not accepting all of the characters output by your device, such as when using the GTM. If you are having this issue, your GTM would look weird, with missing chunks or characters.
If you have a faster computer, then you can lower this setting to make chording and the GTM feel snappier and more responsive.
This value is adjusted in 40us increments. You can find the default debounce press of the different CharaChorder devices in the table below:
Device |
Default Value |
Min. Value |
Max. Value |
Increments |
|---|---|---|---|---|
CharaChorder One |
480 μs |
0 μs |
10200 μs |
40 μs |
CharaChorder Lite |
480 μs |
0 μs |
10200 μs |
40 μs |
CharaChorder X |
480 μs |
0 μs |
10200 μs |
40 μs |
Capslock
Path: GTM > Keyboard > Capslock
This setting is similar to a computer’s Capslock: it toggles the state of the capslock. When on, all letters output by the CCOS device will be capitalized. When off, all letters output by the CCOS device will be lowercase.
Operating System
Path: GTM > Keyboard > Operating System
This setting refers to your host computer’s operating system. Because the keys on the different computer operating systems may vary, you can set your CCOS device up so that it matches your computer.
Currently, on CCOS, you can select between Windows, Mac, Linux, iOS, or Android.
The intent of this setting is to provide more accurate key mapping. As such, it is recommendable to set this setting to match whatever computer operating system you’re using your CCOS device on.
Device |
Default |
|---|---|
CharaChorder One |
Windows |
CharaChorder Lite |
Windows |
CharaChorder X |
Windows |
Warning
As of December of 2023, this setting doesn’t do anything on CCOS devices.
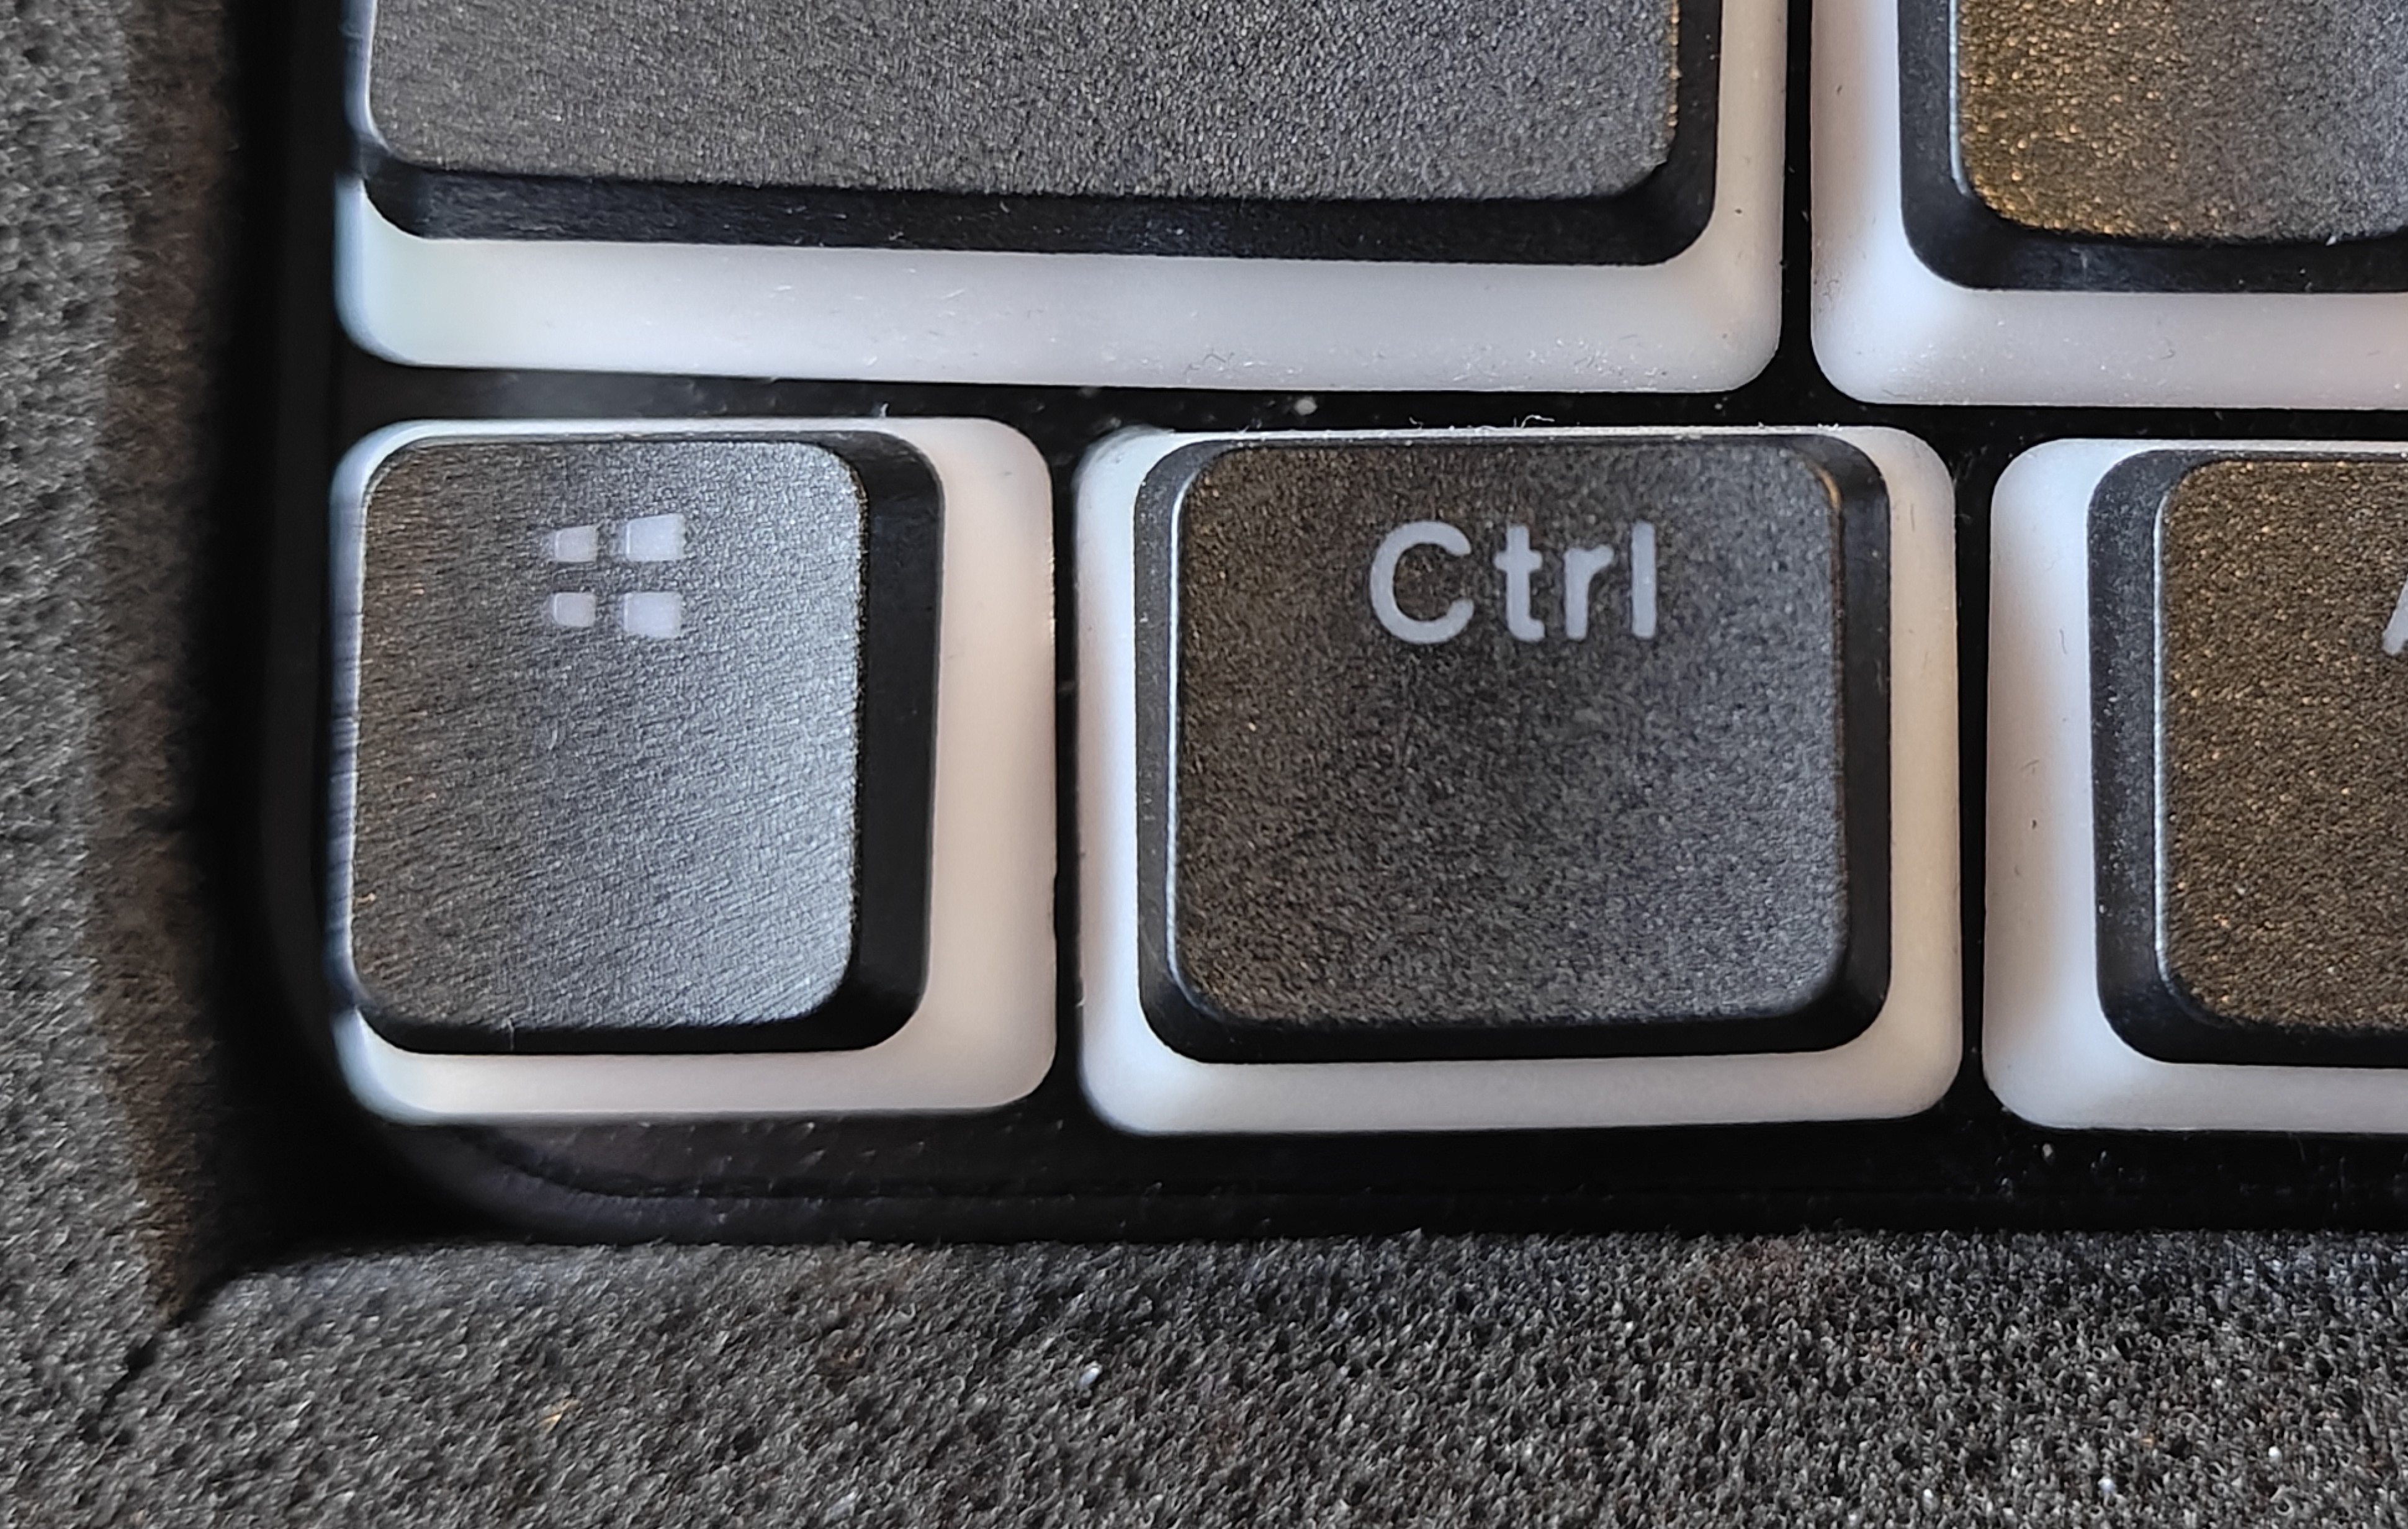
GUI-CTRL Soft Swap (CharaChorder Lite only)
Path: GTM > Keyboard > GUI-CTRL Soft Swap
This setting will swap the behavior of the two keys on the bottom-left of the CharaChorder Lite.
Traditional QWERTY keyboards keep the CTRL key at the bottom left corner of the keyboard with the GUI key (Command key on Mac, Windows key on Windows, Super key on Linux, etc.) to the right of the CTRL key. The CharaChorder Lite has these two keys swapped by default, which some users find odd and difficult to adjust to. A brand new CharaChorder Lite will have the GUI key at the bottom-left corner with the CTRL key to the right of the GUI key.
With this setting, you can effectively swap the two keys’ location at the level of the CCOS so that CTRL is at the bottom-left corner.
This setting has two options: GUI-CTRL and CTRL-GUI. This setting is set to GUI-CTRL by default.
Default Key Mapping:
Key Mapping after swapping:
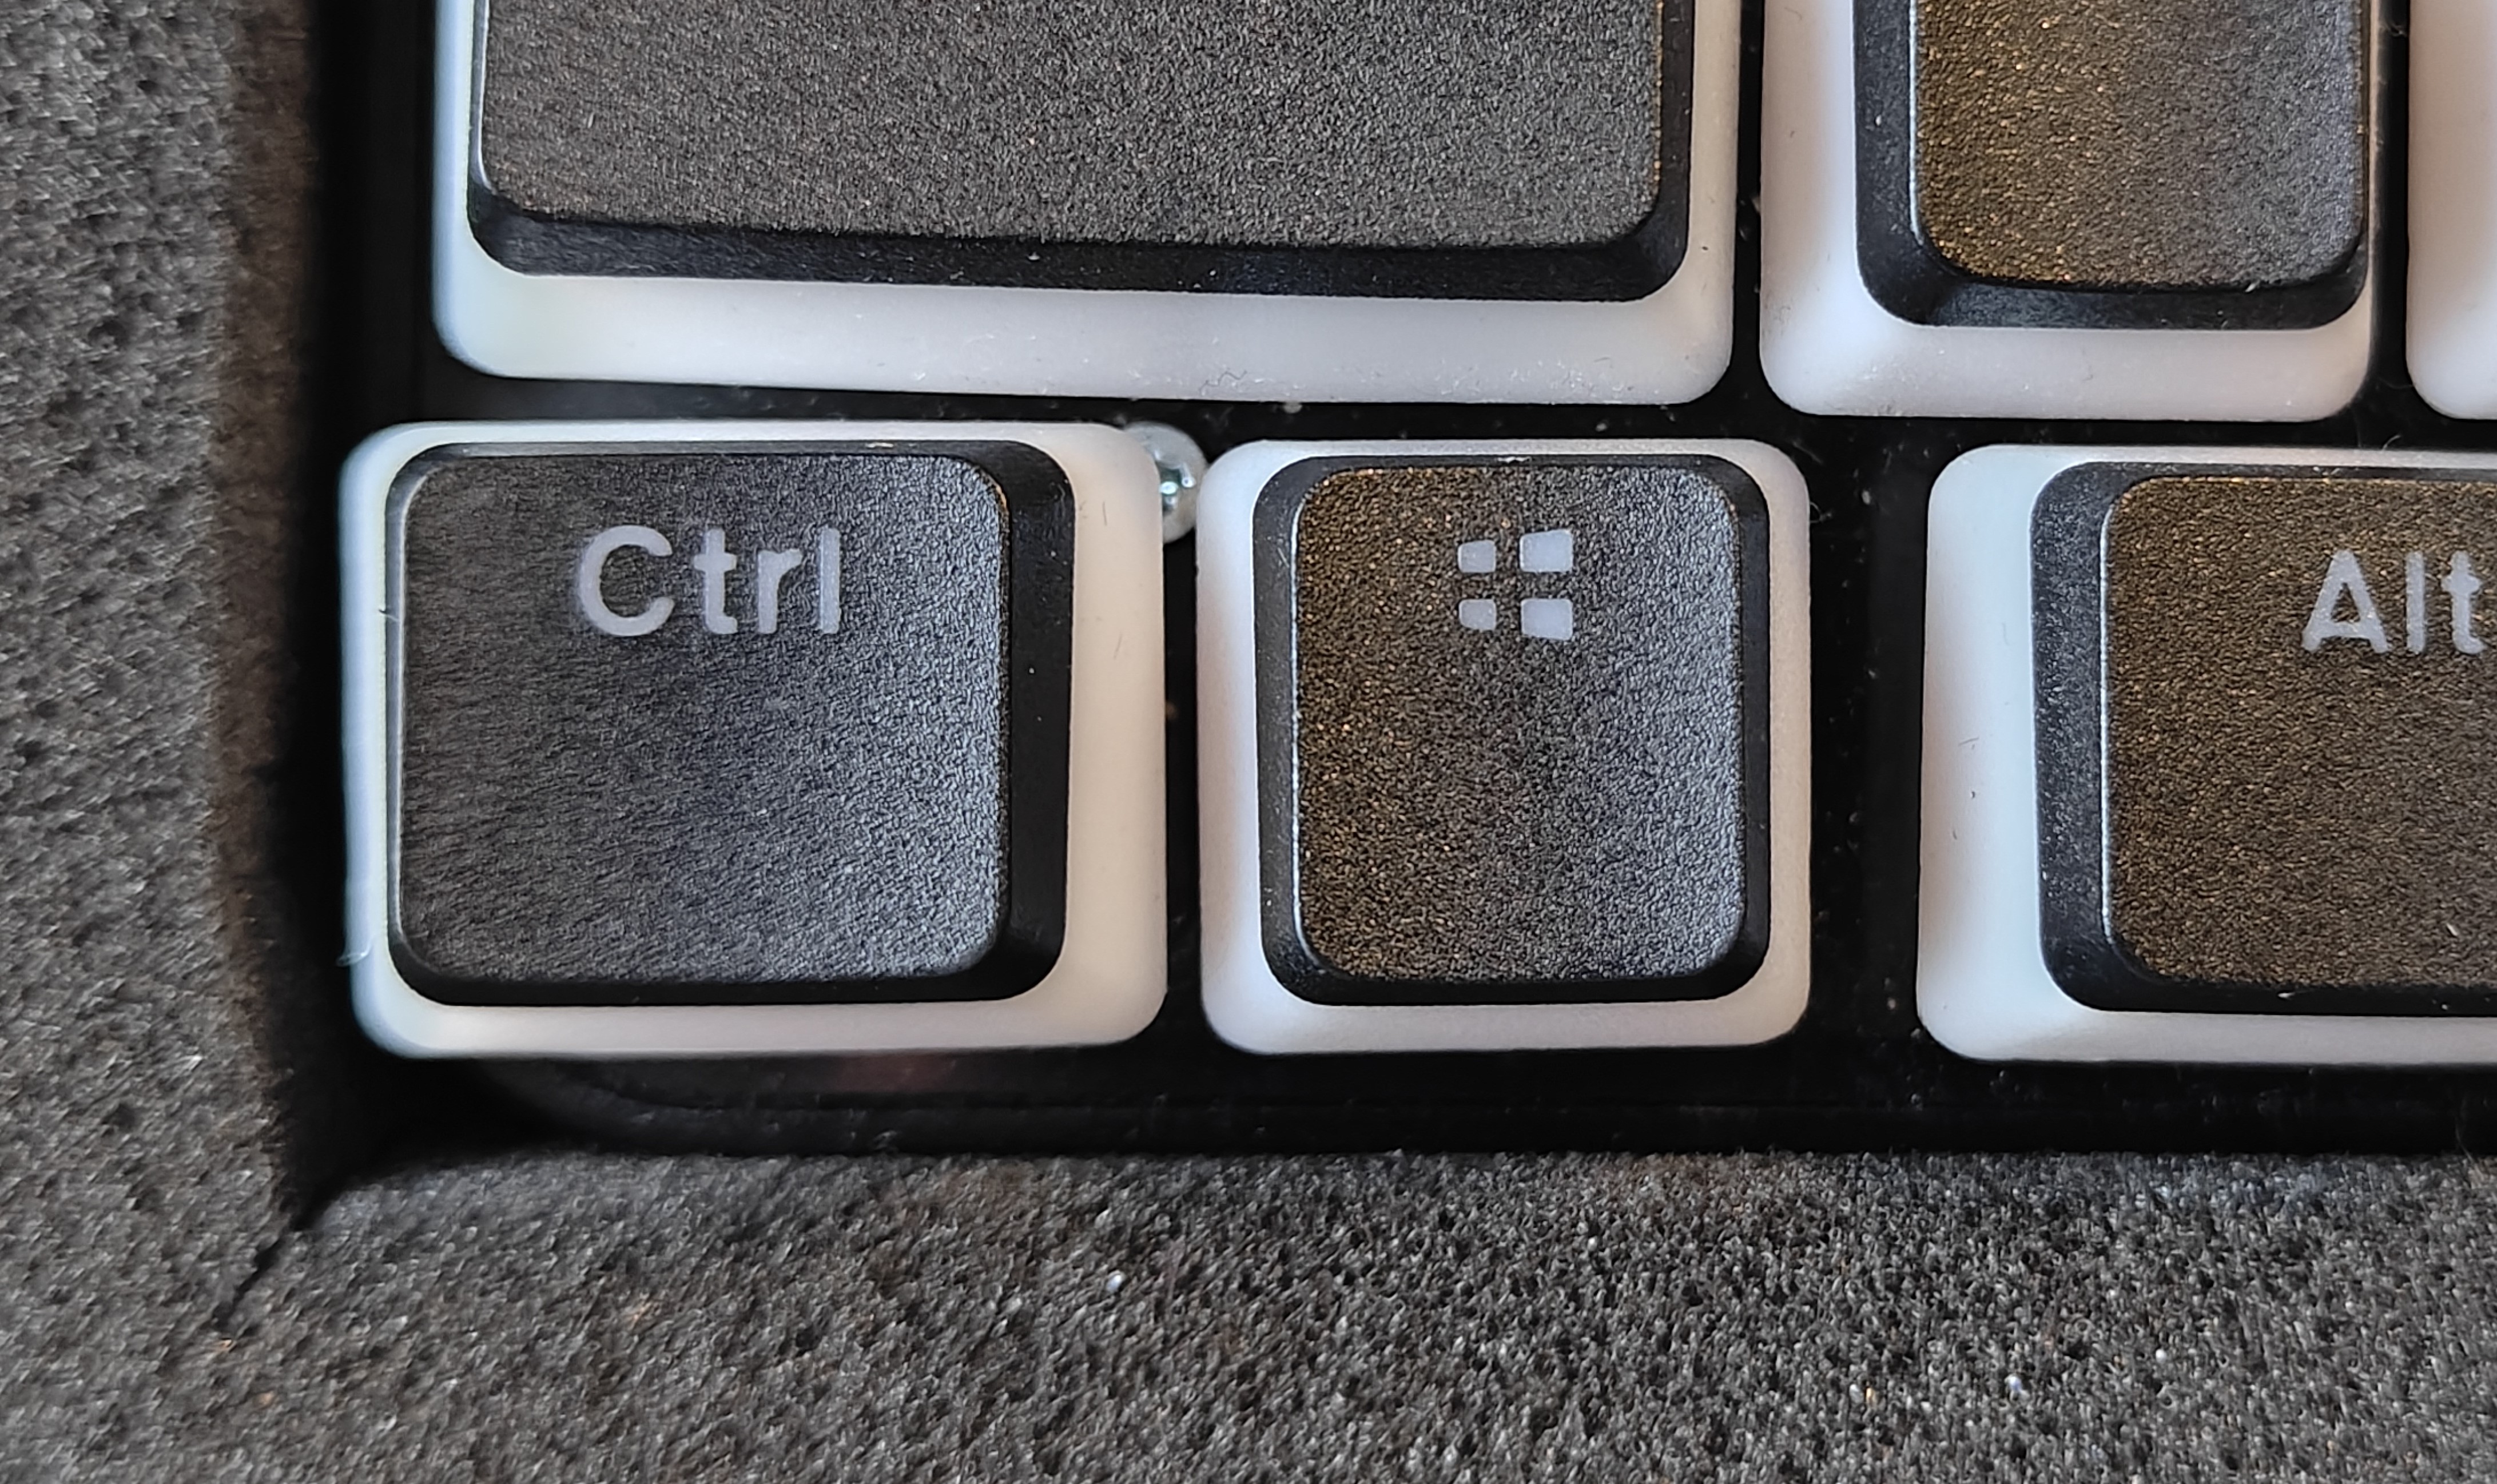
Users who are used to traditional keyboard layouts will want to take advantage of this setting so they don’t have to relearn the new position of the keys.
Mouse
CCOS allows you to use your device as a mouse including functions like scrolling and cursor movement. This section will cover settings that relate to the mouse function on CCOS devices.
Poll Rate
Path: GTM > Mouse > Poll Rate
The polling rate (poll rate) is the frequency at which data from the CharaChorder’s mouse functionality is sent to the device it’s connected to. In other words, how often it updates the cursor’s position to the computer. This is typically expressed in Hz (Hertz), with the average gaming mouse reporting data at 1000 Hz, which means 1000 times every second.
However, CCOS uses ms (milliseconds) which is directly inverse to Hz. 1 ms is equal to 1000 Hz, 2 ms is equal to 500 Hz, and 1000 ms is equal to 1 Hz.
An Explanation of Hz to ms conversion
In the context of frequency and period (time duration), the relationship is inverse. Frequency is the number of cycles per second, measured in Hz. The period is the time it takes for one cycle to complete, measured in seconds (s). The formula is:
Frequency (Hz) = 1/Period (s), where s = 1000 msIf you convert the period to milliseconds (ms), the relationship remains inverse. For instance, if you have a frequency of 1000 Hz, the period is 1 ms (because 1 second = 1000 milliseconds). As the frequency increases, the period (measured in ms) decreases.
You can find the default settings for each device in the table below:
Device |
Default |
Min. Value |
Max. Value |
Increments |
|---|---|---|---|---|
CharaChorder One |
20 ms |
0 ms |
100 ms |
1 ms (Hz) |
CharaChorder Lite |
20 ms |
0 ms |
100 ms |
1 ms (Hz) |
CharaChorder X |
20 ms |
0 ms |
100 ms |
1 ms (Hz) |
This setting is used in conjunction with the slow speed and fast speed settings. Both, the slow speed and the fast speed rely on the poll rate.
Slow Speed
Path: GTM > Mouse > Slow Speed
Slow speed is activated when you use only one of the mouse keys in a single direction (as opposed to using 2 keys in the same direction). Increasing this setting will make your CCOS pointer move faster.
This setting is used in conjunction with poll rate. See the explanation below.
Explanation of CCOS mouse speeds
The mouse speed refers to the speed of the cursor on the CharaChorder’s mouse functionality. The cursor will move at the number of pixels (px) indicated by this setting multiplied by the number of Hz indicated by the polling rate.
In other words, if your speed is set to 2 px, and your poll rate is set to 20 ms (~50 Hz), your CharaChorder’s cursor will move at 100 pixels per second (px/s). The equation comes out to:
Speed (px) x poll rate (Hz) = Number of pixels that the cursor will move per second
You can find the default settings for each device in the table below:
Device |
Default |
Min. Value |
Max. Value |
Increments |
|---|---|---|---|---|
CharaChorder One |
5 px |
0 px |
250 px |
1 px |
CharaChorder Lite |
16 px |
0 px |
250 px |
1 px |
CharaChorder X |
16 px |
0 px |
250 px |
1 px |
Fast Speed
Path: GTM > Mouse > Fast Speed
Fast speed is activated when you use two mouse keys in a single direction (as opposed to using only one key in the same direction). Increasing this setting will make your CCOS pointer move faster.
This setting is used in conjunction with poll rate. See the explanation below.
Explanation of CCOS mouse speeds
The mouse speed refers to the speed of the cursor on the CharaChorder’s mouse functionality. The cursor will move at the number of pixels (px) indicated by this setting multiplied by the number of Hz indicated by the polling rate.
In other words, if your speed is set to 2 px, and your poll rate is set to 20 ms (~50 Hz), your CharaChorder’s cursor will move at 100 pixels per second (px/s). The equation comes out to:
Speed (px) x poll rate (Hz) = Number of pixels that the cursor will move per second
You can find the default settings for each device in the table below:
Device |
Default |
Min. Value |
Max. Value |
Increments |
|---|---|---|---|---|
CharaChorder One |
25 px |
0 px |
250 px |
1 px |
CharaChorder Lite |
32 px |
0 px |
250 px |
1 px |
CharaChorder X |
32 px |
0 px |
250 px |
1 px |
Scroll Speed
Path: GTM > Mouse > Scroll Speed
Scroll speed refers to the speed at which your CCOS scroll will scroll.
Increasing this setting will make your CCOS scrolling scroll faster. This setting is used in conjunction with poll rate. See the explanation below.
Explanation of CCOS mouse speeds
The scroll speed refers to the speed at which the CharaChorder scrolls at. The CCOS will scroll at the number of pixels (px) indicated by this setting multiplied by the number of Hz indicated by the polling rate.
In other words, if your speed is set to 2 px, and your poll rate is set to 20 ms (~50 Hz), your CharaChorder’s scroll will move at 100 pixels per second (px/s). The equation comes out to:
Speed (px) x poll rate (Hz) = Number of pixels that the cursor will move per second
You can find the default settings for each device in the table below:
Device |
Default |
Min. Value |
Max. Value |
Increments |
|---|---|---|---|---|
CharaChorder One |
2 px |
0 px |
25 px |
1 px |
CharaChorder Lite |
2 px |
0 px |
25 px |
1 px |
CharaChorder X |
2 px |
0 px |
25 px |
1 px |
Active Mode
Path: GTM > Mouse > Active Mode
Active mode nudges your mouse cursor one pixel every minute or so (not a specific timing). This setting can be used to keep your computer from going to sleep. You might turn this setting off if you notice desktop apps are preventing you from getting mobile notifications (for example on Discord or Microsoft Teams).
Chording
CCOS devices feature the ability to chord. The following settings affect the device’s chording abilities.
Character Only Mode
Path: GTM > Chording > Character Only Mode
This setting is a toggle that disables chording capabilities on CCOS devices. It is off by default and can be enabled in case we don’t want any chording at all. This setting can be useful in cases where we don’t want to accidentally trigger chords unintentionally, such as when gaming.
If your CCOS device suddenly loses its chording ability, it’s a good idea to check if this setting is toggled off.
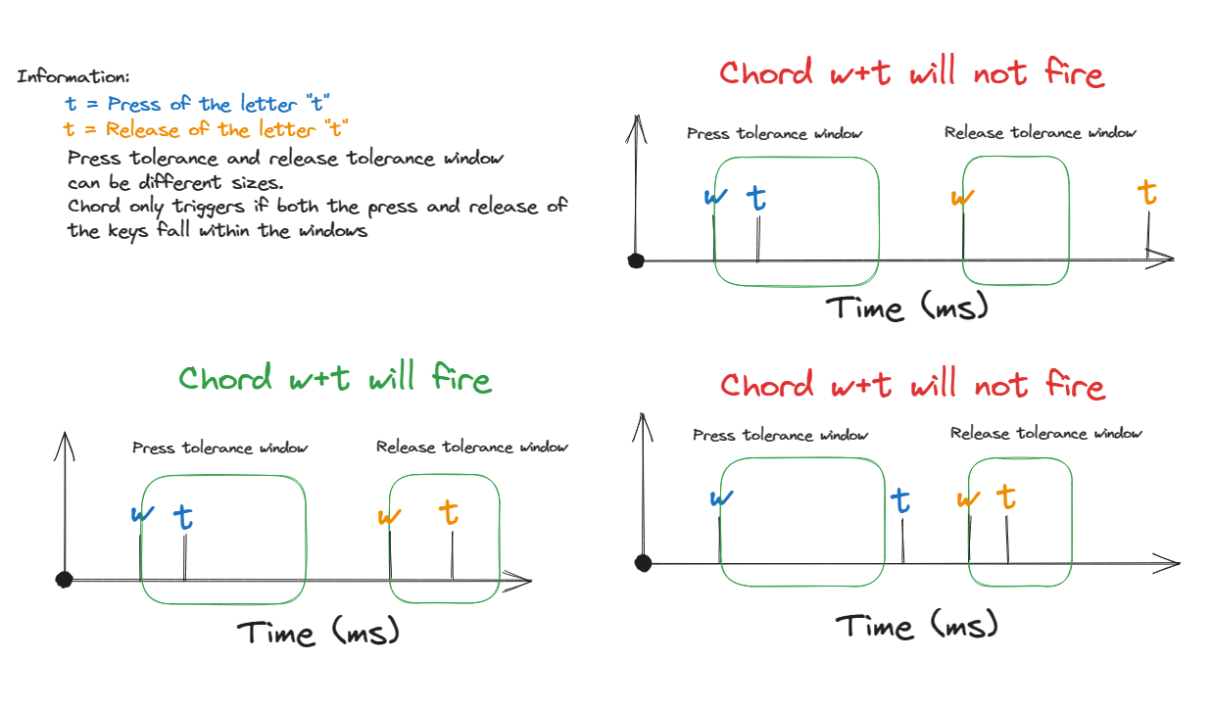
Press Tolerance
Path: GTM > Chording > Press Tolerance
The press tolerance refers to a window of time in which a chord can be performed, measured in milliseconds (ms). This timer is initiated upon the first “press” action of the first key in a chord and ends once the last key of the chord is pressed, or until the press tolerance runs out, whichever comes first.
Put simply, increasing the press tolerance (usually, done in conjunction with increasing the release tolerance) makes it easier to perform chords.
Note
The press tolerance scales (increases) according to the number of keys in a chord. The window of time will be bigger with a 6-key chord than with a 3-key chord. This means that, though you might set the tolerance to a specific timing, it will actually be longer than that depending on how many keys are in your chord.
You can increase this setting in order to make that window of time longer and make chording easier.
The downside to having higher values is that you may accidentally trigger chords during normal character entry. Therefore, if you are noticing chords fire unintentionally, it is a good idea to lower this setting along with the release tolerance.
You can find the default settings for each device in the table below:
Device |
Default |
Min. Value |
Max. Value |
Increments |
|---|---|---|---|---|
CharaChorder One |
25 ms |
0 ms |
150 ms |
1 ms |
CharaChorder Lite |
25 ms |
0 ms |
150 ms |
1 ms |
CharaChorder X |
25 ms |
0 ms |
150 ms |
1 ms |
Release Tolerance
Path: GTM > Chording > Release Tolerance
The release tolerance refers to a window of time in which a chord can be performed, measured in milliseconds (ms). This timer is initiated upon the first “release” action of any key in a chord and ends once the chord is fully performed, or until the release tolerance runs out, whichever comes first.
Put simply, increasing the release tolerance (usually, done in conjunction with increasing the press tolerance) makes it easier to perform chords.
Note
The press tolerance scales (increases) according to the number of keys in a chord. The window of time will be bigger with a 6-key chord than with a 3-key chord. This means that, though you might set the tolerance to a specific timing, it will actually be longer than that depending on how many keys are in your chord.
You can increase this setting in order to make that window of time longer and make chording easier.
The downside to having higher values is that you may accidentally trigger chords during normal character entry. Therefore, if you are noticing chords fire unintentionally, it is a good idea to lower this setting along with the press tolerance.
You can find the default settings for each device in the table below:
Device |
Default |
Min. Value |
Max. Value |
Increments |
|---|---|---|---|---|
CharaChorder One |
18 ms |
0 ms |
150 ms |
1 ms |
CharaChorder Lite |
18 ms |
0 ms |
150 ms |
1 ms |
CharaChorder X |
18 ms |
0 ms |
150 ms |
1 ms |
Timeout
Path: GTM > Chording > Timeout
This setting will change how long CCOS counts time in order to replace characters that precede a chord.
CCOS devices have a running timer that starts after every single character that is entered in traditional chentry (character entry, i.e. one letter at a time). This timer controls whether or not the next chord that you perform deletes the preceding characters.
This feature allows users to misfire chords, yet be able to correct them by quickly performing the chord correctly, without having to backspace manually to erase the misfired chord. The result is that the timeout will automatically backspace all of the preceding characters (up to the last breaking character) and replace them with the intended chord.
You can set this setting to be as low as 0.0 seconds (s) or as high as 25.0 seconds (s), being able to adapt it to your individual chording style.
Warning
Setting this setting to 0.0 s will result in chords not working at all. They will fire, but they will not automatically erase the chord inputs.
You can find the default settings for each device in the table below:
Device |
Default |
Min. Value |
Max. Value |
Increments |
|---|---|---|---|---|
CharaChorder One |
4 s |
0 s |
25 s |
0.1 s |
CharaChorder Lite |
4 s |
0 s |
25 s |
0.1 s |
CharaChorder X |
4 s |
0 s |
25 s |
0.1 s |
Spurring
Path: GTM > Chording > Spurring
A ‘chording only’ mode which tells your device to output chords on a press event rather than a press & release and release event. When in spurring mode, you can press the keys of a chord one at a time with a much longer waiting period, which makes it a useful mode for those who want to practice chording without worrying about proper timing.
Spurring mode also enables you to jump from one chord to another without releasing everything. It can provide significant speed gains when chording, but also takes away the flexibility of character entry. Spurring mode can truly maximize speed when chording if a user has chords for all of the words they want to use.
Spurring On/Off
Path: GTM > Chording > Character Only Mode > Spurring Timeout
This setting will toggle spurring mode ON or OFF.
Spurring Timeout
Path: GTM > Chording > Spurring > Spurring Timeout
The time of inactivity to default back to fluid chorded/character entry mode (aka spurring off).
You can find the default settings for each device in the table below:
Device |
Default |
Min. Value |
Max. Value |
Increments |
|---|---|---|---|---|
CharaChorder One |
240 s |
0 s |
250 s |
1 s |
CharaChorder Lite |
240 s |
0 s |
250 s |
1 s |
CharaChorder X |
240 s |
0 s |
250 s |
1 s |
Arpeggiate
Path: GTM > Chording > Arpeggiate
Arpeggiate actions are timed actions that can modify a chord after the chord is performed. A quick example of this is the use of chord modifiers after you perform the chord. You can read that section for information on how the chord modifiers work.
With arpeggiates enabled, you can chord the word run and then, within the arpeggiate timeout window, press the past tense modifier for the word to be “modified” into its past tense variant; in english, ran.
Arpeggiate On/Off
Path: GTM > Chording > Arpeggiate > Arpeggiate On/Off
This setting will let you toggle the arpeggiate capability ON or OFF.
Some users dislike arpeggiates as, in really fast typing, it may cause unwanted modifications.
Arpeggiate Timeout
Path: GTM > Chording > Arpeggiate > Arpeggiate Timeout
The arpeggiate timeout is a window of time after a chord is performed during which CCOS will expect arpeggiates to be performed. After this timer runs out, CCOS will NO LONGER modify the preceding chord.
A common issue that users may run into while having arpeggiates enabled is the shift key modifying the preceding chord instead of the next key. For this reason, some users lower the arpeggiate timeout to a really low amount of time in order to reduce the possibility of this happening unintentionally.
Display
Under this section, you’ll find settings that deal with how your CharaChorder displays certain things.
Version
Path: GTM > Display > Version
Though this is not a setting that can be modified, it’s a useful piece of text that will show you the CCOS version that your CharaChorder is currently on. You can use this to quickly check what version you are running on the fly, anywhere that you can read GTM
Realtime Feedback
Path: GTM > Display > Realtime Feedback
This setting toggles realtime feedback ON or OFF.
Realtime feedback refers to the helpful text like SPURRING_ON, SPURRING_OFF etc, that lets the user know if a certain mode has been activated or deactivated on the CharaChorder device. Since there is no other visual way to know if the chord used to enable or disable certain settings, it is helpful to have these texts pop up as confirmation.
Note
The realtime feedback setting controls the startup setting. If realtime feedback is OFF, then startup will be OFF, regardless of that setting’s individual toggle.
Startup
Path: GTM > Display > Startup
Having this setting set to “ON” will result in your device displaying the text “CCOS is ready.” after you have plugged your device into a computer. The startup text will be displayed wherever your cursor was last typing, if that window is active. This setting is useful so that you know when your CharaChorder device is ready to be used, since startup may take a couple of seconds.
However, if you have editable text highlighted when you connect your CharaChorder, this setting will replace that highlighted text with the startup message. Additionally, if there is not a selected window where text may be typed, the key codes that the CharaChorder sends to your computer in order to display the startup message may be interpreted by your computer as actions and may result in unwanted behavior.
If you would rather not have this message display every time that you connect your device, then you can toggle this setting OFF.
Warning
The Startup setting is dependent on the realtime feedback setting. If that setting is set to OFF, then Startup won’t display, even if Startup is set to ON.
LEDs (CharaChorder Lite only)
Path: GTM > Display > LEDs
The CharaChorder Lite comes with RGB LEDs that light up the keys of the keyboard from below with a static light. This section contains settings pertaining to those LED lights.
Note
LED settings only exist in the GTM for CharaChorder Lite devices, not on any other CharaChorder devices.
On/Off
Path: GTM > Display > LEDs > On/Off
Quickly toggle the LEDs on or off with this setting.
Color
Path: GTM > Display > LEDs > Color
Use this setting to change the color of the LED backlights on your CharaChorder Lite. In the GTM, there are 11 colors to choose from which you can see in the table below:
Letter |
Color |
|---|---|
W |
White |
R |
Red |
O |
Orange |
Y |
Yellow |
L |
Lime |
G |
Green |
C |
Cyan |
B |
Blue |
V |
Violet |
P |
Pink |
M |
Multicolor |
Please note that, as of December of 2023, the LEDs are NOT individually addressable. The color setting changes the color of ALL LEDs at the same time.
Brightness
Path: GTM > Display > LEDs > Brightness
This setting lets you adjust the brightness of the LED backlights on your CharaChorder Lite. You can choose any number between 0 and 50, where 0 means that your LEDs are completely off and 50 means that your LEDs are at max brightness.
Please note that LEDs are NOT individually addressable as of December of 2023. The brightness setting adjusts the brightness for ALL LEDs equally.
Note
If you are using a low power usb bank or port, having a high LED brightness may lead to issues with your CharaChorder Lite’s power. If you have issues on your device that seem to keep your CharaChorder Lite from properly powering on or staying on, it may be a good idea to lower this setting.
You can find the default settings for the CharaChorder Lite in the table below:
Device |
Default |
Min. Value |
Max. Value |
Increments |
|---|---|---|---|---|
CharaChorder Lite |
5 |
0 |
50 |
1 |
Resources
Path: GTM > Resources
This section contains links which may be helpful to you. These links include:
Letter |
Item |
Description |
|---|---|---|
A |
About |
|
G |
Get started |
|
D |
Discord |
Invites you to the CharaChorder Discord |
T |
Training |
Opens https://iq-eq.io, our free tool to help people learn to type at the speed of thought |
M |
Message Riley |
Copies Riley Keen (CharaChorder CEO)’s email address to your clipboard |
L |
Learn chords |
Opens The Starter Chord List |
S |
Check system updates |
Opens the CCOS version updates page |