Device Manager
The CharaChorder Device Manager is the one-stop-shop for users with a CCOS-powered device. It boasts high quality graphics, animations and a simple user interface. On the device manager, you can change your device’s layout, manage your chord library, and adjust your settings.
In this section, we’ll talk about the device manager and how you can navigate around it to configure your device to your liking. First, we’ll discuss the website and where to find useful buttons on it, then we’ll cover the main pages on the device manager and how to use them, and, lastly, we’ll touch upon some other features and useful tools on the manager.
Feel free to use the links below to skip to whatever section you would like to read or scroll to start with the first section.
Connecting to the Device Manager
You can follow the steps below to connect to the device manager for the first time.
Note
If you have previously selected Auto-connect within that browser for the same device, you may not need to repeat these steps every time that you go to the device manager page.
On a chromium based browser, such as Chrome or Edge, go to the CharaChorder Device Manager
Click “Connect” at the bottom center of the screen
When the popup box comes up that reads “charachorder.io wants to connect to a serial port”, choose your CharaChorder device, then click the “Connect” button
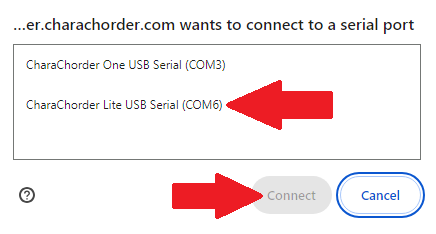
If these steps were performed correctly, you can see the connected device name in the bottom bar where “Connect” was previously.
Linux Serial Port Access
Warning
For Linux based users: serial port access is often restricted to specific user groups for security. To enable serial port access in a browser like Chromium, you’ll need to add your user to the appropriate group based on your Linux distribution. Follow the steps below to grant access.
For Ubuntu, Debian, Fedora, Linux Mint, openSUSE, CentOS, Elementary OS, Zorin OS:
sudo usermod -aG dialout $USER
For Arch Linux, Manjaro:
sudo usermod -aG uucp $USER
Replace $USER with your username or use $USER to automatically reference the current user.
Log out and log back in for the changes to take effect.
If the above commands don’t work, check the group ownership of the serial device (e.g., /dev/ttyUSB0) using:
ls -l /dev/ttyUSB0
This command will display the device’s group. Replace /dev/ttyUSB0 with the appropriate device file for your system.
After identifying the group (e.g., dialout, uucp, or another), add your user to that group using:
sudo usermod -aG <group_name> $USER
Replace <group_name> with the name of the group displayed in the previous step.
Log out and log back in to apply the changes. Your user will now have the necessary permissions to access the serial port.
Device Manager Website
The device manager comes with a navigation menu on the left hand side of the screen. Otherwise, regardless of what page you are on, there are a few helpful buttons you should know about.
Connect / Device name
The bottom center of the screen is where you connect to your device and see which you are connected to, as well as other info such as the site version and your device’s CCOS version.
Undo and Redo

Near the top left corner, the device manager has handy undo and redo buttons which do exactly what their names describe. If you’re making changes to your layout, your chords, or your layout, you can step back, one change at a time, all the way back to the very first change that you made during that session. Once you’re stepped back, you can step forward to redo the change(s) that was/were undone.
Color Scheme
On the bottom right of the device manager, you’ll see a circle with a solid color. Hovering over this circle will reveal the label “color scheme.” You can click this circle to change the color scheme of the device manager. In the color scheme menu, you can choose your preferred color using a color pallette, an RGB color system, or by clicking the dropper icon to choose a color on your screen.

Light and Dark Mode
Also in the bottom right-hand corner, you’ll find a sun or moon icon where you can toggle between light and dark mode. This toggle can help those who would rather a brighter screen to see better or a darker screen to reduce eye strain.
Save Button

If you make changes in the library, the layout editor or the device menu, a colored “save” button will pop up on your screen, towards the top left corner.
Note
Your changes will not take effect until you click the save button.
Device
The Device Tab is the place where you can configure most settings of your connected CCOS device and create backups. Read on to see the different settings you can change. You can find more detailed explanations in the GTM section.
Backup Section
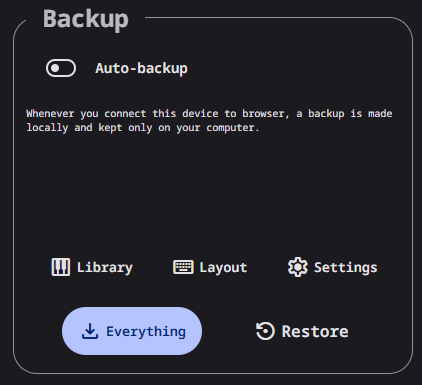
The Backup Menu is home to your backups as well as the place to go to in order to restore your device by using a backup file. There are different kinds of backups that you can create and we’ll cover all of them in the next section.
If you toggle the “Auto-backup” on, then the website will store a copy of your backup on your browser. The backup is stored in the browser that you’re using at that time and remains on your computer, so only YOU can access it.
On the Device Manager, you can create backups of your chords, your layout, and even your settings. Follow the steps below to create a backup and to restore saved backups to your CCOS device.
Creating a Backup
Note
In order to follow these steps, you must already have your device connected to the device manager.
Open the Device tab and locate the “Backup” menu in the top left.
Choose an “individual backup” to download to your computer, or select “download everything” to download a single file with all three parts. The file(s) will be downloaded in .json format.
Note
You can make individual backups of just your chords, just your layout, or just your settings. The “download everything” option will download all three of these in a single file instead of three separate files.
If prompted, select a location to save to on your computer and rename the file to your liking.
Congratulations! Now you have created a backup.
Restoring from a Backup
Additionally, you can restore your chords, your layout, and your settings on the Device Manager. Follow the steps below to do so.
Note
In order to follow these steps, you must already have your device connected to the device manager.
Open the Device tab and locate the “Backup” menu in the top left.
Click on “Restore”.
Select a file to use to restore from. This file should be in .json format.
Note
Files that you can restore from will have been created ahead of time by following the steps to create a backup.
If there are changes, the save button will appear on the top left. Note the changes in the appropriate tab. If you restored chords, check the chords tab, if you restored a layout, check the layout tab, and if you restored settings, check the settings tab.
Note
The restore feature does NOT erase data from your device. If there is a conflict (such as a changed setting, a different key in the layout, or a chord that has a different output), that will be overwritten by the restore file. Settings and layout backups ALWAYS overwrite everything.
Once you see the changes that the restore file made, you can click save to apply the changes.
Device Section
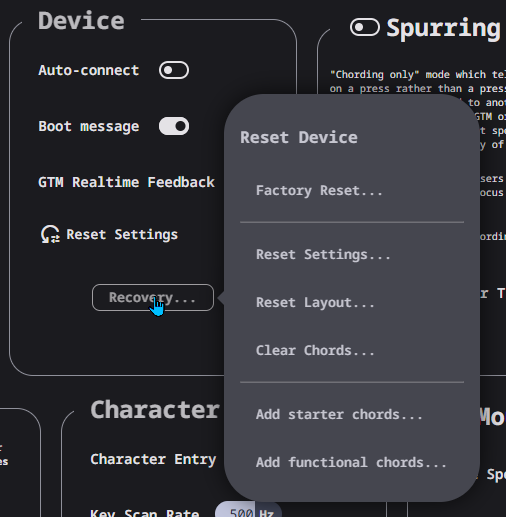
Here you’ll find a helpful toggle labeled “Auto-connect”. By enabling this, the device manager will automatically connect your paired device through a serial connection every time that you open it. In doing so, it will also read your chords to detect changes that you may have made since the last time you connected it. If you have this enabled, you won’t have to manually connect your device to the manager ever again!
The boot message and realtime feedback can be enabled or disabled in this box. Additionally, you can reset some parts of your device files such as your chords, your layout, and even return to factory settings.
Spurring
What is Spurring?
Spurring is a ‘chording only’ mode which tells your device to output chords on a press event rather than a press and release event. When in spurring mode, you can press the keys of a chord one at a time with a much longer waiting period, which makes it a useful mode for those who want to practice chording without worrying about proper timing.
Spurring mode also enables you to jump from one chord to another without releasing everything. It can provide significant speed gains when chording, but also takes away the flexibility of character entry. Spurring mode can truly maximize speed when chording if a user has chords for all of the words they want to use.
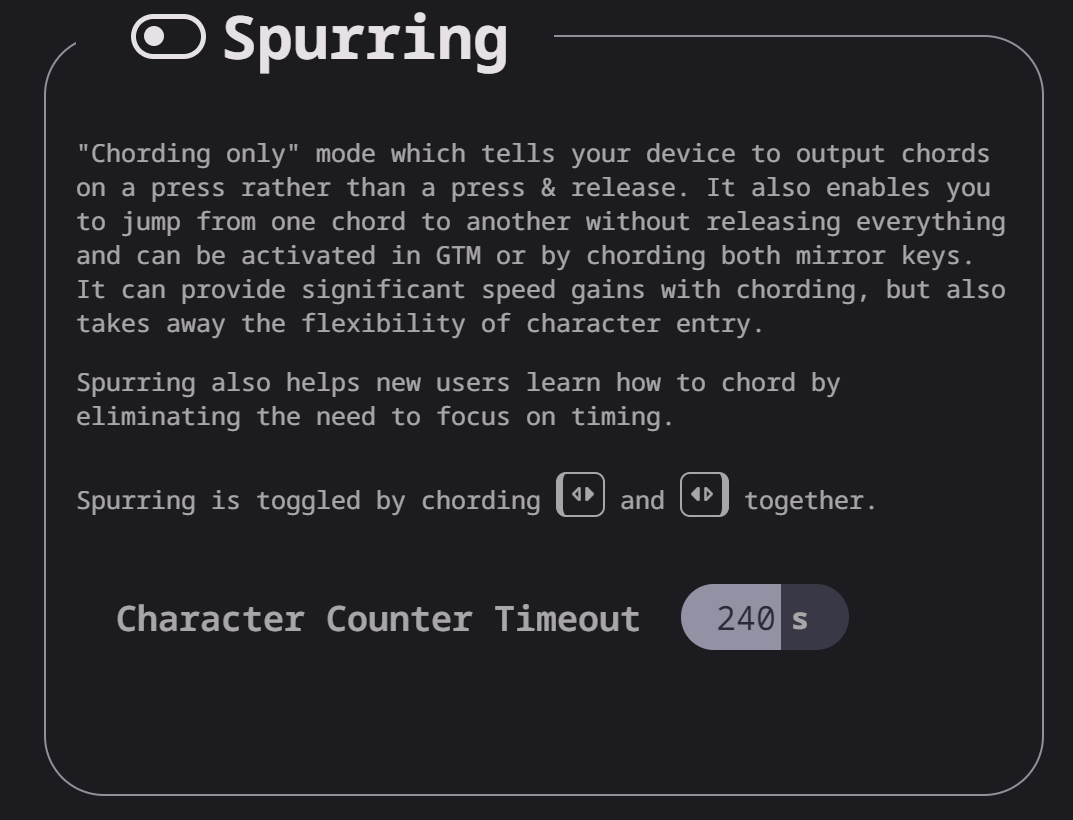
In this box, you can enable or disable spurring mode as well as increase or decrease the spurring timeout setting.
Arpeggiates
What are arpeggiates?
Arpeggiate actions are timed actions that can modify a chord after the chord is performed. A quick example of this is the use of chord modifiers after you perform the chord. You can read that section for information on how the chord modifiers work.
With arpeggiates enabled, you can chord the word run and then, within the arpeggiate timeout window, press the past tense modifier for the word to be “modified” into its past tense variant; in english, ran.
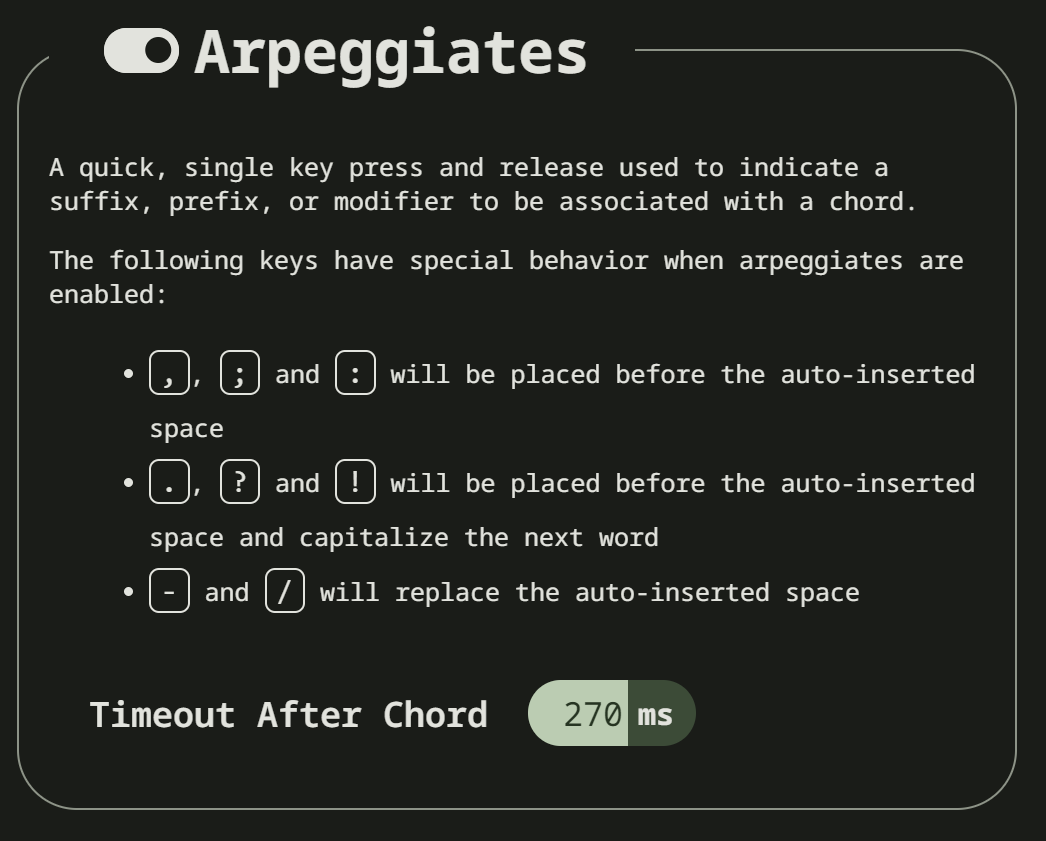
In this box, ou can enable or disable arpeggiates as well as increase or decrease the arpeggiate timeout setting.
Chord Modifiers
What are chord modifiers?
Chord modifiers are actions that change a chord when chorded at the same time as the chord input, or when pressed immediately after (arpeggiately) the chord, provided that arpeggiates are enabled.
As of February of 2024, only the CharaChorder One and CharaChorder Lite support the use of chord modifiers. Additionally, as of that same time, chord modifiers only work in English.
Note
Chord modifiers are NOT the same as keyboard modifiers. Keyboard modifiers affect keys pressed on a keyboard. Those keys include CTRL, ALT, and FN. Chord modifiers affect chords.

In this box, you can read a brief explanation of chord modifiers and how to access them.
Capitalization
The capitalization modifier modifies any chord so that the first letter is capitalized on output. This modifier can be performed together with a chord or arpeggiately.
The capitalization modifier is located on the SHIFT key. In the layout editor, this key can be either “Shift Keyboard Modifier (Left)” or “Shift Keyboard Modifier (Right)”.
Note
If you have CAPS LOCK active, all letters in a chord will be capitalized except the first one when using this modifier.
Present Tense
The present tense modifier modifies supported chords so that they turn into their present tense variants. The word “run” would be modified into “running” and the word “work” would be turned into “working”. This modifier can be performed together with a chord or arpeggiately.
The present tense modifier has different locations depending on your device. On the CharaChorder One, this modifier is linked to the “AMBIDEXTROUS THROWOVER (LEFT)” key. On the CharaChorder Lite, it’s linked to the “NUMERIC LAYER (LEFT)” key.
Pluralizer
The pluralizer modifier makes supported chords plural. It will add an “s” or “es” to the end of supported chords. “Box” will turn into “boxes” and “dog” will become “dogs”. This modifier can be performed together with a chord or arpeggiately.
The pluralizer modifier has different locations depending on your device. On the CharaChorder One, it’s linked to the “AMBIDEXTROUS THROWOVER (RIGHT)” key. On the CharaChorder Lite, it’s linked to the “RIGHT SPACEBAR” key, not to be confused with the “SPACE” key.
Past Tense
The past tense modifier modifies supported chords so that they turn into their past tense variants. The word “run” would be modified into “ran”. The word “work” would be turned into “worked”. This modifier can be performed together with a chord or arpeggiately.
The past tense modifier has different locations depending on your device. On the CharaChorder One, it’s linked to the “NUMERIC LAYER (LEFT)” key. On the CharaChorder Lite, it’s linked to the “SPACE” key, not to be confused with the “RIGHT SPACEBAR” key.
Comparative
The comparative modifier modifies supported chords so that they turn into their comparative variant. “Big” becomes “bigger” and “small” turns into “smaller”. This modifier can be performed together with a chord or arpeggiately.
The comparative modifier is located on the “NUMERIC LAYER (RIGHT)” key on both the CharaChorder One and the CharaChorder Lite.
Character Entry
What is Character Entry?
Character entry, known to the CharaChorder community as “chentry,” refers to typing one character at time.
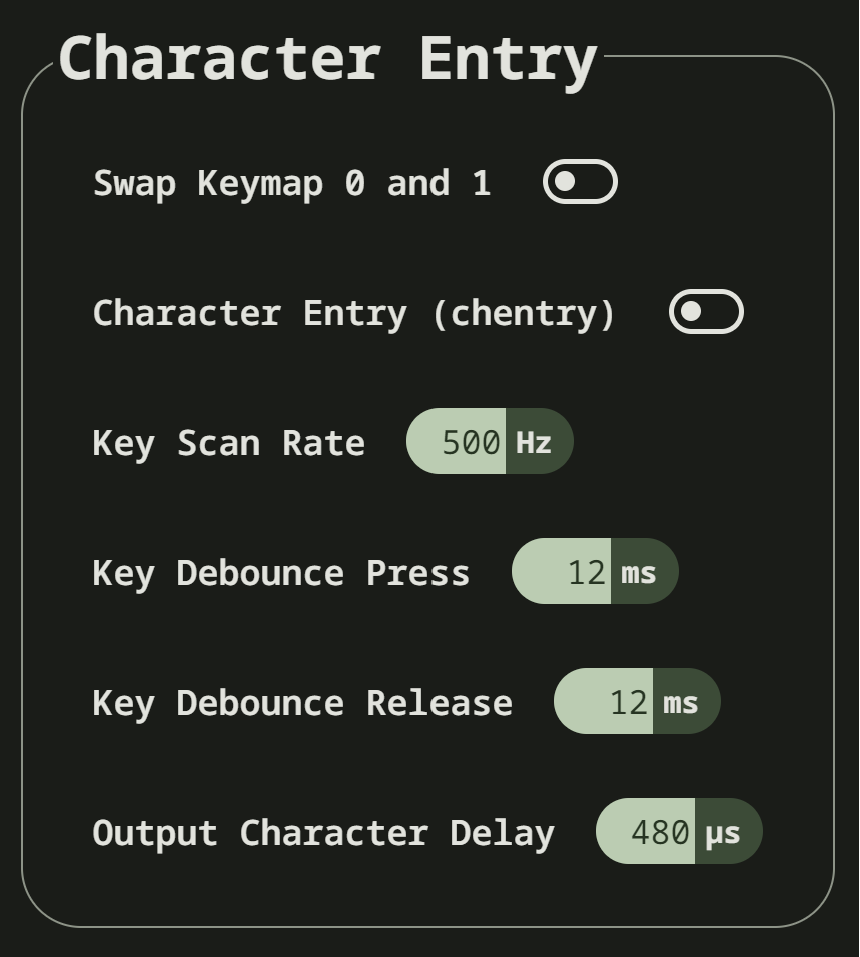
In this box, you can change a few settings that relate to using your device for character entry.
Swap Keymap 0 and 1
This setting will swap the behavior of the two keys on the bottom-left of the CharaChorder Lite.
Traditional QWERTY keyboards keep the CTRL key at the bottom left corner of the keyboard with the GUI key (Command key on Mac, Windows key on Windows, Super key on Linux, etc.) to the right of the CTRL key. The CharaChorder Lite has these two keys swapped by default, which some users find odd and difficult to adjust to. A brand new CharaChorder Lite will have the GUI key at the bottom-left corner with the CTRL key to the right of the GUI key.
With this setting, you can effectively swap the two keys’ location at the level of the CCOS so that CTRL is at the bottom-left corner.
Character Entry (chentry)
This setting is a toggle that disables chording capabilities on CCOS devices. It is off by default and can be enabled in case we don’t want any chording at all. This setting can be useful in cases where we don’t want to accidentally trigger chords unintentionally, such as when gaming.
If your CCOS device suddenly loses its chording ability, it’s a good idea to check if this setting is toggled off.
Key Scan Rate
The scan rate, sometimes known as the “Key scan duration,” refers to the frequency at which the device checks the state of the input keys. For reference, 5 ms corresponds to 200 Hz, which means that CCOS checks the position of the keys once every 5 milliseconds, which equals 200 times in a second. Having a lower number is usually better as it makes CCOS more responsive, though the difference at low numbers is usually negligible. In the GTM, this setting is adjustable in millisecond (ms) units.
Key Debounce Press
The debounce press setting refers to the time frame (measured in milliseconds) in which CCOS will filter out duplicate key activations on a press event. In other words, any duplicate activations within the given time frame will only be counted as one.
We should adjust this setting if we are having unintentional duplicate characters while typing. Increasing this value will lower the probability that unwanted duplicate characters will appear because it tells CCOS to wait longer before typing an additional character that’s assigned to the same switch-direction. However, having this setting set too high might also cause issues with CCOS not reading intentional double-presses, so it’s recommended to try different numbers in small increments. This setting should be used in connection with the debounce release setting.
Key Debounce Release
The debounce release setting refers to the time frame (measured in milliseconds) in which CCOS will filter out duplicate key activations on a release event. In other words, any duplicate activations within the given time frame will only be counted as one.
We should adjust this setting if we are having unintentional duplicate characters while typing. Increasing this value will lower the probability that unwanted duplicate characters will appear because it tells CCOS to wait longer before typing an additional character that’s assigned to the same switch-direction. However, having this setting set too high might also cause issues with CCOS not reading intentional double-presses, so it’s recommended to try different numbers in small increments. This setting should be used in connection with the debounce press setting.
Output Character Delay
This setting adds a small delay to keystroke inputs. It is measured in microseconds (μs) and is very small by default.
You should increase this value if your computer is not accepting all of the characters output by your device, such as when using the GTM. If you are having this issue, your GTM would look weird, with missing chunks or characters.
If you have a faster computer, then you can lower this setting to make chording and the GTM feel snappier and more responsive.
Mouse
Mouse???
CCOS has mouse functionality. This means that your CharaChorder, or CCOS-powered keyboard, has the ability to control your computer’s mouse. These settings affect the mouse usage on your CharaChorder.

In this box, you can adjust settings relating to CCOS’ mouse abilities.
Mouse Speed(s)
CCOS has two mouse speeds, a fast speed and a slow speed. The slow speed is activated when you use only one of the mouse keys in a single direction (as opposed to using 2 keys in the same direction). The fast speed is activated when you use two mouse keys in a single direction (as opposed to using only one key in the same direction).
You can read a more in-depth explanation of mouse speeds in the GTM section.
Scroll Speed
Scroll speed refers to the speed at which your CCOS scroll will scroll.
You can read a more in-depth explanation of the scroll speed in the GTM section.
Active Mouse
Active mode nudges your mouse cursor one pixel every minute or so (not a specific timing). This setting can be used to keep your computer from going to sleep. You might turn this setting off if you notice desktop apps are preventing you from getting mobile notifications (for example on Discord or Microsoft Teams).
Poll Rate
The polling rate (poll rate) is the frequency at which data from the CharaChorder’s mouse functionality is sent to the device it’s connected to. In other words, how often it updates the cursor’s position to the computer.
You can read a more in-depth explanation of the polling rate in the GTM section.
Chording
What is Chording?
Chording is the beautiful ability of pressing multiple keys at a time to get a predefined output, whether it’s a single word, an entire phrase, or important addresses.
A chord is a type of input/output action on a keyboard: you press two or more keys at the same time and release them at the same time, after which a predefined output will replace the originally pressed keys.
By chording, we are able to type one word at a time instead of one letter at a time. It’s even possible to have chords for phrases and entire sentences.

In this box, you can adjust settings relating to CCOS’ chording abilities as well as turn off chording altogether, should you choose to.
Press Tolerance
The press tolerance refers to a window of time in which a chord can be performed, measured in milliseconds (ms). This timer is initiated upon the first “press” action of the first key in a chord and ends once the last key of the chord is pressed, or until the press tolerance runs out, whichever comes first. Read the GTM section for a more in-depth explanation.
Release Tolerance
The release tolerance refers to a window of time in which a chord can be performed, measured in milliseconds (ms). This timer is initiated upon the first “release” action of any key in a chord and ends once the chord is fully performed, or until the release tolerance runs out, whichever comes first. Read the GTM section for a more in-depth explanation.
Compound timeout
The Compound timeout determines if a compound chord succeeds or fails.
If the time between the individual chords in a compound chord is:
less than the Compound timeout, then it succeeds and the individual chords are replaced with the compound chord’s output
greater than the Compound timeout, then it fails and the individual chords remain
Detection method
There are three detection methods:
Latency (classic) mode. Each key is printed instantly and backspaced after a successful chord.
Smart adds a small amount of latency depending on your tolerances, and only prints characters when it is no longer plausible for the inputs to be a chord input.
Continuous (spurring) allows you to jump from one chord to the next without releasing all keys, with more potential speed traded against the flexibility of character entry.
Autocorrect

Maximum attempts
Set to 0 to turn off autocorrect. An attempt is every stroke from the first keypress to the next full release. Recommended to turn off when you are comfortable using Quickfix.
Timeout
This setting will change how long CCOS counts time in order to replace characters that precede a chord.
CCOS devices have a running timer that starts after every single character that is entered in traditional chentry (character entry, i.e. one letter at a time). This timer controls whether or not the next chord that you perform deletes the preceding characters.
This feature allows users to misfire chords, yet be able to correct them by quickly performing the chord correctly, without having to backspace manually to erase the misfired chord. The result is that the timeout will automatically backspace all of the preceding characters (up to the last breaking character) and replace them with the intended chord.
RGB
The RGB settings ONLY affect the CharaChorder Lite as of February of 2024.
These settings adjust the color and brightness of your CharaChorder Lite.

Library
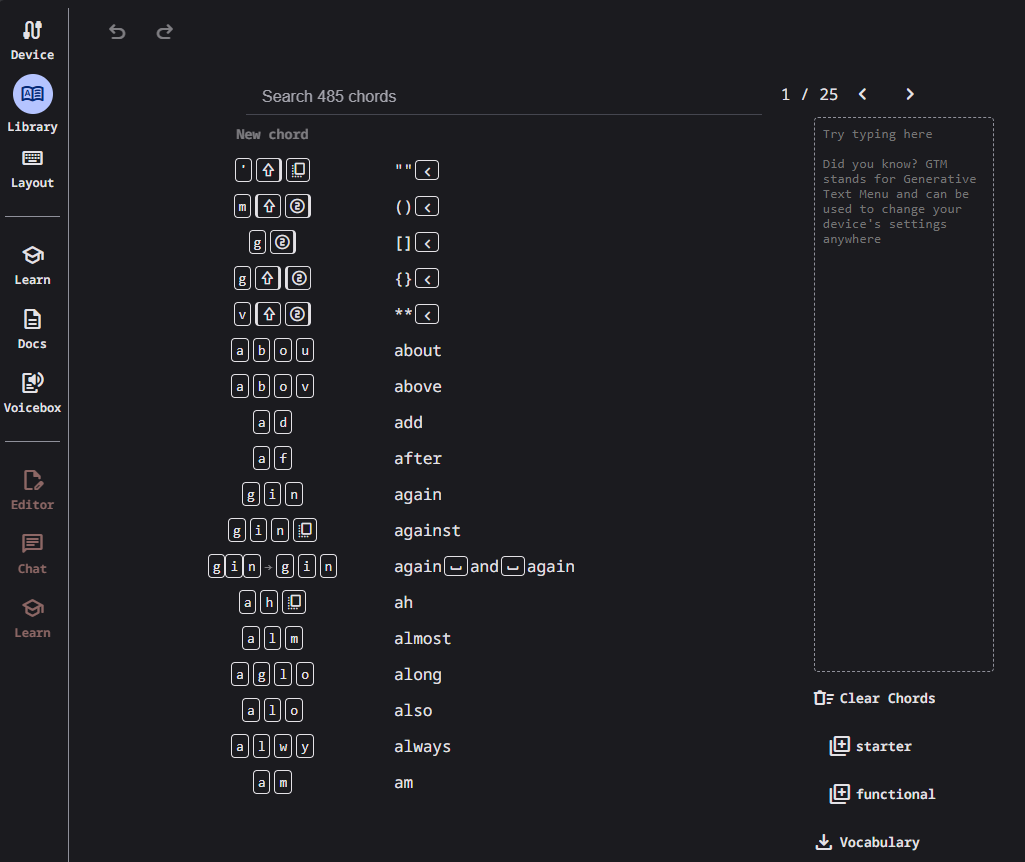
The Library is a powerful tool that lets you add, delete and edit chords stored in your chord library. It’s easy to use and quick to load. We’ll go over how to use it below.
When you connect your device to the device manager, the webpage will start reading the chords on your device. It may take a couple of seconds — or even over a minute for very large libraries — to load the first time. If you have auto-reconnect enabled, the loading times are much shorter.
Chords displayed here are shown in alphabetical order, using the list of chord outputs. The number of chords shown on the library depends on your screen size and browser zoom settings. Above the chords list, you’ll see the search bar which will display the number of chords on your CCOS device until something is typed there.
You can search through your chords by searching chord outputs (the word that displays once you’ve performed a chord). This textbox is not case sensitive, so you can type in capital or lowercase letters regardless of whether or not the chord has a capital letter in it. This search bar is also intuitive enough that you are also able to search partial words/phrases.
To the right of the search bar, you’ll find two numbers separated by a forward slash (/). These numbers indicate the page number that you’re on out of the total number of pages that compose your chord library. Using the angle brackets to the right of those numbers will allow you to flip through the different pages of your chord library which is sorted in alphabetical order.
Under the page-turning brackets, you’ll see a tall box with the text “Try typing here”. You can use this text box to test your new chords as you edit them in the manager.
Under the text box if your device supports it you can find some shortcuts to help you clear your chord library, add back in the starter chords that came on your device, add functional utility chords, and download a text file with all of your chord outputs separated by a pipe character for importing into practice tools.
Finally, at the bottom of the page, if you hover over the Device name you’ll notice that you can hold Shift and click on it to “Sync”. If you do this, it will have the device manager read your device’s chord library again. This process can take a few seconds.
Creating a Chord
You can follow the steps below to create a new chord on the device manager.
Note
In order to follow these steps, you must already have your device connected to the device manager.
Find the “New chord” text under the search bar and click it.
When the text displays “Hold chord,” press and hold all of the keys that you want to use as your chord input. Once you have pressed all of the keys, release the keys.
You will now see the chord input in the left column as letters inside individual boxes. These boxed-letters will be highlighted in a color (as opposed to black or white). The color depends on your selected color scheme. You will also notice a single, floating dot highlighted in the same color off to the right of the boxed-letters.
Note
You can add any number of chords at a time without defining the desired chord output.
Warning
If you click save, before defining a chord output as described in step three, any chords that you’ve created will save to your device with a blank output and will lead to strange behavior.
Click into the text box to the right of the chord input that you created in the previous step and type your desired chord output.
Using Action Codes
As you type your chord output, you’ll notice that your cursor will have a bubble with a
+above it. You can click this to open the action codes menu where you can search for specific action codes or browse through the action codes available to assign into a chord output. Read the action codes section for information on the different kinds of action codes.As you type, you’ll notice that your text has changed color to match your color scheme and that the end of your text has a floating dot immediately to the right.
Once you are satisfied with your output, you can proceed to modify another chord or click save.
Deleting a Chord
You can follow the steps below to delete a chord in the device manager.
Note
In order to follow these steps, you must already have your device connected to the device manager.
Locate the chord that you would like to delete.
When you hover over the chord that you would like to delete, you will notice a small trash icon appear in line with that chord map. Click the trash icon in order to mark it for deletion.
When you click the trash icon, the boxed-letters in the left column will have a line through them and they will turn red. You can unmark chords for deletion by clicking the “undo” arrow next to the trash icon. The chord will return to its original color and the line will disappear.
Tip
You can mark multiple chords for deletion at a time. Flipping through the pages in your chord library will not unmark the chords that you have marked for deletion.
Once you have marked the undesired chords for deletion and are ready to delete them, click the save button.
Once you click save, the marked chord maps will disappear from the list.
Editing a Chord
You can follow the steps below to edit an existing chord in the device manager.
Note
In order to follow these steps, you must already have your device connected to the device manager.
Locate the chord that you would like to edit.
Click the textbox in the right column where the chord output is displayed.
Edit the chord output to be whatever you would like. As you type, you will notice that the text changes color to match your color scheme and that the end of your text has a floating dot immediately to the right.
Using Action Codes
As you type your chord output, you’ll notice that your cursor will have a bubble with a
+above it. You can click this to open the action codes menu where you can search for specific action codes or browse through the action codes available to assign into a chord output. Read the action codes section for information on the different kinds of action codes.Tip
You can edit multiple chords before saving your changes. Flipping through the pages in your chord library will not undo the changes that you have made to your existing chords.
Once you are ready to save your changes, click save.
Once you click save, the chord(s) that you’ve modified will change color to match the rest of the list and the floating dot will disappear.
Layout
The Device Manager has a very intuitive layer editor. It’s the third option in the main navigation bar at the left of the page. When you go to this tab, you’ll see a diagram of your device, with each key filled in with the corresponding action code.
Layer Selector
Explanation of Layers on CCOS Devices
As of February of 2024, CCOS devices come with three (3) layers that you can make use of: the base layer, called the A1 (Alpha) layer, the secondary layer, referred to as A2 (Numeric), and the tertiary layer, named A3 (Function).
In order to access layers, you need to press and hold a “layer access” button. You MUST hold the button in order to use keys mapped to layers other than the alpha layer. The alpha layer is active by default.
Note
In this section, we’ll refer only to the default layouts on CCOS devices. If you have modified your layout to something different, then the next portion might not be accurate for your device. If you have purchased your device from CharaChorder, then the following is accurate to your device.
A1 Layer
The A1 layer, also known as the alpha layer, is the main layer that is active by default. Your device will always be in the A1 layer upon boot.
A2 Layer
The A2 layer, sometimes referred to as the numeric layer, is accessible with the A2 access key. In the Device Manager, this key has the name “Numeric Layer (Left)” and “Numeric Layer (Right)”, one for each hand.
The A2 Layer is accessible by pressing and holding one layer access button. Any key that is mapped to the A2 Layer can only be accessed by pressing and holding the A2 Layer access key along with the target key. You do not need to chord the keys together; it’s only required that the A2 Layer access key is pressed while the target key is pressed.
A3 Layer
The A3 layer, sometimes referred to as the “function layer”, is accessible with the A3 access key. In the Device Manager, this key is assignable by the names “Function Layer (Left)” and “Function Layer (Right)”.
Once you’ve mapped the A3 layer access buttons, the A3 Layer is accessible by pressing and holding either one of them. You do not have to hold them both in order to access the A3 layer. Any key that is on the A3 Layer can only be accessed by pressing and holding the A3 access key, along with the target key. You do not need to chord the keys together; it’s only required that the A3 layer access key is pressed while the target key is pressed.
Note
The following section assumes that you have already connected your device to the device manager.
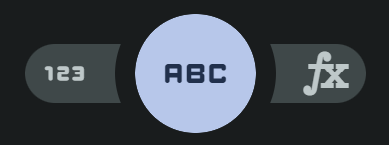
Above the diagram of your device, you’ll see a circle with the letters “ABC” in the middle. The circle, together with the “wings” on either side (one on the left with the numbers “123” inscribed and one on the right with “fx” stylized within), make up the layer selector. You can select any one of these to view the keys that are mapped to each location, on each layer.
Remapping
On the layer editor, you can remap your layout by using action codes. Follow the instructions below to remap your device one key at a time.
How to Remap Your Keys
Note
In order to follow these steps, you must already have your device connected to the device manager.
Choose the layer where you want to change the key.
Click on the key that you would like to change. This will bring up the action codes menu.
Use the search feature in the action codes menu or scroll through available action codes. Once you’ve found the desired action code, click on it.
Once you select the action code, you will notice that the layout diagram now reflects the selected action code highlighted according to your color scheme and it will be accompanied by a floating dot.
Once you have changed the desired key(s), click the save button.
Using Action Codes
You can use action codes in chord outputs as well as while remapping keys.
What are Action Codes
Action codes are data that CCOS interprets as characters. Put simply, they are the characters that we see while typing. These include letters, numbers, special characters, function keys, and others.
Available Action Codes
You can view the action codes here.